


After the Charismas season or a holiday trip, you must have numerous photos and images. And here you will learn how to create photo journal via iPhoto on your Mac (El Capitan included).
iPhoto is a photo manager on Mac which enables you to create photo albums, organize Mac photos and transfer iOS photos and more. With this app, you can also easily create your own compelling photo journals.
6 Steps to Make a Photo Journal in iPhoto
Step 1. Gather Your Best Photos
First of all, you need gather those photos you wanna use.
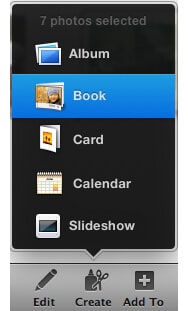
If the images you wanna use are in one event or photo album: select the collection, and click on Create, select Book.
If those images are scattered, you can go to the main photos view, hold down the Command key and choose the ideal images by clicking the thumbnails, create a new album by clicking Command-N. Or you can create the photo book first, then drag those ideal images into the project.
Note: If you wanan so some adjustment first on your photos before you create the book, you can click Edit button at the right bottom of the iPhoto interface. On the Edit panel, you can: rotate your image, enhance the photo, fix red-eye, adjust straighten, crop the image, and add effects like fade, boost, antique and more.
And if you accidently add some unnecessary photos, you can right click the image and choose trash.
Step 2. Customize Page Layouts
If you wanna add text to your photos to create a creative and rich photo journal, you can use Photo Essay or Travel themes. It's not recommended for you to change your theme after starting a photo journal or you may lose the text.
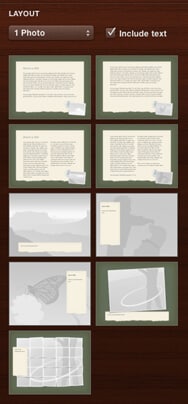
You can reorder the photos even the iPhoto app has done this. Go through and change the individual page layouts. Press the outline, zoom in by double clicking and now hit the layout button. Alternatively, you can press the Design button at the right corner of the bottom, then you can choose the layouts in the Design panel.
On the page from the drop-down menu, you can select the number of images and choose from the layout options. Make sure the Text box is checked.
After setting the layouts, you can drag new shots into the page.
Step 3. Format Text
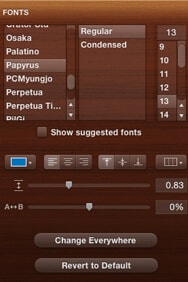
When you choose text, you can get a pop-up menu with some basic text features provided. But in the Design panel, you will get the full list of font options. After the text set, press the button of Change Everywhere on the menu to apply the same style in the book. And iPhoto only list the fonts recommended by itself for your book template, so here, you can uncheck the Show Suggested Fonts to get the full list of possible fonts.
Step 4. Add the Narrative
You can make your photo book a real page turner. For example, you can manage your book chronologically and add location or description name to each page, spread, or section. Things like these, just make your book more smooth.

Step 5. Include a Little Something Extra
It's possible to add image effects like sepia to illustrate your book story. A map page is also available to be added from the seven samples in layout menu in your photo journal to make it much richer.
And you can also set your background image if you have text-only pages: go to the background drop-down menu and choose the last square and drag your ideal image onto the page.
Step 6. Save Your Book in PDF
After the photo book creation, you can get your book in PDF form: go to File and choose Print or press Command-P, then click PDF drop down menu to save as PDF.


