Contents
- 1.1 Top External Hard Drive Recovery Software
- 1.2 Recover Files from External Hard Drive
- 1.3 Recover Data from External Hard Drive
- 2. Recover Different External Hard Drives
- 2.1 Western Digital External Hard Drive
- 2.2 WD External Hard Drive
- 2.3 WD My Book External Hard Drive
- 2.4 WD My Passport External Hard Drive
- 2.5 Seagate External Hard Drive
- 2.6 Seagate Backup Plus External Hard Drive
- 2.7 LaCie External Hard Drive
- 2.8 Toshiba External Hard Drive
- 2.9 Hitachi External Hard Drive
- 2.10 Samsung External Hard Drive
- 2.11 Dell External Hard Drive
- 2.12 HP External Hard Drive
- 2.13 SimpleTech External Hard Drive
- 2.14 Iomega External Hard Drive
- 2.15 Buffalo External Hard Drive
- 2.16 Transcend External Hard Drive
- 2.17 Maxtor External Hard Drive
- 3. Recover External Hard Drive for Devices
- 3.1 Recover Apple External Hard Drive
- 3.2 Recover MacBook Pro External Hard Drive
- 3.3 Recover iMac External Hard Drive
- 4. Recover Particular External Hard Drive
- 4.1 Solid State External Hard Drive
- 4.2 SSD External Hard Drive
- 4.3 Firewire External Hard Drive
- 4.4 eSATA External Hard Drive
- 4.5 Thunderbolt External Hard Drive
- 5. Tips & Troubleshooting
It is always wise to have a back-up for those valuable files stored in storage like an external hard drives in order to prevent data loss. Important folders containing valuable files could be accidentally deleted and recycle bin is emptied at the same time. In another instance, you could have formatted a wrong drive by mistake or the current drive isn't functioning, resulting to loss of files. This article will not only teach you how to backup external hard drive, but also guide you to restore external hard drive from backup file.
Part 1. The Steps for Backing up External Hard Drive
An option to resort to back up your external hard drives by utilizing Window's backup and restore feature. This feature allows for system image creation in backing up you programs, programs configuration and Windows system files. Another excellent option embedded in this feature is the integrated scheduler that permits you to pick frequency to perform backup that can have you to worry-less about performing back-ups. Here is the step - by- step on how to back-up to your external hard drives.
Step 1. Launch the Windows' Backup and Restore Feature
Attach your external drive to your computer via one of the USB port or other connection protocol like eSATA. Please allow for some free space for the back-up process. Microsoft recommends a minimum of 200 GB.
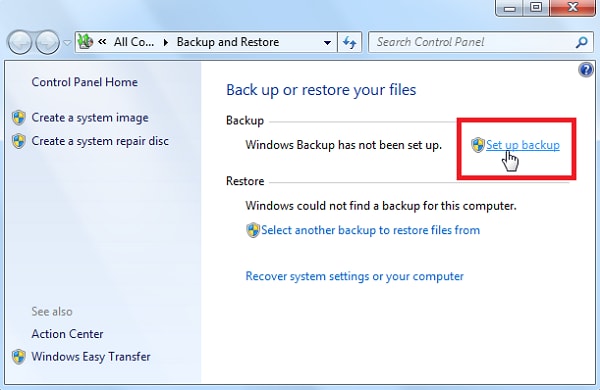
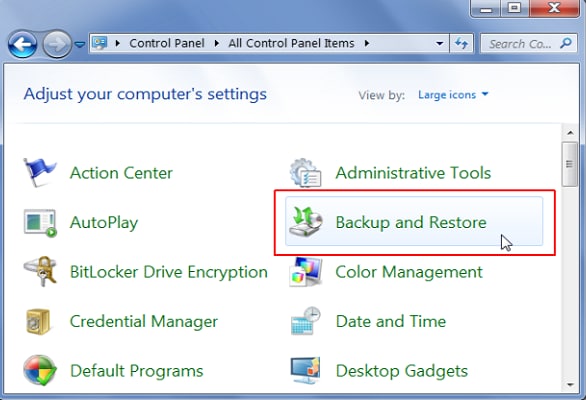
After you have connected the hard drive, usually an Autoplay Window will appear. Click "Use this Drive for Backup" and then click "Next" to select the location for the backup. If the autoplay window doesn't appear, you can simply launch the "Windows' Backup and Restore" function that is located under the Control Panel. If this is your first time to launch this option, you will see a message under “Backup” that stated that "Windows Backup has not been set up". Worry not; do click "Set up backup" as highlighted below.
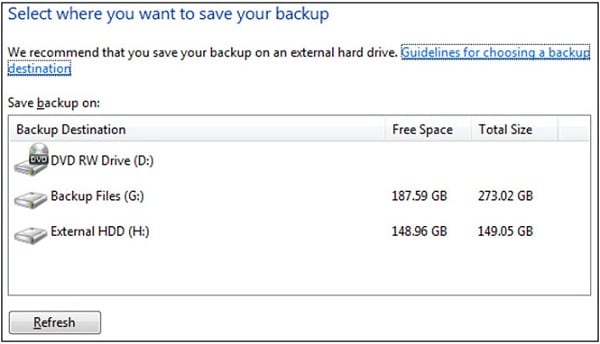
Step 2. Choose Location to Store Your Backup Files
Select "Next" and locate your backup location when a window prompted you to do that. If you have only one backup location, this window might not appear at all. Window will not let you choose your main hard drive as your backup drive. If you are not able to find the location of your desire, ensure that you have plugged the drive correctly and click "Refresh" button.
Step 3. Choose the Files You Want to Backup
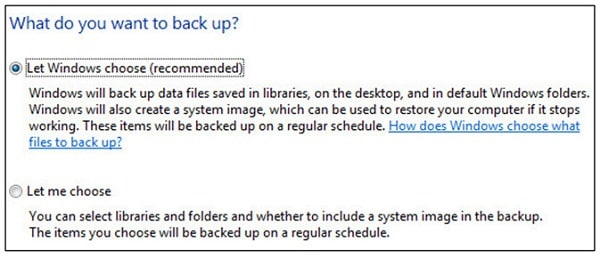
Next, the program will prompt you to identify the files that you want to backup. Two options will appear that is to "Let Windows choose", which is the default option and "Let me choose" option that will allow you to select specific files that you would like to backup.
Thereafter, another window will appear, to let you confirm your selection of files and location for backup.
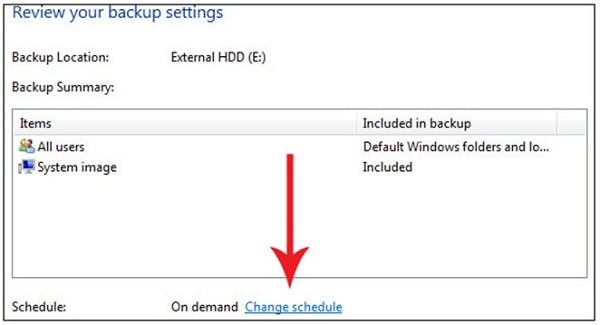
Step 4. Set Your Future Backup Frequency and Initiate Backup Process
You can also set the frequency and timing of your next backup by clicking the "Change Schedule" and change the timing in accordance to your preferences.
Lastly, click "Save settings and run backup" to start the backup process. Normally, the first backup process will take longer time than the subsequent ones because future backups will only cover new files that have been added or changed since the previous backup.
Part 2. How to Restore an External Hard Drive from Backup
Step 1. Select Files to Restore
After you've attached the external hard drive to your computer, you then need to open "Backup and Restore" which can be found under "Start > Control Panel".
If you would like to restore specific files, firstly, click "Restore my files" and then click "Browse for file" and choose the individual files that you want. Alternatively, if you would like restore all files, kindly select the “Restore All Users' Files" that will restore all files or click "Recover System Settings or Your Computer" to perform a system recovery.

Step 2. Restore Your Files
After choosing the files that you want, a window will ask you whether you want to restore the files to a new location or to the original location. Once you have chosen the location, do click "Restore" and the recovery process will initiate.
Part 3. How to Recover Lost Data from an External Hard Drive

Should you experience logical failure on your external hard drive, a data recovery software like the iSkysoft Data Recovery for Mac is a useful tool to have at your expense. It is able to easily guide you through the data recovery process quickly while offering dynamic recovery options. In just three steps, you can get back data contained in the compromised external hard disk:
What You Will Need:
A Computer;
Recoverit (IS) for Mac
Time Required:
Time will vary according to file's size
Difficulty:
Easy
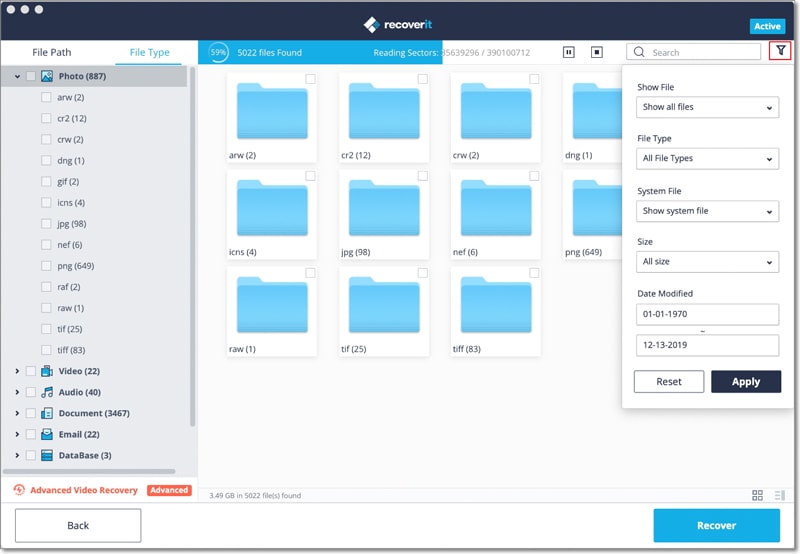
Step 1: Make sure that your external hard disk is detectable by your Mac computer. Start the Recoverit (IS) for Mac software and click on the file types that you want to backup. Then click "Next".

Step 2: From the list of available drives, select your external hard drive and click on the "Start" button. If the external hard drive is not available, click on the refresh icon. Perform the scan function thereafter.

Step 3: Once the software finish scanning the external hard drive, it will give you a list of retrievable files. You can opt to preview the content of the file and see the quality of the recovered file by looking at the "Validity" column before deciding if you want to get back those files.