
• Filed to: iPhone Recovery • Proven solutions
iCloud backs up pretty much anything you'd need to back up from your Apple devices, meaning your information is safe and sound in the cloud, just in case you need to retrieve icloud backup if disaster strikes - we've all been there, sadly watching our iPhones bobbing around in a glass of water.
Part 1: How to Retrieve iPhone Data from iCloud Backup
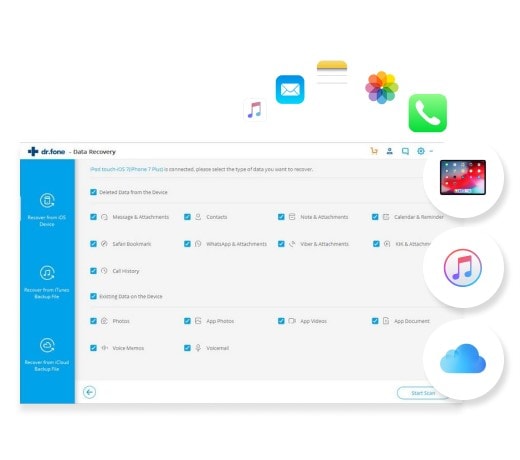
So what happens if you accidentally deleted those all-important files and find yourself needing to retrieve lost data? You turn to iCloud to recover your data, of course. There are plenty of pieces of software out there to help you recover your data from iCloud, but today we're going to focus on dr.fone - Data Recovery (iOS) (compatible with iOS 11). This handy bit of kit will help you recover your lost data in a simple, easy to use fashion. It can help you out in three different ways - by directly scanning your device to recover lost data, to extract iTunes backup files or to download and recovery data from iCloud backup files. Although all three methods are useful, we’re going to take a closer look at the third option: how to download and recover data from iCloud backup files.
Why Choose This Software to Retrieve iPhone from iCloud Backup:
- 3 Recovery Modes: Allows to recover data directly from iPhone, extract iTunes backup and download iCloud backup.
- Support 20+ File Types: Recover lost text messages, iMessages, contacts, photos, videos, notes, etc.
- Preview: Lets you read and preview found data before recovery.
- Various Data Loss: Retrieve data lost due to deletion, factory settings restore, jailbreak failure, iPhone lost or broken, etc.
- Flexible Recovery: Selectively recover any item you want from iPhone (iPhone X and iPhone 8 Plus supported), iTunes and iCloud backup files.
Step-by-Step Guide to Retrieve Data from iCloud Backup to Computer in One Click
Step 1. Log into iCloud
It can be quite difficult to access iCloud backup files without restoring the entire backup to your device, which isn't always what we want to do. So, with dr.fone - Data Recovery (iOS) for Mac we're going to learn how to get access to our iCloud backup files in a few simple steps.
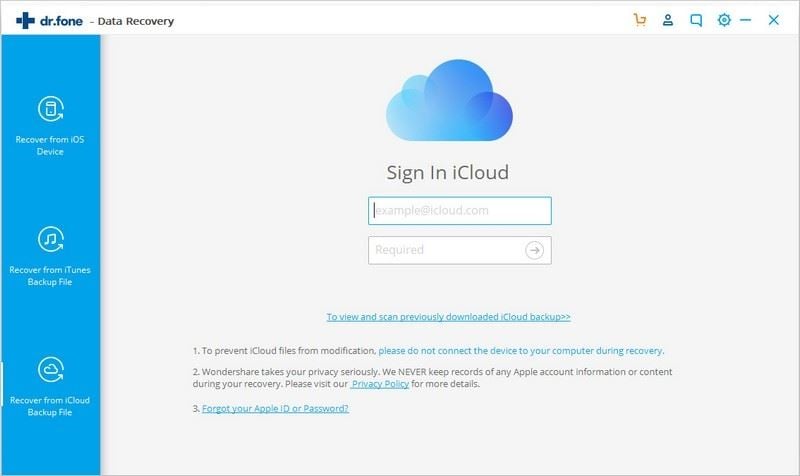
Open dr.fone - Data Recovery (iOS). once it's loaded, select "Recover from iCloud Backup File" tab in "Data Recovery" menu. Next, enter your iCloud ID and password and log in. (It's important to note here that we will not retain any record of your account details or the data contained in your iCloud account. You are always the only person who can see the account and access the data.)
Step 2. Select and Download the Required iCloud Backup
Now you've logged into your iCloud account you'll see a list of all of your backup files, arranged in date order. Simply scroll down the list, select the one you want access to and click on the green "Download" button, which you'll find under the "State" column on the right hand side of the window.
Step 3. Extract Your iCloud Backup
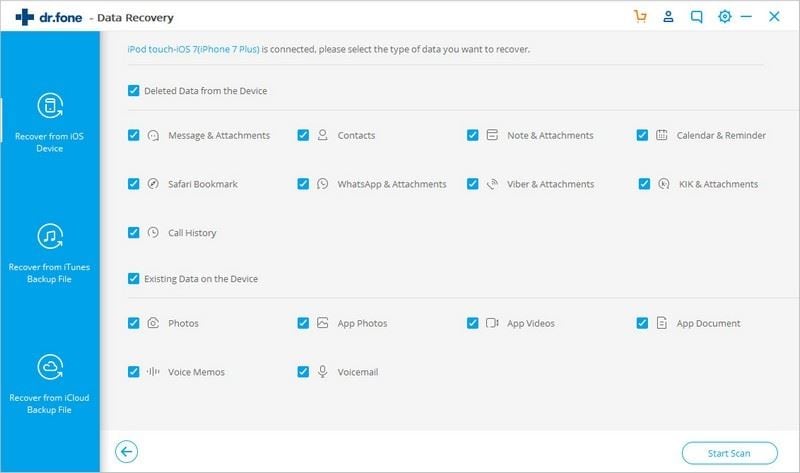
After your download is complete you'll need to extract the backup to access your files. Choose the file type of your lost files, and click "Next" button in the pop-up window.

Step 4. Preview and Retrieve Data from iCloud
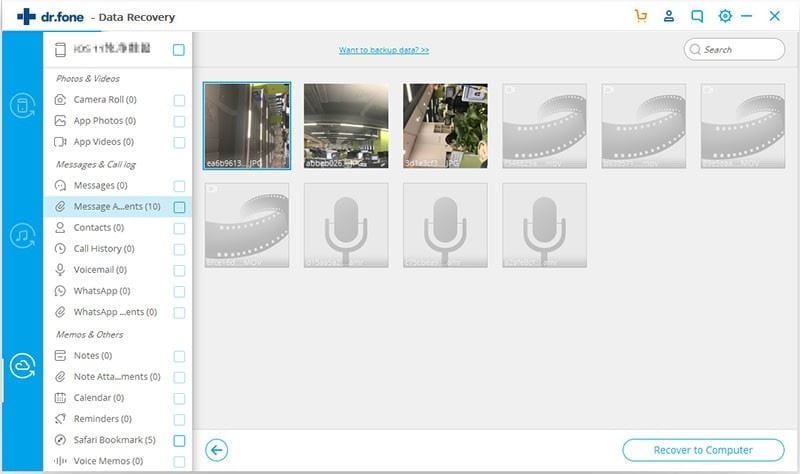
Now your backup file has been scanned you're free to preview each individual piece of data in the backup file. The data will be displayed in a clear list on the left hand side of the screen, where files will be split up into categories like "Photos", "Call History" and "Notes", to make life easier.
Simple scroll through the list of files and select all of the data that you're looking to recover. Then all you have to do is save them to your Mac by clicking the "Export to Mac" bottom on the bottom right hand side of the screen. Wait for the files to download and there you have it, you're done!
Part 2: How to Set Up a New Device from an iCloud Backup
What Exactly Does iCloud Back Up?
When you first register an iCloud account you'll automatically be given a free 5GB of storage. How you choose to use that space is up to you but you can use your iCloud account to back up, well, almost anything you can store on your Apple devices. We all store important data on our Apple devices - whether it's photos of loved ones, a book we've been enjoying or our favourite songs from the last few years. When you plug your device into a power source iCloud will automatically back up your data, providing the device is turned on and locked.
So what exactly does iCloud back up? Here's a little list to answer your question:
- Photos and videos from your Camera Roll
- App data
- Your purchase history for music, apps, books, TV shows and movies
- Device settings
- Home screen organisation
- Ringtones and visual voicemail
- iMessage, SMS and MMS messages
In case you get a new iPhone like iPhone X or iPhone 8 Plus, transferring your data from an existing iCloud account to iPhone is pretty simple. First you need to be sure that you actually have an iCloud account and some back up in there which you can transfer to your iPhone.
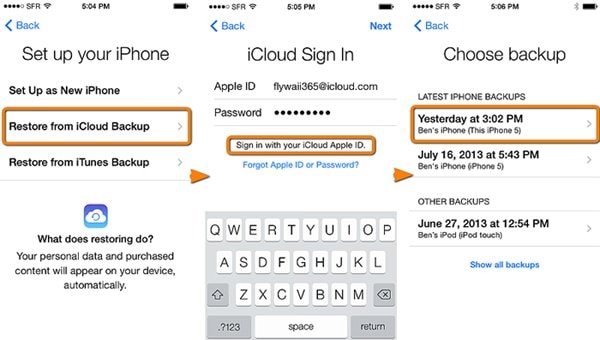
- Once you turn on your iPhone, proceed to the Setup Assistant in the Settings tab. There choose Restore from a backup.
- Sign in to iCloud and move on to “Choose backup” and you’ll find a list of all the backups available.
- Select any one of them and all their backed up information automatically gets restored your new iPhone.
All the Settings and Accounts are restored from the backup device you chose. Your iPhone will restart and begin downloading all the information from your backup on iCloud. Everything including apps, books, images, music, camera roll gets restored. In case you have an app there which cannot be downloaded on your iPhone, then the latest version of the app automatically gets backed up.
Even your purchased content is directly restored from your iCloud account subject to availability in the country. However, previous purchases might not be downloaded in case they have been refunded or are not available in the app store.
In case the purchased items are from iTunes, App Store or iBooks you may have to enter the credentials of those accounts in order to download them.
Elva
staff Editor