


Those who deal with video files and DVD formations should most definitely know about iDVD. iDVD tutorial can be found on the web and it will help understand the application of this interesting and helpful tool that everyone is talking about. iDVD is a discontinued DVD creation application which runs on OS X and has been produced by Apple. The utility of this tool lies in burning MP3 music, QuickTime Movies, digital photos etc. These things can be compressed into high quality DVDs and played in a commercial DVD player. iDVD brings all the apps of iLife into a single removable medium. The best part of iDVD is that movies and clips can be easily and effortlessly created here, which can be shared with friends. Easy creation of the menu system is ensured by iDVD. There are several easy themes called ‘drop zones’ where one can place movies and photographs. They can also be animated automatically. These themes can be applied to the iDVD project. iMovie projects can also be exported directly to iDVD. Scene selection menus along with chapter markers are also present. Below are more tips about iDVD tutoral that you should know.
iDVD formats: DV, high-definition video (HDV), MPEG-2 SD, MPED-4 SD, AVCHD and MPEG-4 HD, and audio formats like AAC, MP3, and AIFF.
Part 1: How to Install iDVD and Use iDVD to Burn DVD
iDVD can be used to burn DVDs. If you are running Mac OS X 10.6.8 or earlier, you can directly download iDVD from the computer’s original disk. Burning a DVD using iDVD is pretty simply and uses only a few steps.
Step 1
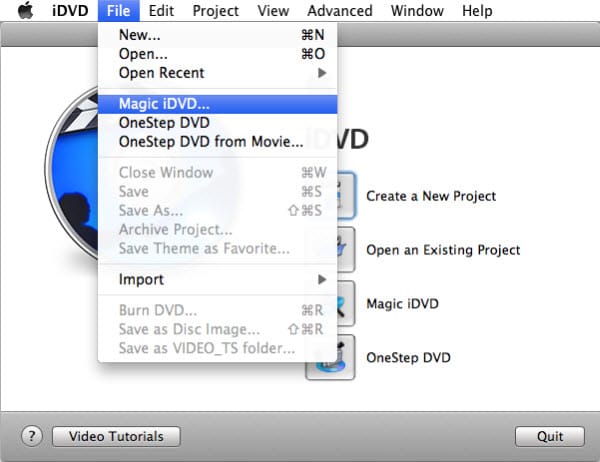
Start the iDVD application of the desktop or any other device after installing. To install iDVD, one can take help from any person who uses it. After starting, you needs to click on the ‘File’ option present at the top of the screen. Under the category there is another option called ‘Create a magic iDVD’, which has to be selected.
Step 2
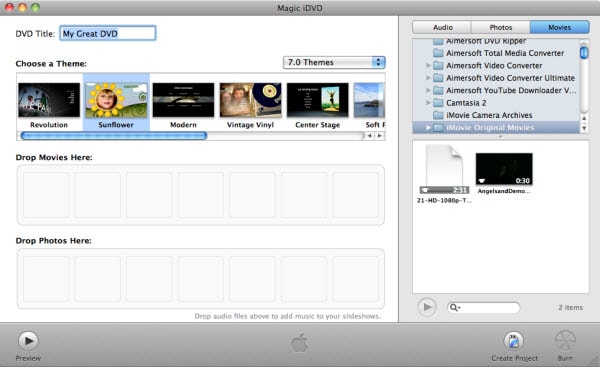
When a message pops up, the project has to be given a name. From the list of elements, it is important to click on the ‘Theme elements’. This gives the DVD menu a preset theme. The various options include ‘Road trip, travel, reflection and Pass through’. To preview a preset, select “open theme element”.
Step 3
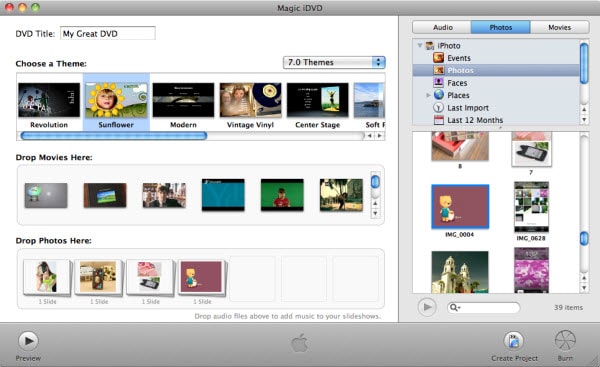
Now, click the “movies” button present in the "iLife Media Browser" in order to select the slideshow or the movies that you want to burn to the DVD. These files must be then dragged to the timeline in the sequence one wishes to view them.
Part 2: iDVD Reviews
Using idvd feels great as it is the most new-age DVD burner that one can come across. This DVD burner can recognize a lot of movie formats and make them into high quality and high definition movies. Thus, people can keep those memories and share it with friends. However, iDVD has Pros and Cons as below:
iDVD Pros:
- The best part of iDVD is that it is very easy to use. One does need trying hard in order to understand its working as it can be run easily without taking any help from people. Instructions are clearly given at every step to guide first timers.
- This software is updated randomly to make it work even more smoothly and effectively. After the idvd update one would be able to enjoy enhanced features.
- The burning process happens quite smoothly and effectively.
iDVD Cons:
- Tere are a few file formats that iDVD does not support. The reason is that the codec of these formats find it difficult to run on iDVD. In such cases, one needs looking for alternatives.
- There are a few problems that are related to the burning of movies on iDVD. iDVD formats are quite specific and that is what creates all the problems.
Part 3: Common Issues on Using iDVD
iDVD Troubleshooting and Solutions
1. There are a lot of occasions where the DVD burning stops mid-way or it freezes which is why one cannot burn it again. In such cases, we can do certain things that will troubleshoot the problem.
First of all, it is important to ensure that the software one is using is completely up-to-date. Also, one needs about 4.8 GB of free space in start-up volume in order to burn the disc. Anything less than that will be a problem for disc burning.
2. For creating a disc image, one need almost double the amount of space. There are often messages like "The recording device reported a media error".
This clearly refers to the insufficiency of disk space. During such problems one should immediately try removing or temporarily disabling any non-Apple quick-time plug-ins by removing them from the Library or QuickTime. In case one is using a third party theme, one should choose a theme which is already there in the options included in the iDVD list. After doing it, try burning it again.
3. Often due to burn failure, there is partially burnt disc.
In such cases, try burning a large amount of data from the finder to the DVD to see if the problem is with the DVD. If it is seen that there is no problem with the DVD, then it is necessary to run an Apple hardware test to ensure that there is problems with the RAM.
Part 4: iDVD Update and Buy iDVD
• Update to iDVD 7.1.2
- Step 1: Before update to iDVD 7.1.2, you need to confirm your Mac system is Mac OS X 10.6.7 or later.
- Step 2: Go to Apple’s official site http://support.apple.com/kb/dl1414 to download iDVD 7.1.2.
• Buy iDVD
Apple ensures that the entire world gets access to the internet and DVDs, but there have been several cases where people had no iDVD installed in the Mac. You can go to learn why there is no iDVD on your new Mac.
If your Mac is running Mac OS X 10.6.8 or lower, you can directly download iDVD from your Mac disk. But if you are running new Mac later than Mac OS X 10.6.8, you have to purchase an iLife 09 or 11 DVD from eBay or Amazon.


