


Have token some pictures of your wife or daughter with digital camera and want to transfer photos from computer to iPhone to use as wallpaper? Or want to sync pictures on your iPhoto to your iPhone? Whether you want to transfer photos from iPhoto to iPhone or from computer to iPhone, you will be lucky to find this article that shows you several easy ways to transfer photos to iPhone.
- Part 1: How to Transfer Photos from Computer to iPhone
- Part 2: How to Transfer Photos from iPhoto to iPhone
- Part 3: How to Transfer Photos from iPod to iPhone
- Part 4: How to Save Photos from Facebook to iPhone
Part 1: How to Transfer Photos from Computer to iPhone
Want to transfer some photos taken with your digital camera and saved on your Mac or Windows PC to your iPhone for other uses? Look no further! The below guide will show you how to transfer photos from PC to iPhone or from Mac to iPhone.
Option 1. Your Best Choice - Using dr.fone
To transfer photos from Mac computer to iPhone, dr.fone for Mac can be the best helper. Once you enable dr.fone on your Mac and connect iPhone to Mac, it can detect your device automatically. Then you are able to transfer media files between iDevice and Mac or iTunes. Also it can manage your iPhone contents easily. See how to transfer photos to iPhone.
•Launch dr.fone and connect your iPhone with Mac using a USB cable.
•In the main interface, open Photos tab on the left pane.
•Click Add on the upper left corner to select the photos from your local folder. Then click OK to start the transfer. Done!

Option 2. Using iTunes
The easy and direct way to transfer photos from computer to iPhone could be done by iTunes. After you have imported photos to your computer, build a new folder on your computer to save the photos. Then you can:
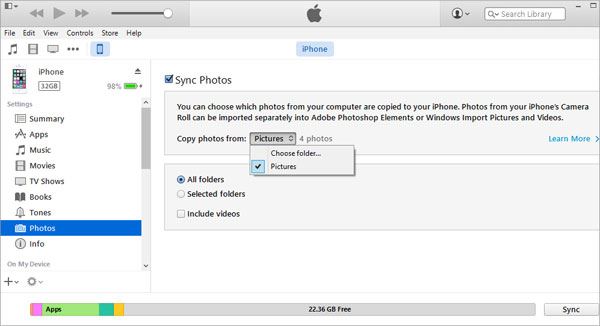
•Launch iTunes and connect your iPhone to your PC with USB cable.
•In the iTunes home page, go to Devices > your iPhone name.
•Then click Photos on the right pane of iTunes home page.
•Now click Sync Photos and choose photos from the folder you have built to save them.
•Lastly, click Apply on the iTunes home page to start transferring photos to iPhone.
Note: Photos transferred by this way will be saved on Photo app on your iPhone (not in Camera Roll). You can create subfolders on your computer and name albums to save the photos. Then the albums will be shown separately on your iPhone Photo app after the transfer.
Option 3. Using iCloud
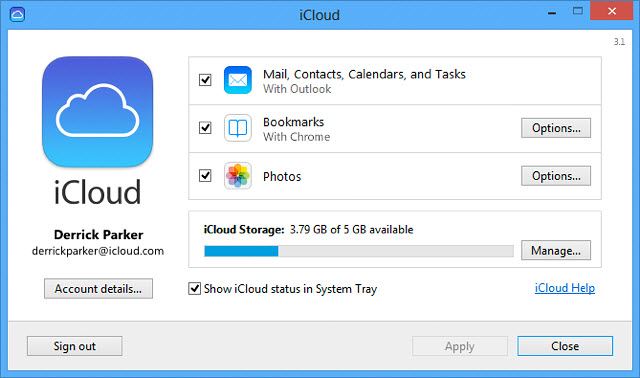
Step 1: iCloud Control Panel installation
Before installing iCloud Control Panel, you have to first check your system. For Windows 7 or 8, you have to install iCloud Control Panel 3.1 for Windows. If you are using Windows Vista, install iCloud Control Panel 2.1.3 for Windows Vista. After the installation, login your Apple ID and enable the Photos option.
Step 2: Choose the photos
Open Windows Explorer and find the folder where you have saved the photos. Choose the photos you want or press Ctrl+A to select all photos. Right click to copy the photos.

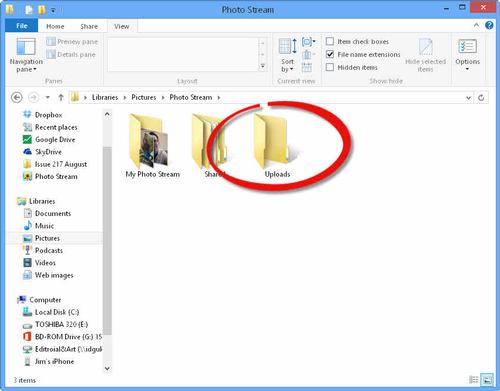
Step 3: Start transferring photos to iPhone
Open Pictures folder on your computer and double click Photo Stream folder (created once you install iCloud Control Panel). You will see Upload folder. Just open it and past photos to this folder. Then the photos will appear on your iPhone photo stream later.
Part 2. How to Transfer Photos from iPhoto to iPhone
iPhoto is a photos management application on Mac. You can use it to organize and view your pictures on Mac. Many of us might use iTunes to transfer photos from iPhoto to iPhone by creating new folder and sync directly. However, iTunes not work well all the time and the photos might not show up on iTunes or iPhone sometimes. Don't feel upset! Here is an easy and safe alternative solution on how to transfer photos to iPhone without iTunes.
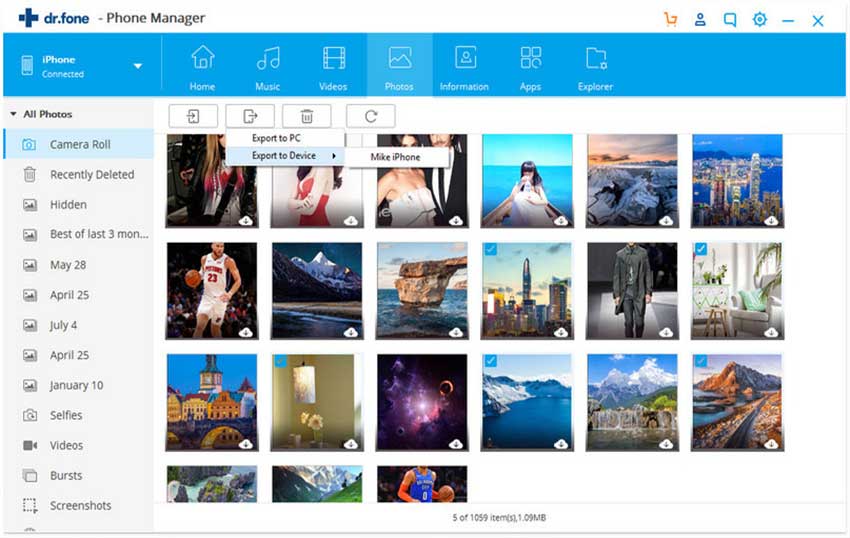
Step 1: Download the latest version of dr.fone and open it. Connect both of your iPhones to the computer and run the software. From the left top conner, choose the iPhone which you want to transfer the photos from.
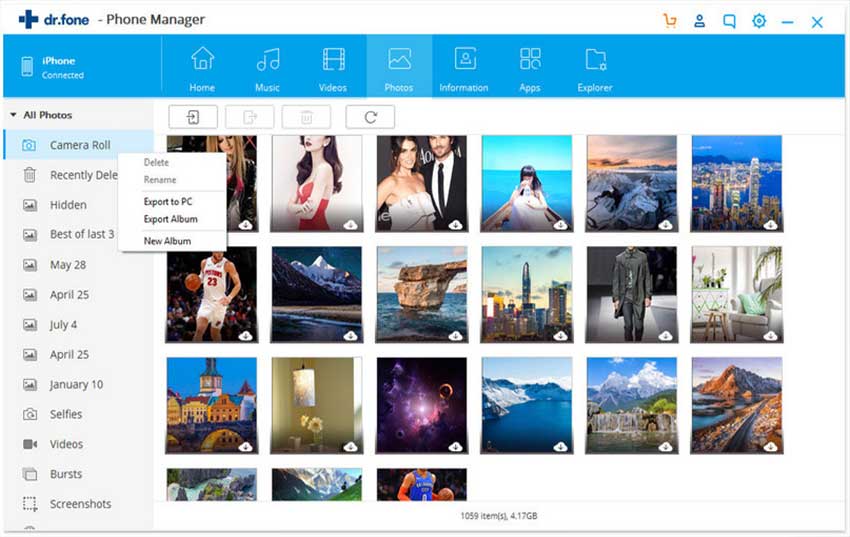
Step 2: Now please click the "Photos" tab to enter the photo managemnet. You will see all your photos on iPhone displayed. Choose the photos you want to transfer to the other iPhone and click on the "Export" option. Select "Export to (name of the other iphone)" to transfer photos from iPhone to iPhone. That's it!
Part 3. How to Transfer Photos from iPod to iPhone
If you are running a Mac and want to transfer photos from iPod to iPhone, we recommend you use dr.fone for Mac to help. It allows you to export photos from your iPod and then sync them to your iPhone easily. You can refer to the guide on transferring photos between iDevice.
However, you might not know that we can transfer photos from iPod to iPhone wirelessly with the help of iMessage. First you have to enable iMessage on both devices. Just go to Settings on your device and tap Message then turn on iMessage. Now you can start transferring photos to iPhone:
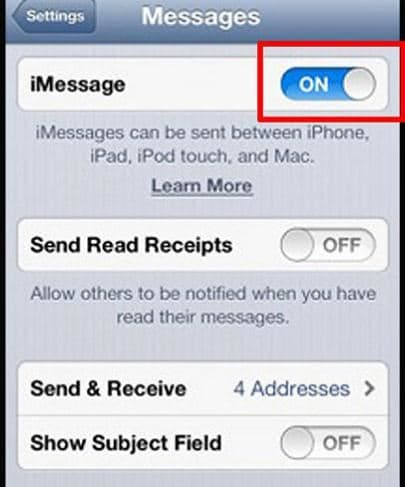
• On your iPod, tap iMessage > New Message.
• Enter recipient's phone number or email address.
• Tap Camera > Choose Existing to find the photos you want.
• Tap Send to transfer the photos.
Part 4. How to Save Photos from Facebook to iPhone
Once you enable Facebook app on your iPhone, it is very easy to save photos from Facebook to iPhone.
• Open Facebook App and go to find the photos you want.
• Press the button option. And when the options show up, tap Save Photo.
• You will get the photos saved on your iPhone camera roll.
Toubleshooting: can't save photos from Facebook to iPhone?
For many cases, you will fail to save photos from Facebook to iPhone for this or that reason; especially you update your iOS system. Don't feel upset! You can also save photos from Facebook to iPhone easily and quickly using the following method.
• Launch Facebook App and access the photos you like.
• Continuously press Home button till the options show up. Then press Sleep/Wake option quickly.
• By doing this, you have token screenshot. You can just open your camera roll to view the photos.
Video Tutorial: Transfer Photos from Mac to iPhone
