How to Use Slideshow Maker for Mac
Slideshow Maker for Mac lets you easily transform photos and video to a fantastic slideshow on Mac. By dragging and dropping, you can then export Hollywood-like slideshows to share on YouTube, TV, Mac, and Apple devices. This user guide will show you how to achieve this step by step.
Part 1. How to Make a Slideshow Movie on Mac OS X
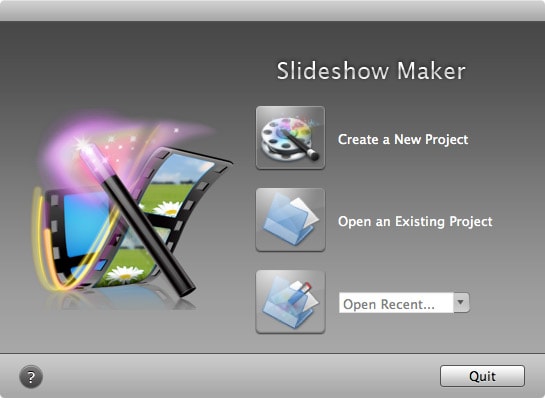
Step 1. Download and run Slideshow Maker for Mac
Download and install Slideshow Maker for Mac, run this program, and you'll see its interface as below.
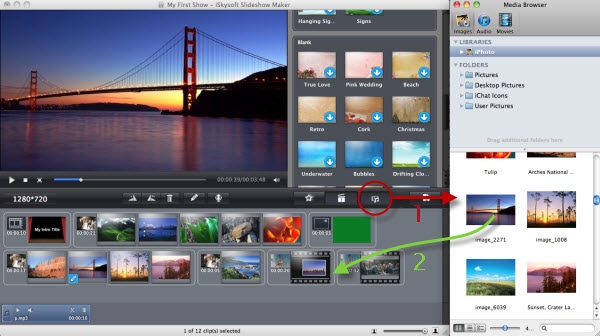
Step 2. Import media files into the program
Slideshow Maker for Mac uses a Media Browser for you to easily import images, audios and videos to your project. Click the Media Browser icon to turn it on or off. When the media is added to the storyboard, drag and drop specific slide to arrange it. The most interesting feature here is that you can drag media out of Slideshow Maker to delete it.
Besides the drag and drop method, editing buttons are easy to access, such as delete, rotate, and edit. You can also right click a photo or video for the equivalent options.
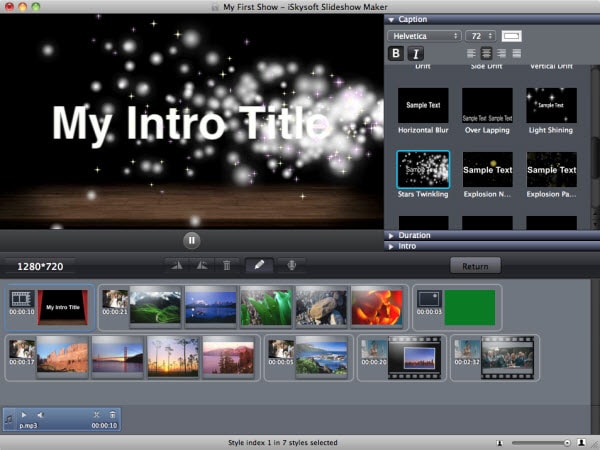
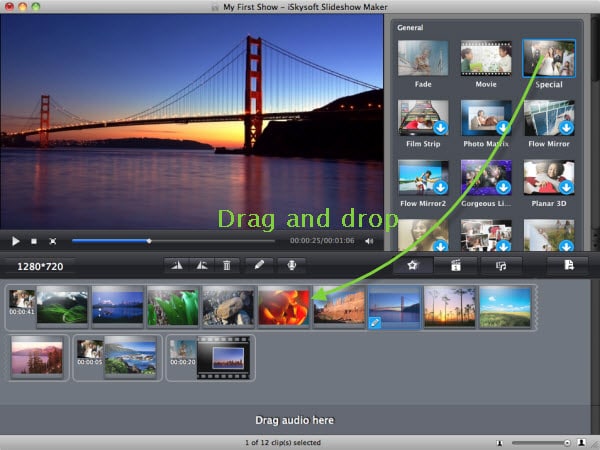
Step 3. Change styles
When you import photos and video to the project, random themes will be automatically applied. You can keep them or change them anytime later as you like. Over 30 Styles (themes) are included. To add a Style to photo or video slide(s), simply drag and drop desired style to replace the existing one. You are also free to drag photo/video from one style to another. The other way is to increase the number of clips in a style, shown as below. To bring up this dialog, mouse over a style and click the setting icon when it appears.
If necessary, also change the duration of clips and the background of style. Check the option "Apply to all clips" to make all clips have the same duration. Alternatively, right click any slide to bring up a menu from which select individual duration by Duration option. Also note that only General and 3D styles allows you to change the background to predesign paper or a local image on Mac.
Note:Internet connection is required to download themes with a down arrow indicator before you can apply them. Here is the all-in-one resource package that contains all themes and extra Intro/Credit slides.
Step 4. Preview and share
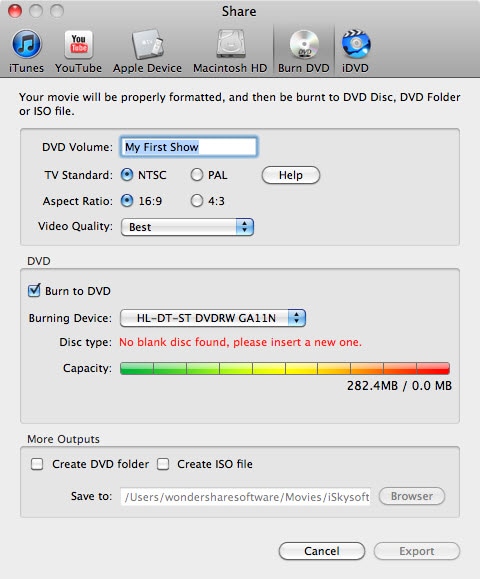
Now preview your slideshow movie from start to end. If you are happy with it, go to "Share" menu on top, and select the way you want to share with others. Alternatively, click the "Share" button in the middle left-hand side. You could directly upload your shows to YouTube (simultaneously on Facebook if necessary), burn to DVD using DVD Creator for Mac, DVD or the built-in DVD burning tool (smaller size without menu), export to iTunes library for management, or watch on iPod/iPhone/iPad/Apple TV.
Tips: 1. For sharing on Apple Device, you have no need to set the dimensions. The best dimensions and optimized parameters would be used. 2. You can save the project for later editing. To do so, go to File menu and select Save or Save As option.
Video Tutorial: How to Make Slideshow with iSkysoft Slideshow Maker
Part 2. How to Customize Your Slideshow
Slideshow Maker comes with a wide range of editing tools to customize your slideshow in a snap. Generally, double click any photo or video, or click the "Edit" button after selecting an item to show the editing dialog. Click "Return" to confirm and "Restore" to discard changes.
1. Photo Editing
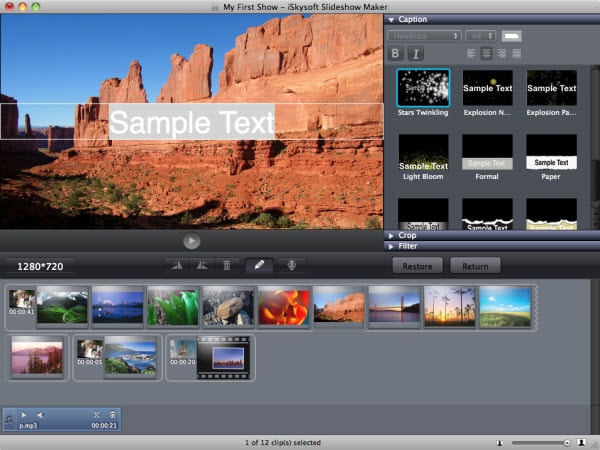
There are 3 panels in the photo editing windows: Caption, Crop, and Filter.
Adding Captions: Simply select a caption template and you can preview it before you start editing texts. The caption you added on screen will turn to animated immediately. If necessary, click text to enter editing mode.
Cropping photos: The Crop panel lets you easily crop interesting part of the photo in 4:3, 16:9 or any aspect ratio. Just choose an aspect ratio and adjust the ratio on the preview windows. Finally, click Apply to apply and click Return to go back to the primary window.
Applying effects: Choose from 15+ filter effects to enhance your photos instantly.
Tips: 1. Right click the desired photo or video slide for more editing options, such as Duration, Copy, Cut, Style Property, etc.
2. Video Editing
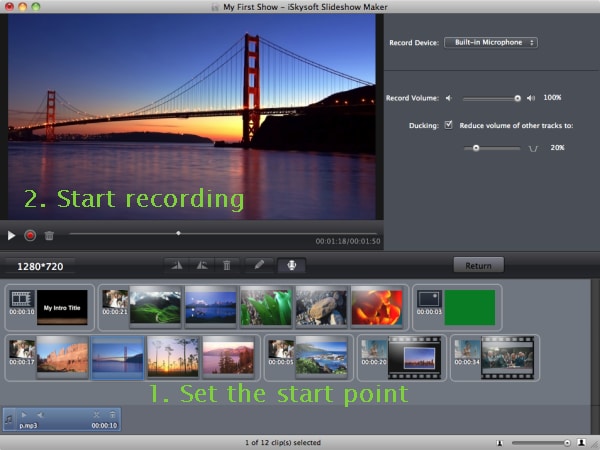
Slideshow Maker for Mac also provides easy video editing tools to change the volume of video and trimming video. Just drag the slider to adjust volume on the panel next to the preview window. At the bottom of preview window, you can easily split video into multiple pieces. To do so, first set the start point, and then click the Cut button. The mark-in and mark-out buttons will appear so that you can adjust the duration easily.

3. Audio Editing
When you've added audio, you will see several buttons on the audio bar. Click the play button to preview or cut the desired portion by clicking the scissors button. To add voice over to your slideshow movie, simply click the Voice over button under the preview window. A window will show up as follows. Next, you need to set the position to insert your narration. Click the red recording button and start speaking. Click the Stop Recording to finish, the voice over will be added, but won't appear on the audio track.
4. Intro/Credit/Blank Slide
Intro/Credit/Blank slides are helpful to make your shows more funny and organized. Slideshow Maker provides many Intro, Credit and Blank slide templates. Just select Intro/Credit/Blank button, and drag and drop to storyboard to apply. You could edit these slides like photo slides, such as adding compelling captions and changing duration.