Transition is one of the effects used in video editing and you will be able to do that in iMovie. Adding transition in iMovie is not complicated as many people project it to be. If you are not convinced enough, make sure to read through this article and learn about all the important things you need to know concerning adding transition in iMovie.
To begin with, you need to make out that there are different types of transition that you will consider. Cut is the most familiar of the transitions but there are many others that include mix, cross fade, dissolve, fade and wipe. The one you choose will depend on different factors but make sure it is the best decision.
- Part 1. Guide for Adding Transition in iMovie
- Part 2. How to Add Transition to Movies using Filmora Video Editor
Part 1. Guide for Adding Transition in iMovie
Never get bothered again about how to add transition to your video in iMovie because this part will give out a detailed guideline. This is a full-featured program that you have the guarantee of enjoying to the fullest so don’t leave anything to chance. The first step for adding transition in iMovie will be opening the program through clicking on it.
Once it’s open, you can navigate through to view your video project that you want to add transition. Do this by going to the “file” icon on the menu bar of the iMovie, select “open” and the already existing project will open up. On the same, you will see the option to create a new project and that will be viable in case you are starting off from scratch.
Step 1. The video can only be edited at the timeline and you will have to drag it there. Once there, split your video clip right at the point of desire into two segments. Take note that transitions will only fit in between two clips and this step is mandatory if you are to proceed with adding transition in iMovie. The procedure of splitting your video is simple as playing it and stopping the playback at the point where you want the split to happen. Alternatively, right-click on the iMovie timeline, select split clip at playhead and the video will be divided into two.
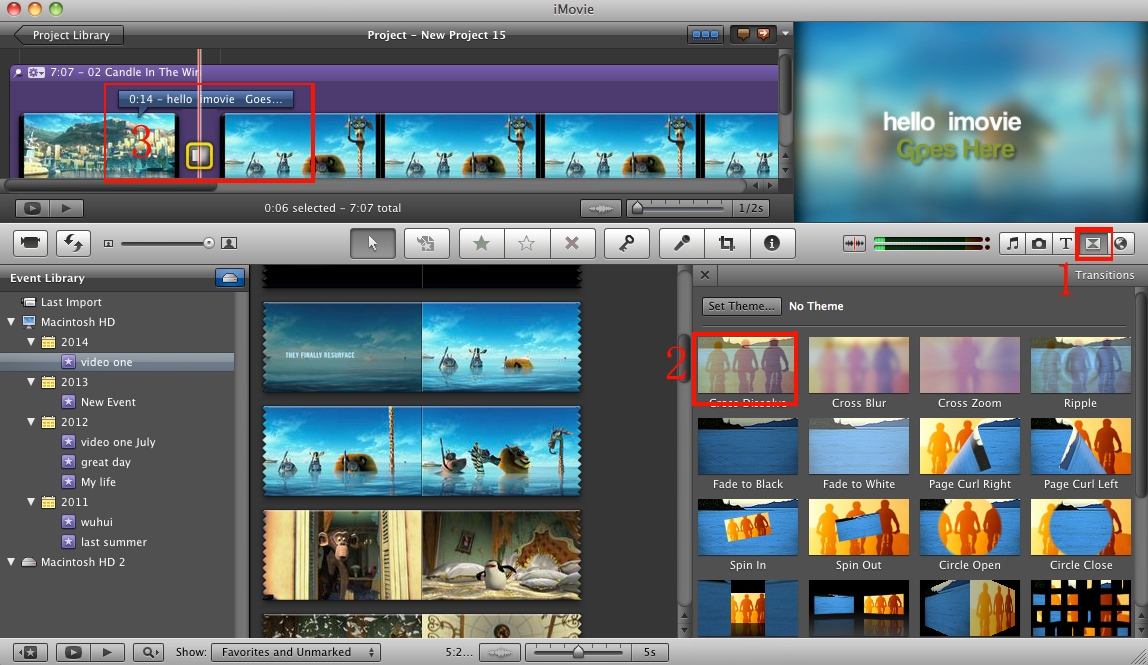
Step 2. The next step will be opening the transition window. Inside the window, position the playhead between the two clips as split and click on the “trans” button showing on the panel. The window will open and it will be an opportunity for you to choose the right transition to add to your video in iMovie. From the long list of transitions given out in the window, make sure you select the one that best suits your video editing mission. You can click on each and every transition for a preview which is important in helping you make an informed choice. Preview the transitions as many times as possible until you are satisfied that you have settled for the best.
Step 3. Adjusting the speed of the transition selected will be one important thing to do which is done from the transition window. Look for a slider that is marked speed and adjust it to set the right transition speed. The effect of this change will be seen immediately so you will not have to wait for longer periods. When all that has been set well, it will be time to add the transition to the timeline through dragging and give it time to render. It can take a few minutes to render depending on video size but the progress will be displayed in the little red bar.
Once completely rendered, take a preview of the transition and this will help you ascertain that it has attained your expected standards. The good thing is that it is still possible to have adjustments made to the speed right at this stage in case you are unsatisfied. Likewise, you can delete a transition added to video in iMovie once you feel it has fallen short of your expectations. You can do that by clicking on the transition right in the timeline and pres the “delete” key on the keyboard.
Part 2. How to Add Transition to Movies using Filmora Video Editor
Filmora Video Editor is a fully featured video editor. With this video editor you will be able to add transitions to your videos as a way of enhancing them before you share them with your friends. It has a total of 200 transitions that are grouped in to basic and fancy. However, you can favourite these transitions and also these transitions are updated with hot ones frequently. Moreover, this software is also built with other editing features listed below.

- It is built with basic editing options for videos such as; trim, split, cut, rotate, aspect ratio, volume and brightness among others.
- you will be able to exploit advanced editing options such as; playing videos in reverse, video stabilizer, split screen, green screen, GIF support, 3D lut and others.
- Filmora Video Editor also allows you to record from webcam, voice over and your PC activities in high quality.
- This media editor can also export edited files to online sites, mobile devices and also convert to a desired output format.
- It also comes inbuilt music library that is free and you can add to your projects.
Steps on How to Add Transition to Videos Using Filmora Video Editor:
To begin with, you must download the software and install it on your computer. From there, you can now follow these simple steps.
Step 1. Import the Movie to the Program
On the home window click on the full mode and then click on “Import Media File” button. From there, upload the desired movie file from your local drive. Alternatively, you can click on “FILE” and then select “Import Files” to upload the movie.

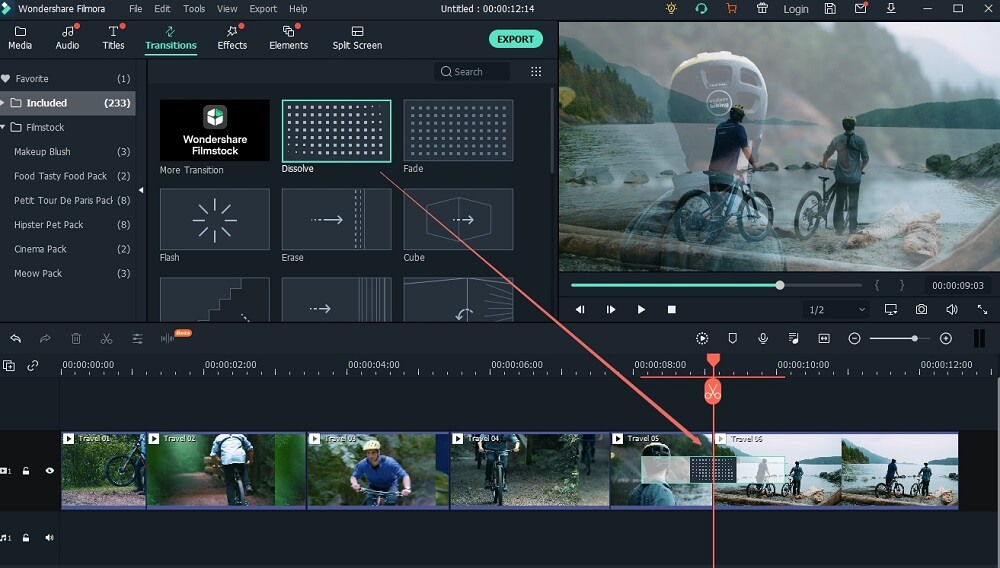
Step 2. Add Transitions to the Movie
The uploaded file will appear on the program window. Click and the then drag it to the media timeline. From there, click on the section to add the transition and then click on “Transition” button on the formatting menu. You will see a list of transitions appear at the top of the window. Browse through and preview it on window at the right.
Once you have identified the right transition, drag the transition to the timeline and it will be added to the movie. Preview the movie before saving it. You can also undo the action and add other transitions.
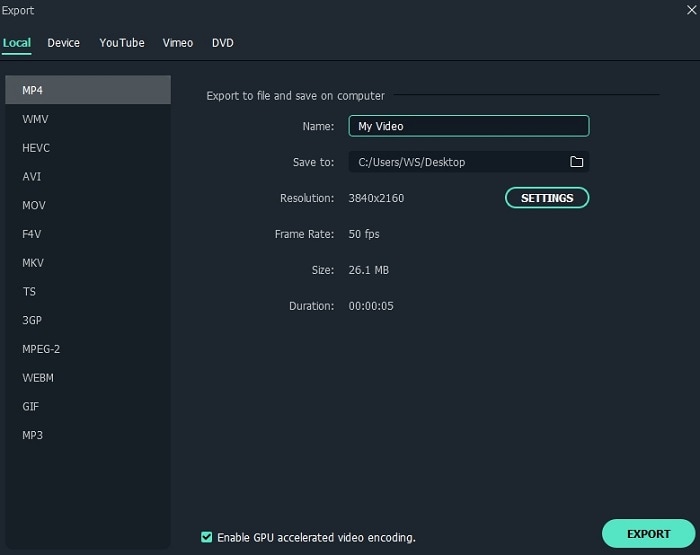
Step 3. Export the Movie
You can now save the edited movie. Click on “Export” button. Click on “Format” and then select the preferred output format and then rename the file. Next, choose where to save the file on your computer and click on “Export” button.