


Does Windows Movie Maker Support FLV Files?
FLV is a very popular and commonly used file format, so you should not expect it to be missing from Windows Movie Maker. It is listed alongside all other supported formats and you just need to peruse through them and select it. Windows Movie Maker is never selective on the formats it supports, and you will have something to smile about if you are using FLV.
- Part 1: How to Solve "Windows Movie Maker Can't Import FLV"?
- Part 2: Instructions on How to Convert Windows Movie Maker Files to FLV
Part 1: How to Solve "Windows Movie Maker Can't Import FLV"?
Many people have been wondering how possible it is to have FLV files imported into Windows Movie Maker. Among the first things you must accomplish is downloading the videos in question then convert to a format that is fully compatible with Windows Movie Maker. In this case, FLV will be the suitable choice. You will always come across a tutorial to help you convert FLV to WMV by using iSkysoft Video Converter Ultimate. This is a program good for both new and experienced video editors, so you should not be naive at all. The procedures applied are not very much different from what other software programs offer.
Features of UniConverter
- - DVD Toolkit: you can burn DVD disc, copy and play the movies on any DVD player after converting them.
- - Conversion speed: this tool enables you to convert video files thirty times faster than other converter tools. It also retains 100% quality of video, audio and images.
- - Supported formats; UniConverter supports formats such as Mpeg, 3gp, MP4, FLV, WMV, AVCHD, VOB among others.
- - The tool can cut the video into multiple pieces, add sub-titles, effects as well as adjusting the video aspect ratio.
- - It can also enable you to convert from two dimensions to three dimensions.
Step-by-Step Guide to Have Your FLV Files Converted to WMV
Step 1. Import files
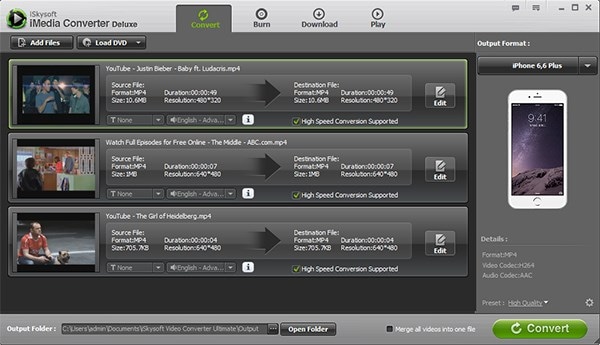
This is the starting point when converting FLV to WMV. There are two main ways of importing media files: drag and drop the files directly to the program or click on “Add Files” from the menu bar and get to browse through the computer for all the files.
Step 2. Output format
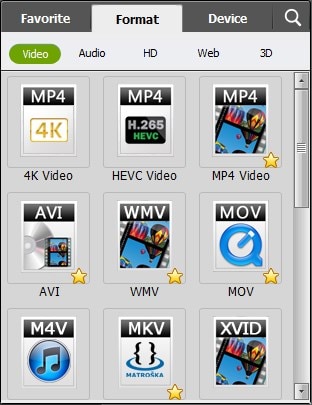
There are hundreds of formats that this program will offer you to choose the best one for your video editing. Go for WMV and you should have minimal concerns about technical details like frame rate or resolution. Compatibility is the most important thing to have in mind.
Step 3. Converting
Once you have successfully configured everything for your videos, the last step will be actualizing the conversion process. You will locate the “Convert” button on the bottom side of the program to click on. There will be a green bar showing progress of the conversion process and the “Cancel” button will allow you to stop the process if necessary.
Part 2: Instructions on How to Convert Windows Movie Maker Files to FLV
As FLV is not a supported format by Windows Movie Maker, so you can't save your Windows Movie Maker files directly into FLV format until you do the conversion job. With the iSkysoft Video Converter Ultimate, you can turn your Windows Movie Maker files into FLV files easily. The intuitive interface that the program comes with helps you finish the process with ease. Know more about the basics of how the program works to ensure you don’t encouter much difficulty. Whether you are a new or experienced video editor, you will find the following guidance very much helpful:
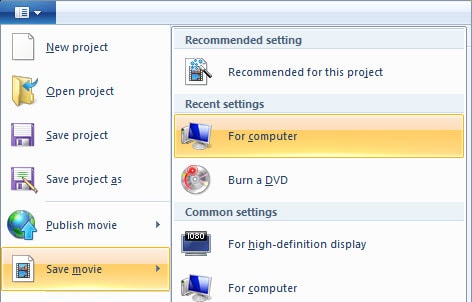
Step 1. Save files to WMV- when your program has successfully launched, you should proceed to the “File” and then “Open Project” so as to locate where the files have been saved. When you have located them, go to “File” then “Save Movie” and that has to be in WMV format.
Step 2. Add files- the files you have converted to FLV should then be added to the convertor. There is the option of dragging and then dropping or using the “File” button on the menu bar to browse for the files from your computer. Any of the two options will be good for your consideration.
Step 2. Choose output format- the best way to set an output format for your video is by going to the “Output Format” option of the program. It will give you the procedures for choosing the right format for your video and it should be FLV.
Step 3. Start conversion- click on the “Convert” button to finalize the process.


