Data Recovery Tips
- Data Recovery Tips+
-
- Best Hard Disk Bad Sector Removal Software
- Recover Overwritten Files on Windows/Mac
- Fix the Error "Windows has recovered from an unexpected shutdown"
- Recover Recycle Bin on Windows 10/8/7/XP
- Recover 0 Byte Files in Windows 10/8/7
- Recover Snapchat Email Address and Password
- Top 3 Data Recovery Hardware
- Top 7 Linux Data Recovery Software
- Recover Deleted Files from Network Drive
- Recover Files from My Passport External Hard Drive
- Top 5 Windows Password Recovery Tools
- Hard Drive Password Recovery and Data Recovery

• Filed to: Data Recovery • Proven solutions
- Have saved lots of privacy info in a partition and want to hide the partition so that others will never access to it?
- Hidden a partition but cannot find hidden drives after a period of time?
- ...
Have you ever met the above issues while dealing with partition hidden or unhidden issues? We all know that Microsoft Windows has integrated disk partition feature and it enables the users to keep their digital data safe and organized on the computer. Getting engaging with disk partition, we can also hide or unhide the partition for the safety of data. If you don't know how to hide a partition, or you have hidden a partition but can't find the hidden drive, this article will help you get out of these issues easily.
Now, let's drive to the right section:
Part 1. How to Hide Partitions in Windows 10/8/7?
There are four ways to hide a partition in Windows 10, 8, and 7. You can hide partition using disk management, Group policy, Windows registry, and by using Diskpart command in command prompt. Here, we'll pick up two of them as an example.
- Using Disk Management to Hide A Partition in Windows
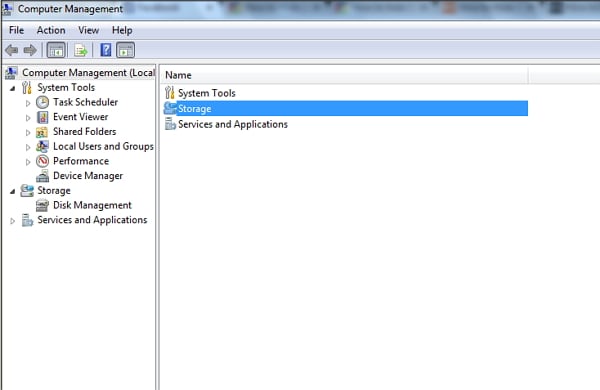
Step 1. At the first step, you have to click on "Start" button and type "Computer management" and hit on "Enter" button.
Step 2. Now Computer management console will appear, you have to click on "Storage" by double-clicking on it.
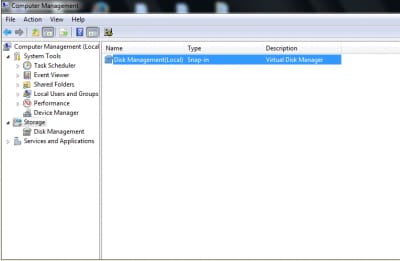
Step 3. Once the above process completed, double-click on Disk Management Snap-in.
Step 4. Disk management console will appear, here you will see all disk partition of your Windows computer.
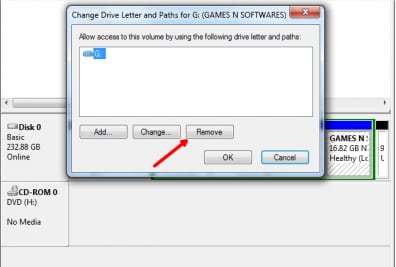
Step 5. Here, you have to select the drive that you would like to hide.
Right click on the drive and choose "Change Letter and Paths" then, click "Remove" button.
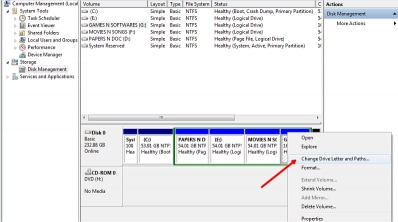
Step 6. Now, it will ask for confirmation. You have to click on "Yes" to grant permission.
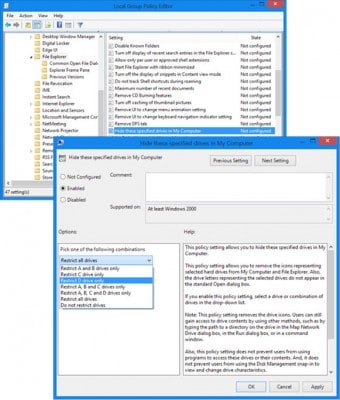
- Using Group Policy to Hide Partitions
1: Click on "Start" button and then type "gpedit.msc".
2: Go to User Configuration/Administrative Templates/Windows Components/File Explorer.
3: Now, you have to double-click on "Hide these specified drives in my computer" and click on Enabled option button.
4: Under the drop-down menu, you have to select the drive that you would like to hide. Then, hit on "Ok" button.
Part 2. How to View Hidden Partitions in Windows 10/8/7?
Step 1. First of all, you have to right-click on "My Computer/This PC" and hit on "Manage" option.
Step 2. Computer management window will appear, click on Disk Management under Storage.
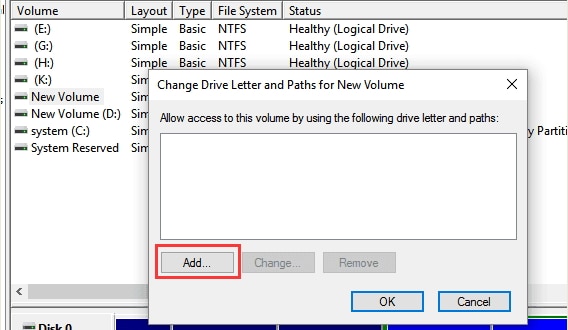
Step 3. Choose the new disk – this is which you have previously hide.
You have to right-click on it by selecting change drive letter and path for a new disk.
Step 4. Now, you have to click on "Add" button to assign a drive letter for the partition to unhide it.
Step 5. Once the above process completed, click on Assign the following drive letter option and hit on "OK" button.
Step 6. Now, you partition will be visible on your computer and it works like other partitions.
Part 3. Why is It Necessary to Hide or Unhide Partition in Windows Computer?
As a computer user, there may be several reasons that you would want to hide or unhide partitions. But first, let's talk about why it is necessary to hide partitions.
• Save Data from Deletion
You may want to hide a partition if you have very important files relating to business deals or others and don't want them to be deleted. You may want to keep these files safe on your computer but if you accidentally deleted the files or formatted the partition, it can be very frustrating. To protect something like from happening, you may hide the partition in which you stored the files to keep them safe and secure from accident deletion or format.
• Prevent Thefts
You may also like to hide partitions to protect the data stored in it from theft. Stealing data from a computer is very easy as long as you can get access to it. You just need to copy the files to a portable storage media and you are done. If you have some confidential files on your computer that you don't want to get stolen, you may hide them along with the partition. This is so because the thief doesn't get access to the partition.
There may be other reasons too like hiding data from kids or family members. But you can't keep your partition permanently hidden as you will need the files stored in it sometime. When you hide a partition, there is no way to access the files stored in it unless you unhide it. Hiding protects your data from others but you also can’t access those files anymore. So you may like to unhide the hidden partition in which you stored the data so that you can use it then.
If you hide a completely full partition, then it isn't any problem. But if you have hidden a partially or completely empty partition, then you are wasting precious storage space. You may also want to unhide the partition if you want to free up some storage space to store more files on it.
Part 4. How to Recover Data from Hidden Partition?
When you find something lost from your hidden drives, you might wish to get them back, right? But how? Since you have hidden the partition, sometimes the tool you used to retrieve hidden partition data might cannot find the drive at all. So obviously, the key point to restore data from a hidden partition is to find a reliable yet professional Partition Recovery software as your assistant. That's why Recoverit is strongly recommended here.
Recoverit-Data Recovery
- Support to recover data lost in different scenarios, like external hard disk, system creash, formatted disk, crash computer, virus infection, etc.
- It can fix playback issues with videos like a corrupt file, dropped frames, audio/video syncing, grainy video, missing audio/video, and so on.
- 8 different recovery modes to help you locate the lost data and get them back in the shortest time.
- New upgraded system crash recovery allows you to recover data from unbootable system within few simple clicks.
- Recover more than 1000 types of file types, like documents, audio, videos, graphaics, emails, etc.
- 100% risk free and easy to use, it can greatly improve your working efficiency.
- Requre no professional skills for both beginners and experts.
How to Perform the Hidden Partition Recovery Software in Details?
Step 1. Download Recoverit on your PC.
Download, install and launch the program on your Windows computer, then choose a recovery mode of "Lost Partition Recoery".
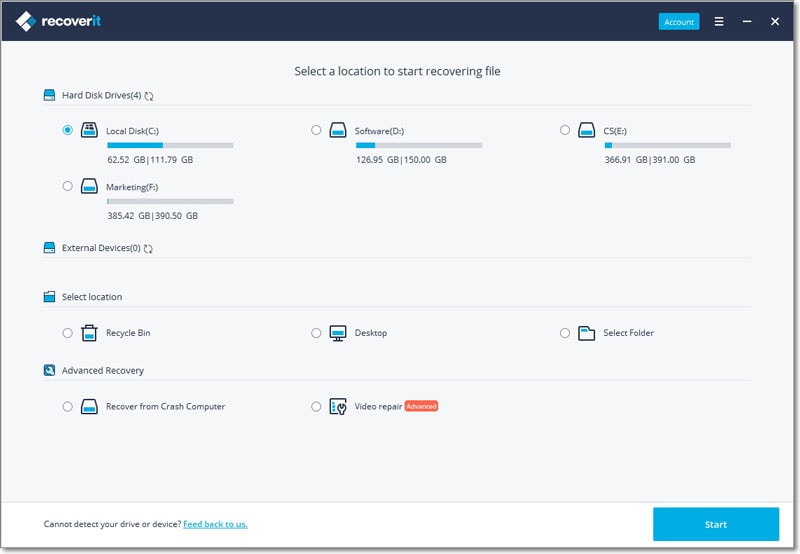
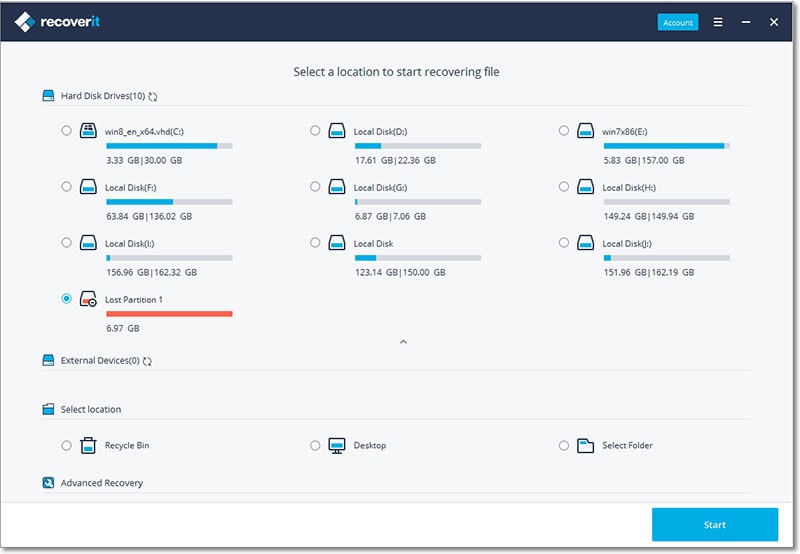
Step 2. Select the data loss partition to start your data recovery process.
Now, all partitions on your computer will be displayed in the program, including hidden or unhidden drives. Select the hidden drive and click "Start" button to begin scanning for lost files.
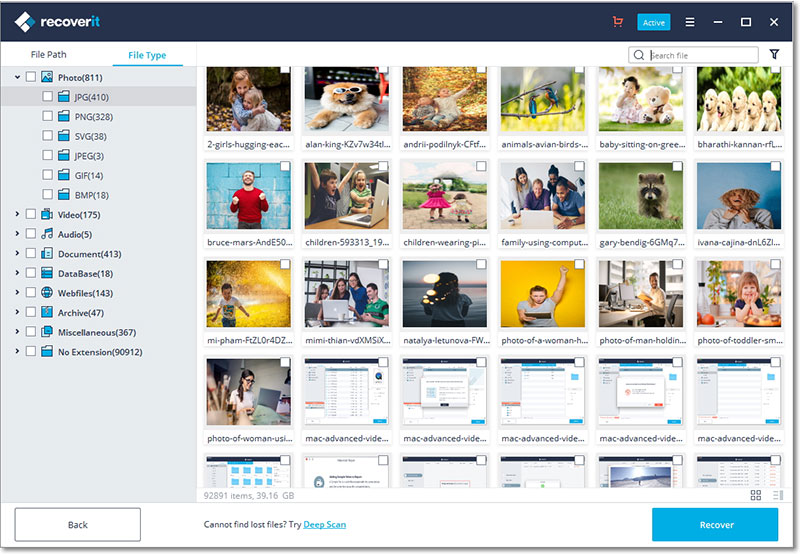
Step 3. Preview and select the data you want to recover.
When the scanning is finished, you can preview the results in the form of file types. Then tick the data you wish to restore and hit "Recover" button to save them to a safe drive.

By the way, if you cannot find your needed data after the first scanning, you can tick the "All-Around Recovery" to conduct a deeply scanning on your selected partition. And this mode will provide you with more recoverable files.
Elva
staff Editor