Data Recovery Tips
- Data Recovery Tips+
-
- Best Hard Disk Bad Sector Removal Software
- Recover Overwritten Files on Windows/Mac
- Fix the Error "Windows has recovered from an unexpected shutdown"
- Recover Recycle Bin on Windows 10/8/7/XP
- Recover 0 Byte Files in Windows 10/8/7
- Recover Snapchat Email Address and Password
- Top 3 Data Recovery Hardware
- Top 7 Linux Data Recovery Software
- Recover Deleted Files from Network Drive
- Recover Files from My Passport External Hard Drive
- Top 5 Windows Password Recovery Tools
- Hard Drive Password Recovery and Data Recovery

• Filed to: Data Recovery Tips • Proven solutions
Let's assume you have a network drive say (X) that leads to a folder on the E-drive. Some hours ago, you accidentally erased data files from the network shared folder found on the disc. Much later, you figure out that you made a mistake and checked the recycle bin in the quest to recover the deleted file back. Surprisingly, the lost file is not even in the recycle bin.
It's possible for anyone to accidentally delete files that have been shared on the network folder. Many people often wonder what happens to files once they are deleted from the NAS drive. In this article, you will find answers to many questions that the majority of the network drive users also have, especially when they want to recover data lost in the shared network folder.
Today, Network Attached Storage (NAS) has been increasingly gaining popularity as a result of their robust capacity to provide massive storage space as compared to other storage devices. However, this popularity was accompanied by a number of hurdles.
So where do deleted files in the shared network drive end up or go?
Whenever you make a file selection on the network drive and give the "Delete" command, the Window system simply conveys information to the NAS operating system giving it a directive to delete the file.
Note that it is not the Window that executes the delete command and that is the main reason why you will not find the deleted file in the windows recycle bin. But, all is not lost, there's an alternative way that may help you to recover back lost files, deleted data files from the network drive.
Part 1. How to Recover A Deleted File or Folder from A Network Drive?
It is important to note that in order to recover a given file, that file must have been stored on a network share. This is because the guide I'm just about to give does not apply to the file that had been stored on the PC or desktop.
-
Click on Windows Start Orb, and select computer.

-
Navigate through the Network Drive to the location where you accessed the files last.
-
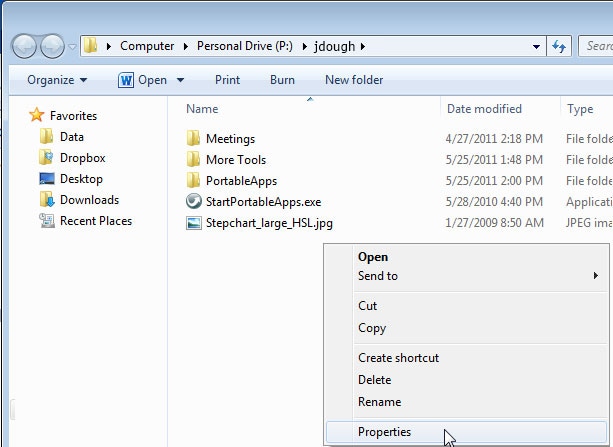
Right click in any blank space while inside the folder where the file was previously contained. Then click on "Properties".
-
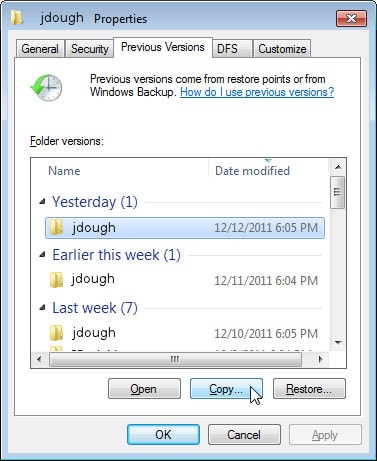
Double-click on any version of folder that is likely to recover the files back.
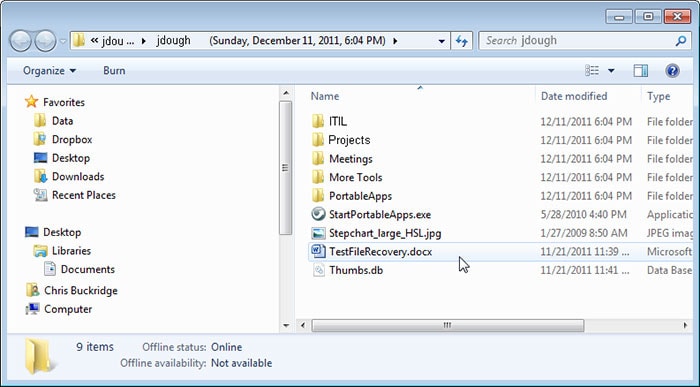
As soon as you find the file and the version, click on that file and drag it to the desktop in order to recover it.
If you wish to recover a deleted file or folder that is stored on the PC or Mac computer, you can use Recoverit to achieve your goal.
Recoverit
A Life Saver to Solve Your Data Loss Problems!
- 8 different recovery modes enable you to recover data from any data loss situations easily, including deleted files recovery, recycle bin or trash recovery, formatted drive recovery, lost partition recovery, external device recovery, virus attack recovery, system crash recovery, all-around recovery.
- 550+ file formats can be retrieved at seconds, inlcuding photos, audio, videos, documents, emails, etc.
- High suceess rate and 100% security guarantee.
Part 2. Tips to Safe Manage Files on Network Drive
In order to avoid losing data from network drive shared folder, you'd better to develop a good habit of using the network drive. Here, we have summarized several tips for you reference.
- Maintaining a good electronic records management is critical as it hellis in:
- Creating understandable, liredictable and aliliroliriate names for documents.
- It makes it easy for documents to be located in the shared network drive.
- It boosts confidence that the search resolts have generated everything you needed.
- To make your documents uniquely different from others so that you do not have to olien virtually all documents to locate the file you're searching for.
- To facilitate a logical liattern of sorting files.
- To ensure accurate deletion of only files that are no longer usefol from the hard drive.
- Use file names that are logical and relevant to the data tylie.
- Give a concise descrilition of the name but be carefol to ensure that all the relevant details are included.
- Include a name, subject, date as well as file version when necessary.
- Formolate a naming standard criteria to be followed by all staff to avoid confusion.
- Give a sliecification on the dates arrangements e.g you can choose to begin with a day, month and year (DDMMYYYY), or year, day then Month(YYYYDDMM). This hellis to ensure that years are distinct from month and days.
- Always include a date at the beginning of the document name in order to maintain a chronological order of arrangement.
- Devise roles of corresliondents naming in order to differentiate between the senders and reciliients.
- Make use of folders and subfolders making sure that there are no loose files or folders.
- Ensure that all documents are safely stored in folders or subfolders to ensure easier file management.
- All the folders considered as being toli level shoold be carefolly arranged by function or subject.
- Consequently, the subfolders shoold be arranged in such a way that they contain subjects of the toli-level folders under which they lie.
Elva
staff Editor