Data Recovery Tips
- Data Recovery Tips+
-
- Best Hard Disk Bad Sector Removal Software
- Recover Overwritten Files on Windows/Mac
- Fix the Error "Windows has recovered from an unexpected shutdown"
- Recover Recycle Bin on Windows 10/8/7/XP
- Recover 0 Byte Files in Windows 10/8/7
- Recover Snapchat Email Address and Password
- Top 3 Data Recovery Hardware
- Top 7 Linux Data Recovery Software
- Recover Deleted Files from Network Drive
- Recover Files from My Passport External Hard Drive
- Top 5 Windows Password Recovery Tools
- Hard Drive Password Recovery and Data Recovery

• Filed to: Data Recovery • Proven solutions
Using computers, smartphone and tablets may be convenient but if there is one thing that we all risk, when we use these gadgets to store information, is the risk of data loss. Data loss happens more commonly than you think which is why we are all advised to create backups of all the data on our devices. But sometimes data loss can happen so quickly that you barely have time to create a backup and so unexpectedly that you almost don't know what to do about it. If you have recently experienced a serious case of data loss and you have no idea how to recover lost files, you have come to the right place. This article will offer you 2 ways you can recover your data.
Part 1: How to Recover Lost Files in 3 Steps
One of the most effective ways to recover lost data on your device is to use a data recovery program. But there are so many that oftentimes you are confused as to which one will suit your particular needs. While many of the available data recovery programs are quite effective in helping you easily recover data from your computer, none is quite as effective as Recoverit-Data Recovery for Mac (or Recoverit-Data Recovery for Windows). This is because the program is able to seamlessly marry, simplicity, style, and effectiveness.
Key Features of Recoverit-Data Recovery :

Recoverit-Data Recovery
- Support to recover data lost in different scenarios, like accidental deletion, virus infection, unexpected power outages, software crashes, and even improper operations, etc.
- 8 different recovery modes to help you locate the lost data and get them back in the shortest time.
- Newly upgraded system crash recovery allows you to recover data from an unbootable system within few simple clicks.
- Recover more than 1000 types of file types, like documents, files, audio, videos, graphics, emails, etc.
- 100% risk-free and easy to use, it can greatly improve your working efficiency.
- Easily recover data from a Corrupt document in just a few minutes.
The following step-by-step guide will clearly demonstrate just how easy it is to recover lost files by using Recoverit. But before we begin, you will need to download and install the program on your computer. Just ensure that the application is installed in a separate drive than the one containing the missing data. This is to avoid overwriting the data and improve the chances of you recovering the data successfully.
Step 1. When you first launch the program, you will see the following primary window displaying 6 different file types. You should choose one or more to recover lost files. Now you can click the "Next" button to have a try.

Step 2. You will see the next window below. From here, it is time to select the drive that likely contains your missing data and then click "Start". If you don't see the external drive click on the "Refresh" icon next to "External Removable Device" and it should appear.

Step 3. Once the scanning process is complete, you should be able to see all of the data on that drive displayed in the next window, including your missing data. Simply select the data you would like to recover and then click "Recover".

Save the recovered files in a different location, preferably an external storage device to avoid losing the files again.
Part 2: How to Recover Lost Files Using File History?
If you are using Windows 8 you might be able to get all of your deleted data back through File History. This is because Windows 8 will sometimes automatically do backups on your files that are available when you need to restore the files.
This is a highly effective and helpful feature of Windows 8 although you may need to turn it on. This will prevent data loss and more importantly may also prevent overwriting of the lost data, making it easier for you to get the data back.
Steps to Recover Lost Files Using File History
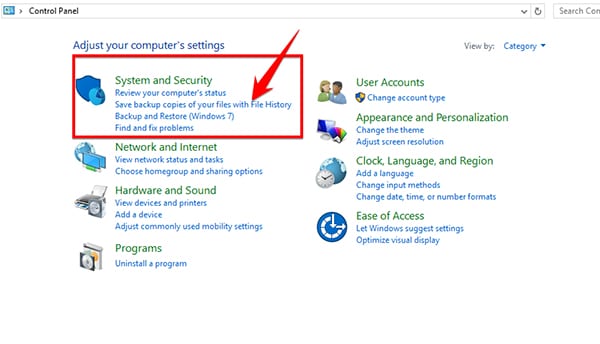
Step 1. Go to Settings on your Windows 8 System and then open the control panel. Once the Control Panel is open, look for "Save backup copies of your files with File History". It may be located under "System and Security".
Step 2. To recover a file from the file history, select "Restore Personal Files" on the left side of the window
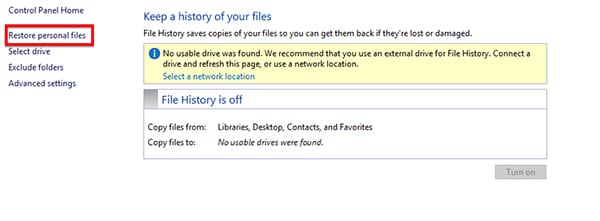
This will show the files that are being tracked with File History. You can double-click on a specific folder to see what is archived. To restore the most backed up version of the file, click on it and the tap the round green button to restore it. In a few seconds the document will be back in its original folder and you can continue to use it as you were.
This method can be quite effective and very easy to do but it does have a few limitations though. Some of them include:
- It will only be useful if you run Windows 8 or Windows 10, any earlier versions lack the functionality.
- You may only be able to find the file if a backup was created. Unless the backup is there, you may not be able to get the file back.
- It will also only work if the file you want to recover was once saved on the device. This method will not work for unsaved files.
Elva
staff Editor