Recycle Bin / Trash Recovery
- Recycle Bin Recovery+
-
- A Full Guide on Recycle Bin Management and Recovery in Windows
- Every Recycle Bin Windows 10 Solution You Need
- Recycle Bin Windows 7 Solutions
- How to Fix Corrupted Recycle Bin in Windows and Restore Lost Data
- How to Find the Recycle Bin Location of Your Desktop
- Full Guide on Removing/Restoring Recycle Bin on PC
- Top Ways to Recycle Bin Data Recovery
- Where is Recycle Bin - How to Locate Recycle Bin on Windows
- How to Recover Deleted Files from Recycle Bin
- Easiest Way to Restore Deleted Files from Recycle Bin
- All You Need to Know About Hidden Recycle Bin
- Mac Trash Recovery+
-
- How to Securely Empty the Trash On Your Mac
- Tried-and-True Solution: How to Force Empty Trash Mac
- How to Restore Deleted Files from Trash on Mac
- 3 Easy Ways to Empty Trash in Gmail
- Easy Ways to Recover Emails Deleted from Trash
- How to Recover Deleted Mail from Trash on Mac
- Empty Trash From Your Mac and iPhone Easily and Securely
- Your Full Guide for Anything Related to Mac Trash
- How Find Recycle Bin and Restore Deleted Files on Android
- How to Empty Trash on iPhone/iPad/iPod (iOS 12 Supported)
- How to Empty Google Drive Trash and Undo Empty Trash
- How to Delete Trash on Mac Securely and Permanently
- Try These Multiple Methods to Recover Deleted Trash on Mac
- 3 Ways to Empty Trash on Mac Completely
- How to Undo Empty Trash Mac
- Recover Emptied Trash on macOS Mojave

• Filed to: Recycle Bin Recovery • Proven solutions
OS X 10.14 Mojave is a significant improvement from the revolutionary features and attractive design introduced by the impressive OS X High Sierra. Using this system, it's still possible for you to accidentally erase the contents of your trash on your Mac or delete files by pressing Command and Delete. If this happened, what to do? In this article, I will teach you how to recover trash on macOS 10.14 Mojave computer.
Part 1. Reliable Program for Trash Data Recovery on Mac (Compatible with macOS 10.14 Mojave)
Recoverit (IS) for Mac will give you the chance to retrieve files from emptied trash. It allows the retrieval of nearly any file, as well as documents, photos, video, music, email, and archive files.
The software permits the retrieval of data regardless of whether the data was lost due to formatting, deletion, improper operation, virus infection, unanticipated power breakdown, or software crash or for any other reason. This software is perhaps the best file recovery tool for macOS 10.14 Mojave, macOS 10.13 High Sierra and macOS 10.12 Sierra.
Recoverit (IS) for Mac
A Life Saver to Solve Your Data Loss Problems!
- It is compatible with both Windows and Mac operating system.
- It supports a large number of storage device type including hard drives, USB flash drives, SD cards, etc.
- All major types of files can be recovered including music, images, video, documents, emails, and archives.
- It has a deep scan features for in-depth scanning of the hard drive for searching files to recover.
Part 2. How to Recover Trashed Files on macOS 10.14 Mojave
One of the most distinctive features of Recoverit (IS) is the ability to recover data inadvertently deleted from the trash. The following is a step by step guide on how to recover data by lost by pressing Command and Delete simultaneously, accidentally emptying the trash, corrupt documents and others.
Step 1 Open Recoverit (IS) by selecting it from the application folder or the location in which it was installed. The application will display the data types for you to choose from. In order to shorten the time, the software will only scan and recover the data types that you choose in this step. Choose the data types and then click "Next".

Step 2 The new window will display the different drives on your Mac. Select the specific drive in which you have lost data which you wish to recover. Click on the "Start" option to begin the scanning process. If the drive that you desire to scan is not visible, press the "Refresh" icon.
The software utilizes the state-of-the-art scanning algorithms that can examine any hard drive on a Mac (macOS Sierra) or an exterior hard disk while causing no harm to the data.

Step 3 Following the completion of the scan, all possible files which can be recovered will be displayed. You may make use of the Preview feature to assist you in identifying specific files which were lost. Before recovery, you can click the files to preview.
To recover the desired files, select the files in your listing and press the "Recover" button found at the top. This will save the selected files to the chosen path. You are advised to save your recovered data to an external drive.
There is a "Deep Scan" option located on the bottom for you if you don't find your wanted files from the scanned data. "Deep Scan" does a deep scanning on your target location and will show you more data that you can recover and save.

Part 3. Useful Tips for Performing Data Recovery in Trash
If the file extension of the lost data is known, you may filter the files recovered by type, i.e., by Image, Document, and Email, etc. by just clicking the button marked as the down arrow.
The Deep Scan option can be used to examine completely your drive and may allow the retrieval of additional files. To use this option, select "Enable Deep Scan" and restart the scan.
Scan results can be saved for later using the button on top marked "Save Scan Info". The saved files can them be restored at a later time by pressing Resume the Recovery from the main interface.
Further, the feature "Preview" allows users to preview the scanned data prior to retrieval.
The Validity feature advice users on whether it is recommended or not to initiate the retrieval of a particular file.
Lost data can be just as easily restored not only from your Mac hard drive but even a USB flash drive, memory card or other storage devices. It should be noted however that, continued use of your hard drive specifically in the same location of the lost data could result in your data being unrecoverable. In such instances, it is advisable to use a different Mac computer towards the installing of Recoverit (IS) for Mac onto a portable USB drive and then execute the data retrieval on the hard drive in question.
 Can't Miss: Disable SIP and Get Data Recovery on macOS High Sierra/Mojave!
Since macOS High Sierra system, Mac users are not allowed to access any system folder or app on Mac because of SIP(System Integrity Protection), a security feature of Apple's macOS operating system introduced in OS X El Capitan. Therefore, if you need to recover lost data on Mac under macOS Mojavea/High Sierra, you need to disable SIP (System Integrity Protection) on Mac firstly before recovery.
Three simple steps to disable "System Integrity protection":

Step 1 Firstly, go to reboot the Mac and press "Command + R" keys simultaneously after you hear the startup chime, then you will boot OS X into "Recovery Mode".
Step 2 Then you will get the "OS X Utilities" window, you need to press the "Utilities" menu at the top of the window, and choose "Terminal" option from the drop down box.
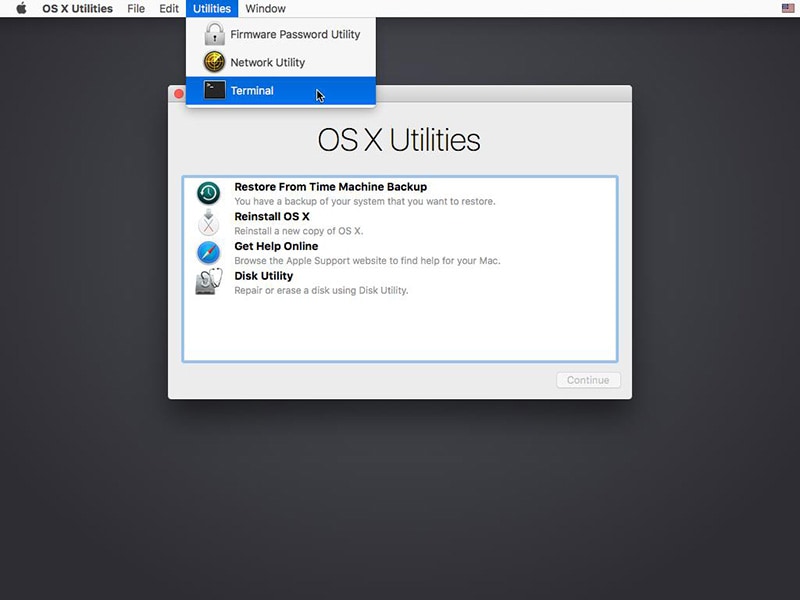
Step 3 Now you are in the "Terminal" window, type in "csrutil disable" and press "Enter", you will get the information that you have successfully disabled System Integrity Protection, then restart your Mac to start to recover lost data from macOS High Sierra.
Last but not least: Once you recovered the lost data on Mac, remember to turn on the SIP(System Integrity Protection) for your Mac security. Reboot your Mac - in the "Terminal" window, type in "csrutil enable" and press "Enter", then restart your Mac again. That's it.
Elva
staff Editor