
• Filed to: PDF Editor
PDFelement Pro - The Best Adobe Acrobat Plugin Alternative
PDFelement Pro is a powerful yet cheaper PDF editor program. It can be the best Adobe Acrobat alternative, helping you to edit your PDF files as ease as working on Word files. With it, you can do any change on the PDF elements, convert, create, OCR, secure and share PDF files.
Why Choose This PDF Editor:
- Easily edit PDF texts, images, links, pages.
- Leave comments, annotation and markup to PDF.
- Convert PDF to Word and other formats.
- Better PDF form feature to fill out and create PDF form.
- Protect PDF with passwords, watermark and signature.
- Batch processing on PDF editing, converting and more.
Part 1: Adobe Acrobat Plug-in for Firefox
The Mozilla Firefox plug-in comes into use to take the Adobe Acrobat software into account and let users of the browser also access the said software. If the plug-in is installed it helps Firefox users to read Adobe files in PDF format inside the Firefox interface itself. Not only that but the plug-in lets users to utilize the broad array of editing, commenting and document manoeuvring options that Adobe Reader provides without launching the software separately.
Download and Install Adobe Acrobat Plug-in for FirefoxThe Adobe Acrobat Reader plug-in comes integrated with the installation file. Here is a small guide to get you started with downloading and installing the Adobe Acrobat Plug-in for Firefox:
- Step 1. Open the Firefox browser and go to the Adobe Reader Download page.
- Step 2. Here click on the ticked box beside "Free McAfee Security Scan Plus" to remove and then select 'Download'.
- Step 3. Next click on the 'Allow' option located on the information bar. This will permit Firefox to automatically install the plug-in of Adobe Reader. Now select 'Install Now'.
- Step 4. Then restart Firefox. This time the Adobe Download Manager will appear as Firefox is restarted. It will show the progress of the download and installation of the software.
- Step 5. Finally click on the 'Close Download Manager' button when the installation is finished. The Adobe Acrobat Reader is now set on your browser to be used.
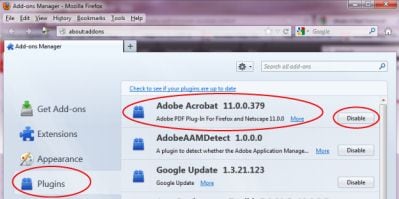
Update Adobe Acrobat Plug-in for Firefox
If you happen to update your Firefox plug-in, there here lies the method:
- Step 1. Launch the Adobe Acrobat Reader window, and navigate to the Help menu. There you would find the “Check for Updates” option. In case of an upgraded version being available, the window will show the “Update is available” message along with the specifications in the new update.
- Step 2. Select the 'Download' option to avail the update. Adobe Acrobat Reader goes on to download the data needed to process the update, and asks the user for a confirmation before installing the new version.
- Step 3. Now select 'Install' to go on with the installation where you can track its progress in the bar showing its current status.
- Step 4. As the Adobe Acrobat Reader and the Firefox add-on are updated, click on the “Restart Now” option to restart Windows. You might also click on the 'Close' option and go on using your computer, but to start using the updated software and plug-n facilities you have to restart your system.

Uninstall Adobe Acrobat Plug-in for Firefox
In the scenario of having to uninstall the Firefox Plug-in of Adobe Acrobat, here are the instructions you should follow:
- Step 1. Shut down the browser of Firefox.
- Step 2. Hold down the 'R' and the Windows logo key together to open a run command box.
- Step 3. Now type 'explorer' in the box and then press Enter. A Windows Explorer Browser will open.
-
Step 4. From here go through the following directory path:
C:\Program Files\Mozilla Firefox\plugins - Step 5. There delete the nppdf32.dll file. This will ensure the uninstallation of the Acrobat plug-in.
Part 2: Adobe Acrobat Plug-in for Chrome
The Chrome plug-in for Adobe Acrobat is so designed as to incorporate the Adobe Reader software with all its editing and annotating attributes to the Chrome interface. With this plug-in you can open and edit PDF files easily on the Chrome browser.
Download and Install Adobe Acrobat Plug-in for ChromeDownloading and installing the Chrome plug-in for Adobe Acrobat is simple. The plug-in is automatically downloaded and installed when one installs the Adobe Acrobat software. But in case, the plug-in does not function automatically, here are the instructions to enable it manually:
- Step 1. Open the browser of Google Chrome.
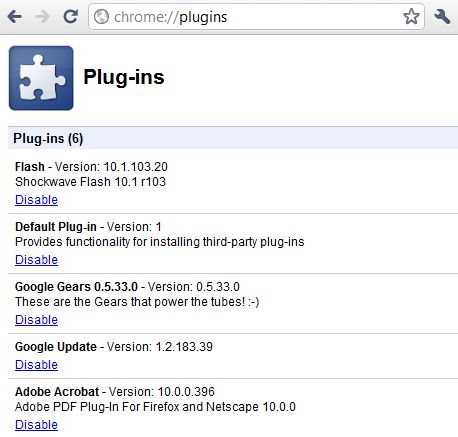
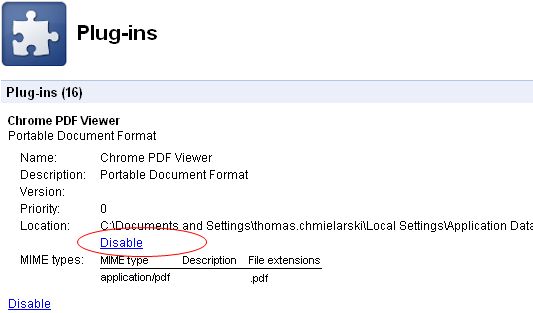
- Step 2. In the address bar type chrome://plugins/ and press Enter.
- Step 3. A list of plug-ins will appear. There locate the Adobe PDF viewer plug-in and select the 'Disable' option next to it.
- Step 4. Now click the newly appeared 'Enable' option next to the Chrome PDF viewer plug-in.
Update Adobe Acrobat Plug-in for Chrome
The Chrome browser plug-ins are automatically updated while the user closes and opens the browser. In case, you have left your browser open for a few days then the browser's Chrome menu changes colours from green to orange to red indicating the number of days an update has been available for. To avail an update, do the following:
- Step 1. Select the Chrome menu on the toolbar of the browser.
- Step 2. There click on 'Update Google Chrome'.
- Step 3. A confirmation message box will be shown to you, there select 'Restart'. The Chrome browser will automatically save the tabs and windows you had opened. On restarting it opens the saved tabs and windows again. You could also select the 'Not Now' option. Then the update waits to be applied till the next time you restart your browser.
Disable Adobe Acrobat Plug-in for Chrome
To get rid of the Adobe plug-ins on your Chrome browser you have to uninstall the very software of Adobe Acrobat from your operating system. To uninstall Adobe Acrobat from Windows follow these steps:
- Step 1. Go to the Control Panel, and navigate to the 'Add or Remove Programs' function there.
- Step 2. Find the Adobe Acrobat or Adobe Reader software and click on the Remove option.
- Step 3. After the uninstallation has been completed, restart your computer to use your browser.
If you are looking to uninstall Adobe Acrobat from a Mac OS then these are the steps:
- Step 1. Simply drag the Adobe Acrobat or Reader software from the Applications folder to the Trash.
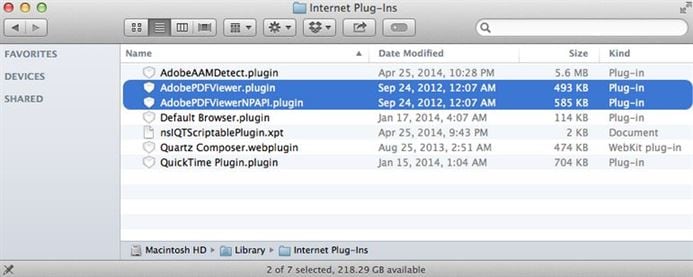
- Step 2. Then go to the Library and then the Internet Plug-ins folder.
- Step 3. Remove the AdobePDFViewer.plugin file from there.
Part 3: Adobe Acrobat Plug-in for Safari
The Adobe Acrobat plug-in for Safari, called AdobePDFViewer, helps to integrate Adobe Acrobat's interface with that of the Safari browser. This lets users of Mac OS to see PDF files in the Safari browser and also to edit them, comment on them and make other media-related changes.
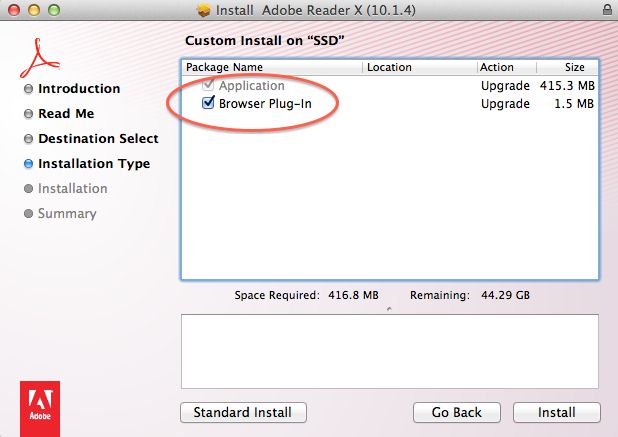
Download and Install Adobe Acrobat Plug-in for SafariAvailing the Adobe Acrobat plug-in for Safari depends on downloading the Adobe Acrobat software. To download Adobe Acrobat on a Mac, follow these instructions:
- Step 1. Navigate to the Adobe Acrobat download page and click the Download Now option.
- Step 2. In the Safari browser, double-click on the .dmg file. In case, the Safari Downloads window does not show, select the Windows option and go to Downloads.
- Step 3. To begin the installation, double-click on Install Adobe Acrobat.
- Step 4. A dialog box asking you whether or not to open the file will be shown, click on Open.
- Step 5. Key in your name and password when asked.
- Step 6. After the installation is complete click on Finish.
- Step 7. After the installation, the Safari browser will automatically have the AdobePDFViewer plug-in enabled.
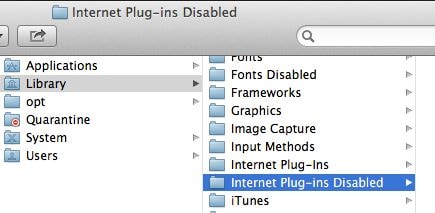
- Step 8. To manually locate the file, navigate to the Library's Internet Plug-in folders, and then to the AdobePDFViewer.plugin file.
However, to do it manually,
- Step 1. Go to the Preferences option from the Safari browser's menu.
- Step 2. There tick the 'Enable plug-ins' and 'Enable Java' options to get your plug-in working.
Update Adobe Acrobat Plug-in for Safari
To update the AdobePDFViewer plug-in file, in case you have updated your Adobe Acrobat, go by this given method:
- Step 1. Remove the older version of the Safari browser from your system.
- Step 2. Then proceed to install the latest edition of Safari available from another browser.
- Step 3. Now delete the Adobe PDFViewer.plugin by navigating to the Internet Plug-Ins folder in the Library.
- Step 4. Then open Acrobat and select the 'Help' option and then click on 'Detect and Repair' there. Here select the Adobe PDFViewer again to get its updated version.
Disable Adobe Acrobat Plug-in for Safari
Your default plug-in for Adobe Acrobat or Adobe Reader will remain the Adobe PDFViewer plug-in. In order to switch this off, go by these steps:
- Step 1. Launch Adobe Acrobat or Reader and go to the 'Preferences' section.
- Step 2. There select 'Internet' and click on the tick beside the 'Display PDF in Browser” option to remove it.
- Step 3. Or you can also delete the AdobePDFViewer.plugin by navigating to the Internet Plug-ins folder from the Library.
Part 4: Adobe Acrobat Plug-in for Internet Explorer
The Adobe Acrobat plug-in for Internet explorer proves itself useful by assimilating the Adobe Acrobat software into the browser's framework. It lets viewers see PDF files inside the Internet Explorer browser, besides letting them edit and annotate these files using all the features of Adobe Acrobat.
Download and Install Adobe Acrobat Plug-in for Internet ExplorerThe installation of the Internet explorer's Adobe Acrobat plug-in happens automatically after the Adobe Acrobat software is downloaded. However, to configure this plug-in to work manually do the following:
- Step 1. Select Tools from the browser's menu.
- Step 2. Navigate to the Adobe Acrobat download page.
- Step 3. From there select the 'Enable Add-ons' option.
- Step 4. From the list that appears in the following window click on the 'Adobe PDF Reader' option.

Update Adobe Acrobat Plug-in for Internet Explorer
If you have updated your version of the Adobe Acrobat and the older plug-in is not compatible with it, then to update it to the present version, you would need to reinstall the plug-in. To do that, follow these simple steps:
- Step 1. Right-click on the 'Start' icon on your Windows screen, and click on 'Explore' to launch Windows Explorer.
-
Step 2. Go to the Adobe Reader installation folder by following the given directory path
C:\Program Files\Adobe\Reader 9.0\Reader\Browser - Step 3. Find the 'nppdf32.dll' file and right-click on it and select the 'Copy' option.
-
Step 4. Now go to the Internet Explorer's Plug-ins folder by following the given directory path
C:\Program Files\Internet Explorer\PLUGINS - Step 5. On reaching the folder right-click inside it and select the 'Paste' option.
- Step 6. On being asked whether you want to overwrite the file, select “Yes”.
Uninstall Adobe Acrobat Plug-in for Internet Explorer
To uninstall the Adobe Acrobat plug-in for Internet Explorer do the following:
- Step 1. Shut down the Internet Explorer Web browser.
- Step 2. Open the Control Panel and navigate to the Programs and Features folder there.
- Step 3. Right-click on the 'Adobe Acrobat Add-On' file and select 'Uninstall' in the menu.
- Step 4. The uninstallation process of the Acrobat Add-on will take a while.
- Step 5. After it is completed to save the changes restart your computer.

Part 5: Adobe Acrobat Plug-in Troubleshooting Issues
There are various problems that arise when a user is trying to view a PDF file on the web. The problem may lie with the browser, the plug-in, the PDF file or your version of the Adobe Acrobat. Given below are certain troubleshooting issues and their solutions.
Problem 1: If a blank page is showing on the web instead of your PDF file.
Solution: Try to update your version of the Adobe Acrobat or Reader. For that open the software, go to the Help menu and click on 'Check for Updates. If there is a new update on hand then it is automatically installed. Then try to refresh the page by clicking on the 'Refresh' or 'Reload' button.
Problem 2: In case the problem of the blank page persists, you could have a problem with the individual website.
Solution: To ascertain if the web page is at fault behind the error try loading a different PDF file. If the other PDF file opens, then it is possible that the web server of the former PDF file is having its unique troubles. In that case, contact the individual or company who is behind that particular website.
Problem 3: If your browser displays an error message trying to open a PDF file.
Solution: Occasionally, the pre-fixed conditions on your computer like browser cookies or security settings get in the way and block you from seeing a PDF file. In such a scenario, the easiest way out is to attempt and open the same file from another browser. Go and try to use a separate browser.
Problem 4: To ensure that you are seeing the newest version of the PDF file.
Solution: You could try deleting the browser cache also known as the 'temporary Internet files'. But exercise caution while choosing the right option. Choose the option to only clear the 'browser cache', otherwise you may end up deleting cookies that hold important information like login data or preferences. Almost all the browsers have specific option to let you properly select the exact data you want to remove.
Problem 5: If your browser shows a red 'X' sign instead of opening the PDF file.
Solution: In this case reset the Display PDF In Browser Preference by following these instructions: Open Adobe Acrobat or Reader, now right-click on the Document window, and go for Page Display Preferences.
- Step 1: Choose Internet from the list that appears on the left.
- Step 2: Now uncheck Display PDF In Browser, and click OK.
- Step 3: Now navigate to Edit, and to Internet from the Preferences section.
- Step 4: There click on Display PDF In Browser followed by OK.
- Step 5: Now open the PDF file again in your browser.
Ivan Cook
chief Editor