iPhone
- iPhone Toplists+
- iPhone Tips+
-
- Face ID vs Facial Recognition
- Download Music from iTunes to iPhone 8
- Download Music from iCloud to iPhone 8
- Undo Jailbreak iPhone
- Delete iCloud Backup
- iPhone Messaging
- Software to Get HD Wallpapers
- Forward Voicemail on iPhone
- Black Messages on iPhone
- Delete Photos from iCloud
- Print from iPhone without Airprint
- iPhone Undelete App
- Recover iPad Password
- iPhone Shake to Undo
- iPhone Voicemail to MP3
- Upload Photos to iCloud
- iCloud Backup Full
- iPhone Visual Voicemail
- Best iOS 9 Games
- iPhone Ask for Voicemail Password
- Delete iCloud Account
- Send Voicemail on iPhone
- iPhone Messages Not Sending
- Undo iPhone Update
- Change Voicemail on iPhone
- Undo Passcode on iPhone
- iPad Backup Location
- Leave Voicemail Without Calling
- Voicemail to Text on iPhone
- Backup iTunes Library
- Undo on iPhone
- Access iOS File System
- iPad Email Attachments
- Send SMS from iPad
- iPhone Ringes Before Voicemail
- Seatch Messages on iPhone
- Forgot iCloud Password
- Best 6 Call Forwarding Apps for iPhone

• Filed to: iPhone Recovery • Proven solutions
Is it possible to send calls to voicemail?
When required, you can send all calls to your voicemail by simply forwarding all calls to voicemail using the “Do Not Disturb” function. This way you send ALL calls to voicemail on iPhone when you do not want to be disturbed. You may be in a meeting and do not want to switch off your phone; by sending calls to voicemail, you still get all your important calls stored for you as voicemail. This function adds a lot of convenience for iPhone users and it is one that you should familiarize yourself with.
Part 1: Step-by-step Guide to Send Voicemail on iPhone
When you want to know how to send calls straight to voicemail on iPhone, you can use any of the two methods listed below.
Method 1: Send directly to another number through messaging
Step 1. Access the Voicemail tab.
On the lower right corner of your home screen, select the voicemail icon so you can access your voicemail messages. Look for the voicemail(s) that you want to send and select.
Step 2. Select the recipients of the forwarded voicemail.
Next, tap on the share icon, which is now displayed at the top of the screen. It resembles a paper page with an arrow at the top. When you click on the share button, you will get a list of people to whom you want to send the voicemail(s).
Step 3. Select the mode of sharing.
Select the mode that you would want to send the voicemail with; you will be presented with an array of options. In this case, select text message.
Method 2: Send voicemail through email or social media
You can also send the voicemail through email or social media.
Step 1. Access the Voicemail tab.
Get to the voicemail feature by clicking on the voicemail icon at the bottom right side of your home screen. This will give you a list of voicemail messages; select the one that you want to send.
Step 2. Select the recipients of the forwarded voicemail.
After selecting the voicemail message(s), you will see a share icon appear at the top of your screen. Click on the share icon and you will get a list of people with whom you would like to share the voicemail. Check only those to who you want to send the voicemail.
Step 3. Select email as the mode of sharing.
You will then be taken to the screen where you can decide on which model you would like to send the voicemail with. You can now choose email or social media. Note that you should have stored the email addresses or social profiles of the people you want to share with.
Part 2: How to Send Calls to Voicemail on iPhone?
When you want to send calls to voicemail using the “Do Not Disturb” function, here are the steps that you should follow:
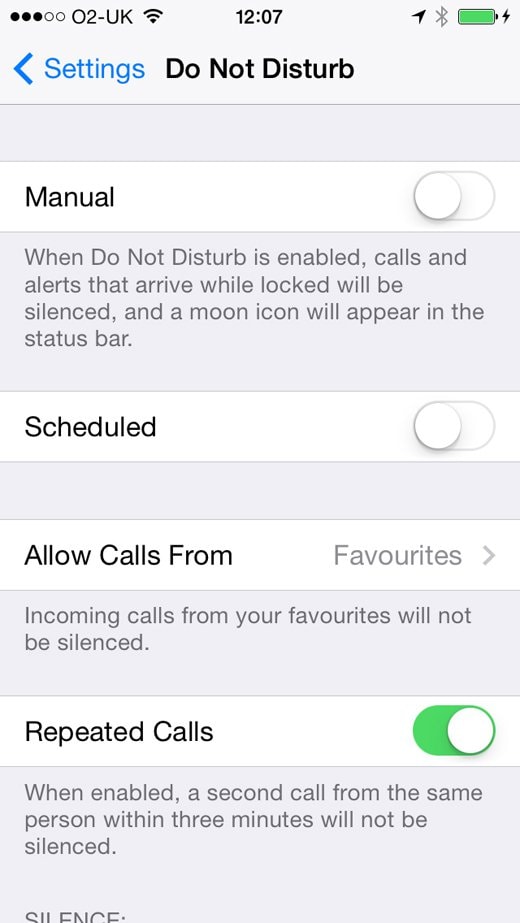
Step 1. Access the “Do Not Disturb” function.
Open the “Settings” tab on your iPhone and then select “Do Not Disturb”.
Step 2. Go to “Manual”.
You will get a screen that has several options, Go to “Manual”. This will leave the "Do Not Disturb" option ON until you disable it manually.
Step 3. Select calls to send to voicemail.
Here you can decide which calls should be sent to voicemail. You can allow calls from your “Favorites” list to come through and all others to be sent to voicemail. You can also allow calls that are made repeatedly from the same number in less than 3 minutes to send you a notification. Basically follow the prompts and make your selection.
Part 3. How to Recover Deleted Voicemail on iPhone?
Creating regular backups on iTunes or iCloud ensures that you have the latest voicemail messages stored; when you lose your voicemail messages, you can easily recover them from these storage services. If you try dr.fone - Data Recovery (iOS), you can easily recover lost voicemail from iTunes or iCloud backup. And you can also recover from your iPhone device by using iSkysoft iPhone Data Recovery as well.

dr.fone - Data Recovery (iOS)
Key Features of dr.fone - Data Recovery (iOS)
- Multiple Recovery Modes – Your voicemail messages can be recovered from iTunes, iCloud or your iPhone device.
- Multiple File-type Compatibility – You can recover 18 different file types from your backups; notes, contacts, messages, voicemails, videos, images and so on.
- Handy Preview Feature – This feature allows you to preview your backup files before you send them back to your device.
- Simple User Interface – It is well designed allowing users to use it with plenty of ease.
How to recover lost voicemail from iPhone? Here are simple steps.
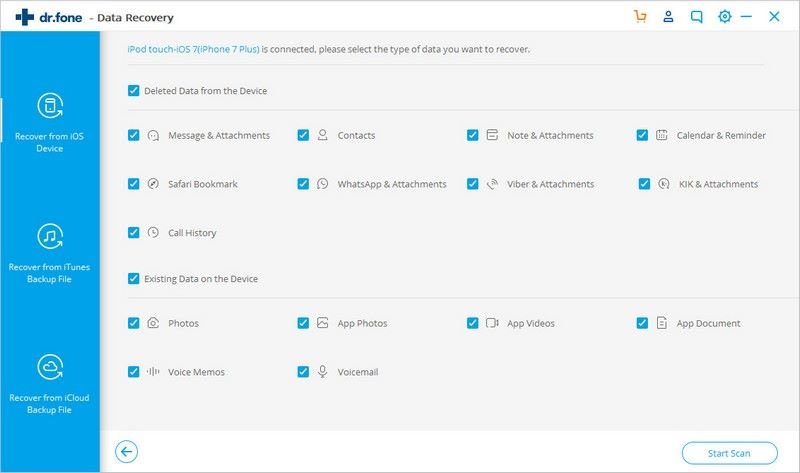
Step 1. Make sure you have downloaded and installed dr.fone - Data Recovery (iOS) on your computer. Open it and choose the Data Recovery option. And don't forget to connect your iPhone to the computer. Now let's move to step 2!

Step 2. Now select the file types that you want to recover. See, there is a Voicemail option. Tick it and click on the Start Scan button.
Step 3. See the come out? You can check the voicemail by clicking on it before you decide to Restore to Device or Recover to Computer.

Click here to view how to recover Voicemail from iTunes or iCloud backups.
Write in the End
The post is designed to teach you how to send a voicemail or a call to voicemail on your iPhone. Some accessible methods are shown for you. Furthermore, it hit me that under certain fortunate circumstances, you may get your voicemail messages missed. In that case, our powerful tool dr.fone - Data Recovery (iOS) will surely lend you a helping hand.
Elva
staff Editor