/ Posted by to
How to Convert and Import WMV Files to Final Cut Pro
Go to Mac
Go to Windows
by Brian Fisher Proven solutions
Final Cut pro was exclusively designed by Apple to serve various video editing needs. But, now that Apple’s the Final Cut Pro version is opened up for Windows OS too. So if you have a video file on Windows in WMV, and want to import to Final Cut Pro for editting, you must convert WMV to FCP format. But how? Well, find the steps below!
Part 1. How to Import WMV Videos into Final Cut Pro
Well, converting a .wmv file is always the best way to import WMV to Final Cut Pro for editing. Of the third-party media conversion software around, the UniConverter (formerly UniConverter)) is among the best and most practical tool to use. Why?
UniConverter - Best WMV to FCP Video Converter:
- Convert Video & Audio: Easily convert WMV to Final Cut Pro, and convert video up to 150+, like MOV, FLV, MKV, AVI, MP4, WMV, M4V, MP3, M4A, WMA, etc.
- Edit Video: Personalize videos with diversified video editing tools, like Trim, Crop, Subtitle, Watermark, Effects, etc.
- Optimized Presets: Directly convert video to fit iPhone/iPad/iPod, Android devices, editing tools like Final Cut Pro, iMovie, and so on.
- Transfer to Devices: Easily transfer converted video like WMV to your mobile devices such as iPhone, iPad, Android Phones with USB.
How to Convert WMV Video to Final Cut Pro Supported Format on Mac and Windows
Step 1
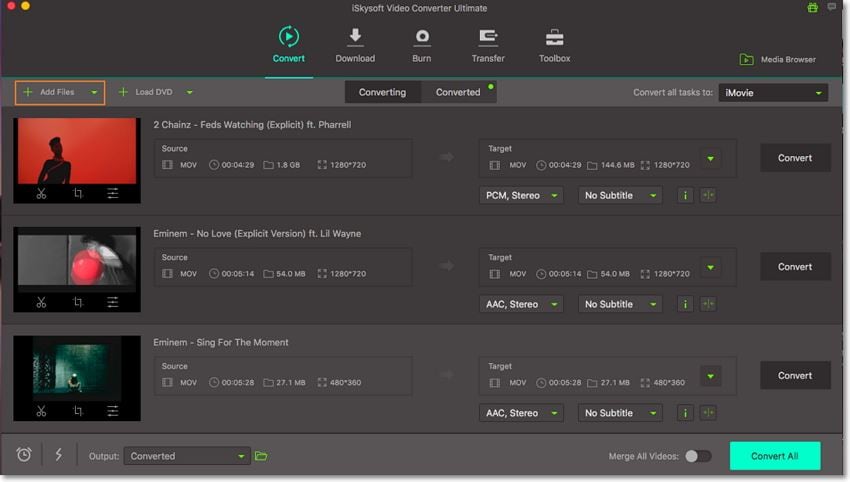
Load WMV to the WMV to FCP converter
First, open iSkysoft WMV video converter. Drag & drop WMV files to the program. Or choose "Add Files" button to locate the WMV files you want to add. BTW, batch conversion is supported. And if you have several WMV files and want to join all of them, you can just turn "Merge All Videos" option on, you'll see all video will be linked together in the list.
Step 2
Select Final Cut Pro as output format
To import WMV to Final Cut Pro, in this step you will need to select Final Cut Pro as the outpur format. You can find it frmo the Editing option. Also select the resolution. The Same as source will keep the original quality.
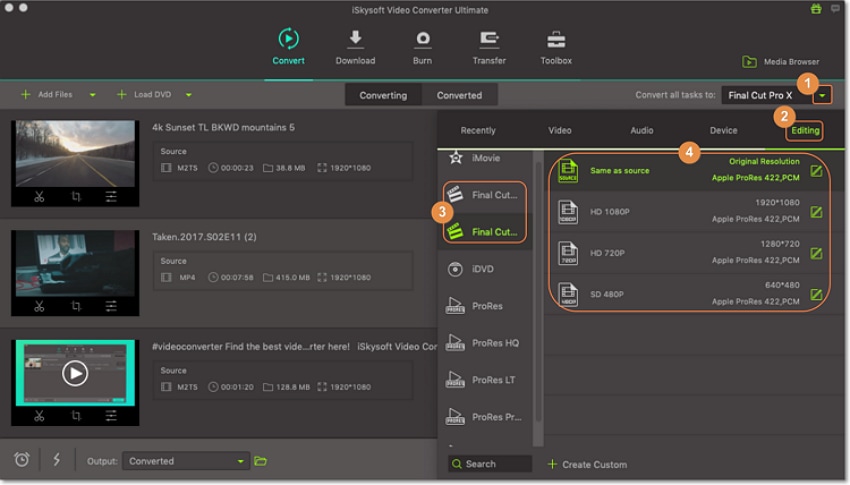
Actually, iSkysoft WMV to FCP converter have the built-in video editor. It enables you to edit the video before conversion. With it you can trim or crop video, add effect and subtitle, watermark to the video as needed. Just click the little Scissor icon below the video to start editting.
Step 3
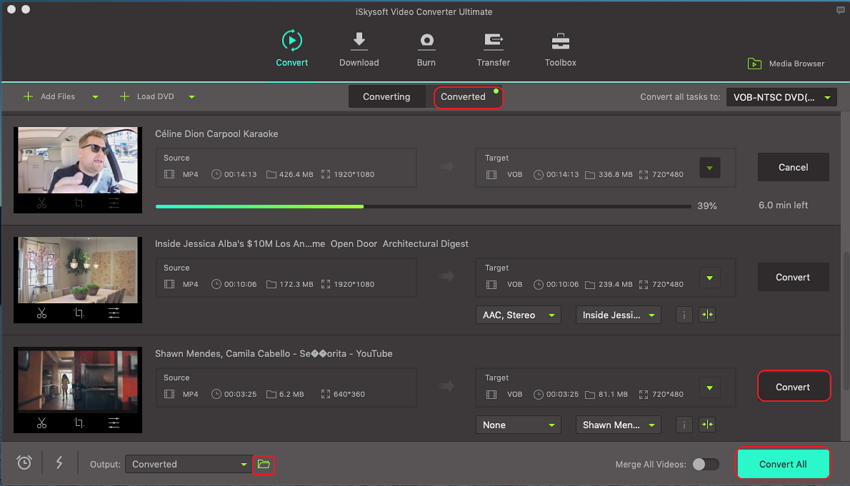
Start the WMV to Final Cut Pro conversion
When you finish the output setting, just click the Convert button to start WMV to FCP conversion with this Video Converter for Mac. It will only take a few seconds to complete. If you don't want to wait around during conversion, this smart program allows you to shut down the computer automatically after conversion. Now you can handle these WMV files and FCP well.
Part 2. How Do I Export Final Cut Pro Video to WMV
Here we bring you the step by step tutorial on how to export video from Final Cut Pro to WMV file format. Let’s explore.
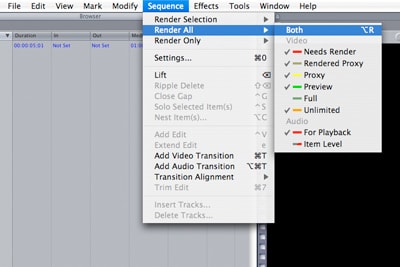
Step 1: If you have assured to give the final editing of the video in Final Cut Pro, ensure to opt for ‘Sequence’ featuring in the top section. After that, go down to ‘Render All’ and click ‘Both’ as it will fetch you video and audio both.
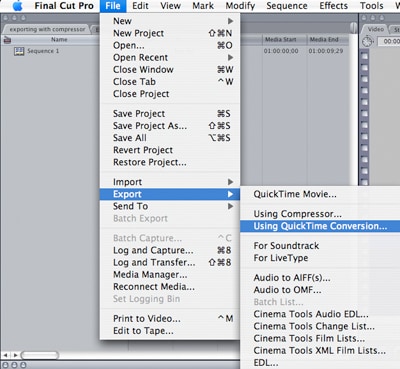
Step 2: Once you are through with the rendering process, opt for the ‘Timeline’ and tap on ‘File’ option available in the top menu. Now, select ‘Export’ followed by ‘Quick Time Conversion’.
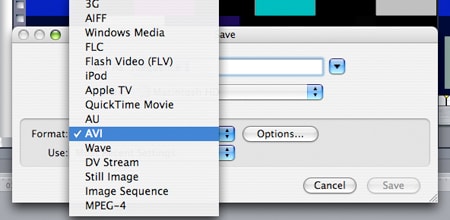
Step 3: You will now witness ‘Save’ option right beside Format. Move your cursor to the respective drop down menu and click on ‘Windows Media’.
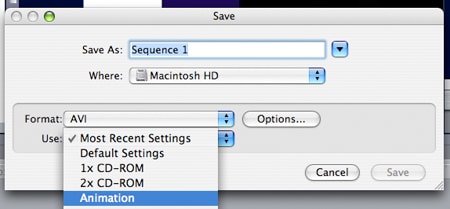
Step 4: Note: It is a must to select ‘Animation’ option featuring under the ‘USE’ section. If you do not, then it can adversely affect the quality of your video. Lastly, hit the ‘Save’.
Part 3. Know More about WMV & Final Cut Pro
1
What is WMV?
In essential terms, Windows Media Video stands for WMV format which came live in 2003 by the house of Windows OS. Further the format was given intensive customization by the “Society of Motion Picture and Television Engineers”. The WMV format is popularly known for its smaller size compared to the other existing video formats. It is crucially helpful for carrying down the processes of network transmissions. But, it’s smaller size stands as boon for the quality of the video is regarded to be merely average.
2
About Final Cut Pro
Ever since Apple’s Final Cut Pro has been opened for all the Operating systems, it has unlocked greater avenues. As it is compatible with a bunch of formats and gives greater features. Read on to know!
Main features:
- Keystroke option useful in enlarging Audio file.
- Easily creates 3D Titles for professionalizing video titles.
- You can simply try various shots and find the best one with its Auditions feature.
- Moreover, the shots and clips are arranged closed thereby eliminating any gaps in between the timeline.
Supported Formats:
- Apple Animation Codec
- Apple ProRes for (all versions)
- Apple Intermediate codec
- AVC-ULTRA(including AVC-LongG
- AVC-Intra Class 50/100/200/4:4:4,and AVC-Intra LT
- AVCHD (Which includes AVCHD Lite, AVCCAM and NXCAM)
- DVCPRO HD
- iFrame
- HDV
- DV (DVCPRO50, DVCAM,DVCPRO)
- Motion JPEG (Which open DML only)
- QuickTime formats
- MPEG IMX (D-10)
- Uncompressed 10 bit 4:2:2
- REDCODE RAW (R3D)
- Uncompressed 8 bit 4:2:2
- XDCAM EX/HD/ HD422
- XAVC (including XAVC-S)
- XF-AVC
3
Why Can't I Import WMV Files into Final Cut Pro?
For Mac users, .wmv files seem to be those on the other end of various video formats they can work on in Final Cut Pro. After all, .wmv files were made to run and be used perfectly in Windows PCs, not on Mac-powered computers. Given this fact, an error or two will most likely appear if you try to import or edit your .wmv videos in Final Cut Pro. Some of such errors are discussed below:
1. What could I do when Final Cut Pro successfully loads my entire .wmv video, but it isn't editable?
As you must have read previously, the .wmv wasn't made for Mac systems. It is Windows' main video format and because of that, there's a very high probability that it won't work as flawlessly as .mov files work on Mac systems and software. Conversion to another video format supported by Final Cut Pro would be the best thing to do if you encounter this problem.
2. My .wmv file is successfully imported, however, the audio is present but the video is not. What can I do to fix this problem?
This problem seems to be rooted in the codecs used in making the .wmv video that you want to import to Final Cut Pro. It is able to detect the audio codec and use the proper audio decoder that's why the import finishes successfully and the audio present. The reason for the video component's absence is Final Cut Pro not being able to decode it. In other terms, it failed to process your video, hence it doesn't show. A workaround for this is to convert your .wmv file to another format, preferably the .move format, using a video codec that can be processed by Final Cut Pro.
3. How do I solve a problem where every time I try to import my .wmv file, I get an error saying "No importable files - None of the selected files or folders can be imported. Change the selection and try again"?
The error message appears because Final Cut Pro doesn't have the right codec for your .wmv file's audio and video. It cannot decode any of its components, thus, it says that you cannot import it at all. The only solution you can resort to is to try to convert your .wmv video file into something else that'll work fine with Final Cut Pro. You would probably want to convert it to the .mov format using a codec supported by Final Cut Pro.
Related Articles
This article will introduce how to convert MKV to MOV on Mac and Windows so that you can smoothly play or edit your video on a Mac computer.
If you want to extract WAV from MOV, then the 7 ways to convert MOV to WAV listed in this article can help you a lot. Let's check them out!
If you find it difficult to play FLV videos on QuickTime, then the most effective way to solve it is to convert FLV to MOV. Read this post and you can turn FLV to MOV easily.
This tutorial introduces 3 viable solutions to convert MOV to WMV in Mac and Windows 10 by using the helpful MOV to WMV converters.
WMV
- 1. Convert WMV to Other Format
-
- 1.1 Convert WMV to MP4
- 1.2 Convert WMV to MP4 Mac
- 1.3 Convert WMV to MP4 Online
- 1.4 Convert WMV to MOV
- 1.5 WMV to MOV Converter Online
- 1.6 Import WMV to Final Cut Pro
- 1.7 Convert WMV to MP3
- 1.8 Convert WMV to AVI
- 1.9 Convert WMV to GIF
- 1.10 WMV to MKV Converter Online
- 1.11 WMV to WMA Converter
- 1.12 Convert WMV to Apple
- 2. Convert Other Format to WMV
- 3. WMV Tools & Tips
Brian Fisher
chief Editor