


The deletion of windows updates made with the aim of freeing up some space from the hard drive. The process of windows updates work silently in the background with the frequency set by the windows user. 32 Bit of windows 7 and 8 require 16 GB of available hard disk space. On the other hand, 64 Bit of windows 7 and 8 require 20 GB of free space. It is always recommended to have free storage space of 30 to 50 GB on the partition where you want to install windows. But sometimes, these windows update consume lots of hard drive space or sometime cause problems. Here in this article, we will talk about best ways to delete windows update files in Windows 7/8/10.
Part 1. How to Delete Windows Update Files Using Command Prompt
Deleting windows update files using command prompt is not an easy task for the layman. It requires extra technical skill to delete files with cmd. This process is only for the person who has technical knowledge. If you have then, you can follow below steps to delete windows update files using the command prompt.
Step by Step Guide to Remove Windows Update Using Command Prompt
Step 1: First of all, click on "Start" button and type "Command prompt" or "cmd" without quotes (") and hit "Enter" button.
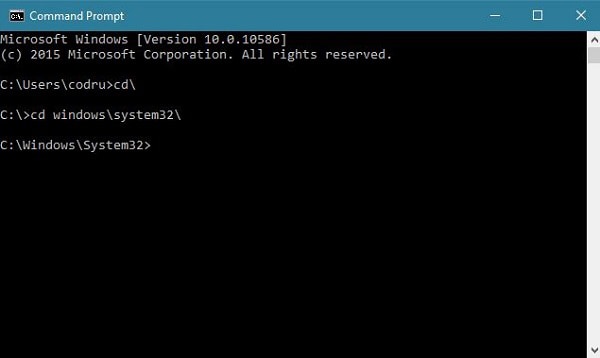
Step 2: Type "cd/" then Hit "enter" and type "cd windows\system32\" and press "Enter" button again.

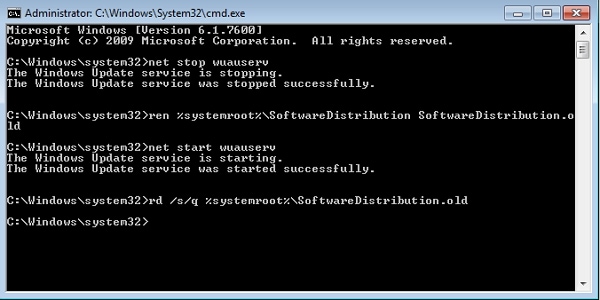
Step 3: Now, enter "net stop wuauserv" and press "Enter" button.
Step 4: Type "ren %systemroot%\SoftwareDistribution SoftwareDistribution.old" and hit "Enter" button.
Step 5: Once the above process completed, type "net start wuauserv" and press "Enter".
Step 6: Type "rd /s/q %systemroot%\SoftwareDistribution.old" and press "Enter" button again.
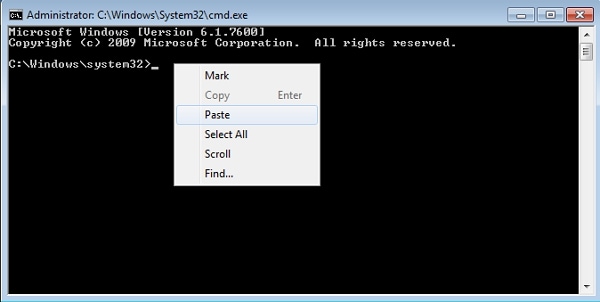
Note: All you have to copy and paste these commands from here into command prompt without any quotes (").
Part 2. How to Delete Old Windows Update Files Using Windows Explorer in Windows 10/8/7
If your computer is running on Microsoft Windows 7, 8, or 10 then, you can follow below steps to delete old windows files. This process of deleting windows update file is very easy there is no need for extra technical skill. Any non-professional can easily perform such steps without consulting an expert. This method will show you how to delete old windows update files using windows explorer in Windows 7, 8, and 10.
Step by Step Guide to Delete Old Windows Update Files Using Windows Explorer
Step 1: At the first step, click on "Start" button at the bottom left of the screen.

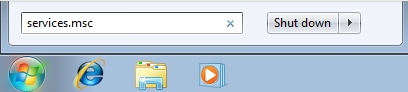
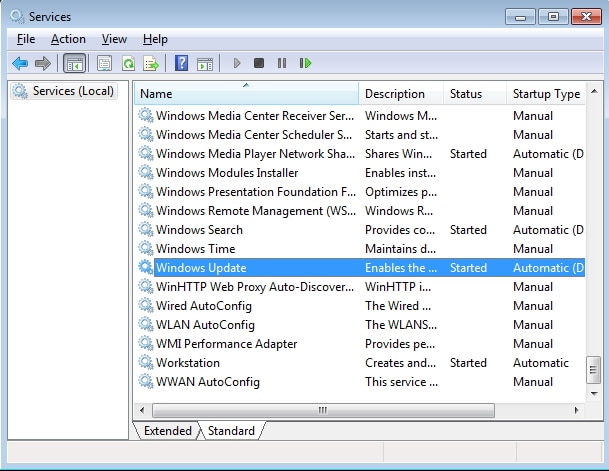
Step 2: Then, type "services.msc" without any quote (") and press "Enter" button.
Step 3: Services window will appear, you have to scroll down to find Windows Update. Double-Click on it to open.
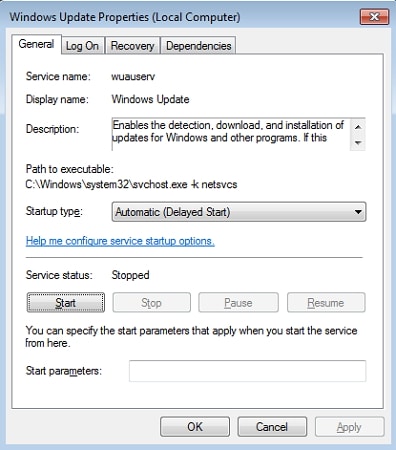
Step 4: Windows Updates properties dialog box will appear, click on "Stop" button under services status to stop windows update.
Step 5: Click on "Start" button again. Now, you have to type "C:\WINDOWS" and press "Enter" again.

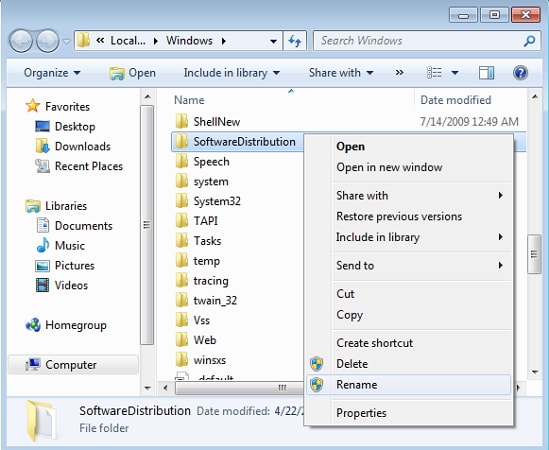
Step 6: Windows Explorer will appear, now locate "SoftwareDistribution". Now, right-click on "SoftwareDistribution" and click on "Rename". Then, change the name to "SoftwareDistribution.old" and press "Enter" button.
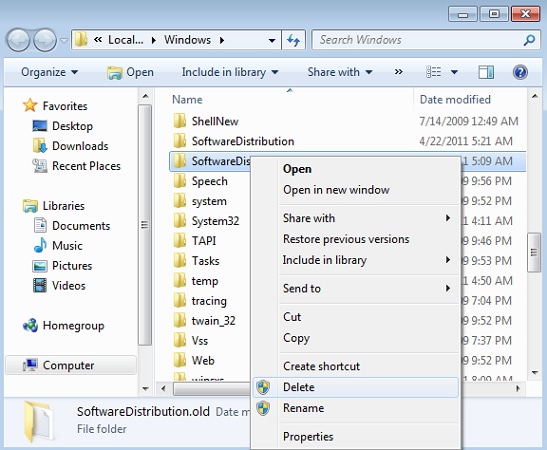
Step 7: Now go back to Windows update properties (Local Computer) and start the service by clicking on "Start" button. Once the windows update service started, it will create a new folder named as "SoftwareDistribution". You have to delete "SoftwareDistribution.old" Folder by click on Delete option.
Part 3. How to Delete Windows 10 Update Files in Control Panel
Uninstall or delete windows update files is very easy with the control panel. Control panel is an integrated part of Microsoft windows series that allow the user to manage the computer. Getting engaging with control panel, one can manage hardware, software, internet, System security and much more. You can also upgrade or downgrade your system software using Control panel. Here, we provide you steps to delete windows update files using control panel.
Step by Step Guide to Delete Windows 10 Update Files in Control Panel
Step 1: Firstly, you have to open Windows 10 "Settings app" by pressing Windows + I shortcut key. Or you can open it from the start menu.
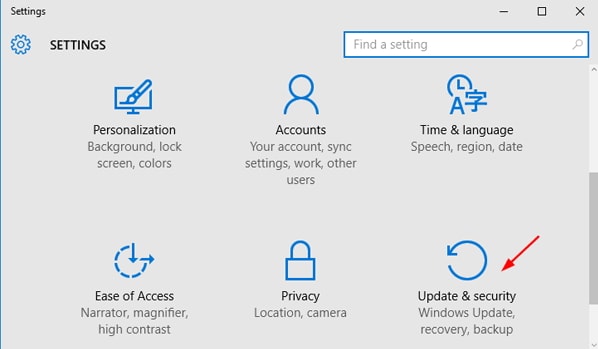
Step 2: Now, setting app window will appear. Here, you will see several options. You have to open "Update and Security" by clicking on it.
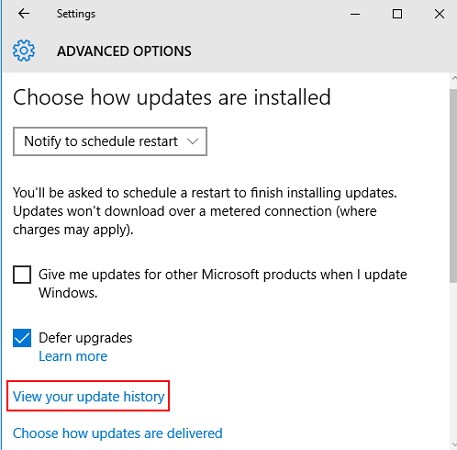
Step 3: You have to click on "Windows Update" and then, hit on "Advanced options" under Windows update. Then, you can click on "View your update history" at the bottom left of the screen. This will show you installed updates on your computer.
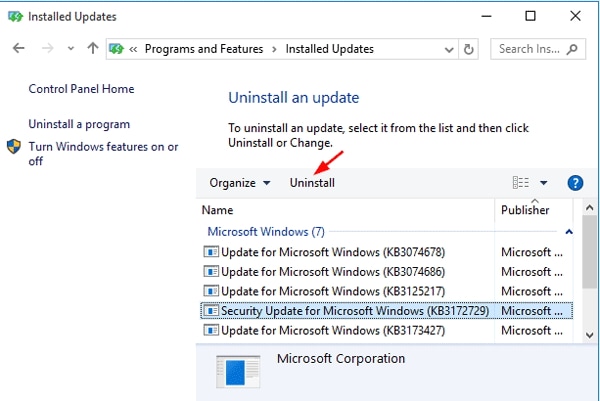
Step 4: You have to click on "Uninstall an update" to delete windows update files from your computer. Now, control panel window will appear with all installed update list. To uninstall these updates, click on update file and hit on "Uninstall" button.
Part 4. How to Recover Deleted Files on Windows 10/8/7

Recoverit for Windows is an all-in-one recovery tool that is designed for both Windows and Mac operating system. The main purpose of this tool is to rescue file as smooth as possible. This recovery tool allows us to retrieve deleted, lost, or corrupted files back in a single go.
Why Choose This Deleted File Recovery Software:
- One can restore any kind of files such as images, videos, document, email, archive, and many others.
- It can recover file from the storage device with file system FAT32, FAT16, NTFS, and exFAT.
- For instance, you can preview thumbnail of images and video before recovery.
- It can perform in-depth scanning to capture all previously deleted files on the storage device.
Easy Steps to Recover Deleted Files on Windows 10/8/7
Getting engaging with this tool, you can recover photos, videos, document, audio, email, and any other type of file. It doesn't matter your data is lost from hard drive, SSD, memory card, media player, or any other storage device. Recoverit has a capability to recover files from any of these storage devices.
Step 1. Install the Software
First of all, you have to open a web browser such as Google Chrome or Internet Explorer and navigate to iSkysoft official website. Now, download Recoverit for Windows and install it on your computer. Go to desktop and double click on its icon to launch this application on your Windows PC.
Step 2. Select the File Types and Location
In the main window, you have to select the file type that you would recover. Here, you will see file types such as Photo, audio, video, document, email, and others. Now, select the location where your lost file is placed such as Hard drive, desktop, recycle bin, portable device or any other device. Then, click on "Start" button to start the scanning process.

Step 3. Select the File Types and Location
After the above process completed, you can preview the files before recovery. For example, you can see thumbnails of images or video. You can click on "Recover" button to recover the original file of ant type.


