Embed this infographic on your site:
What is Time Machine Backup
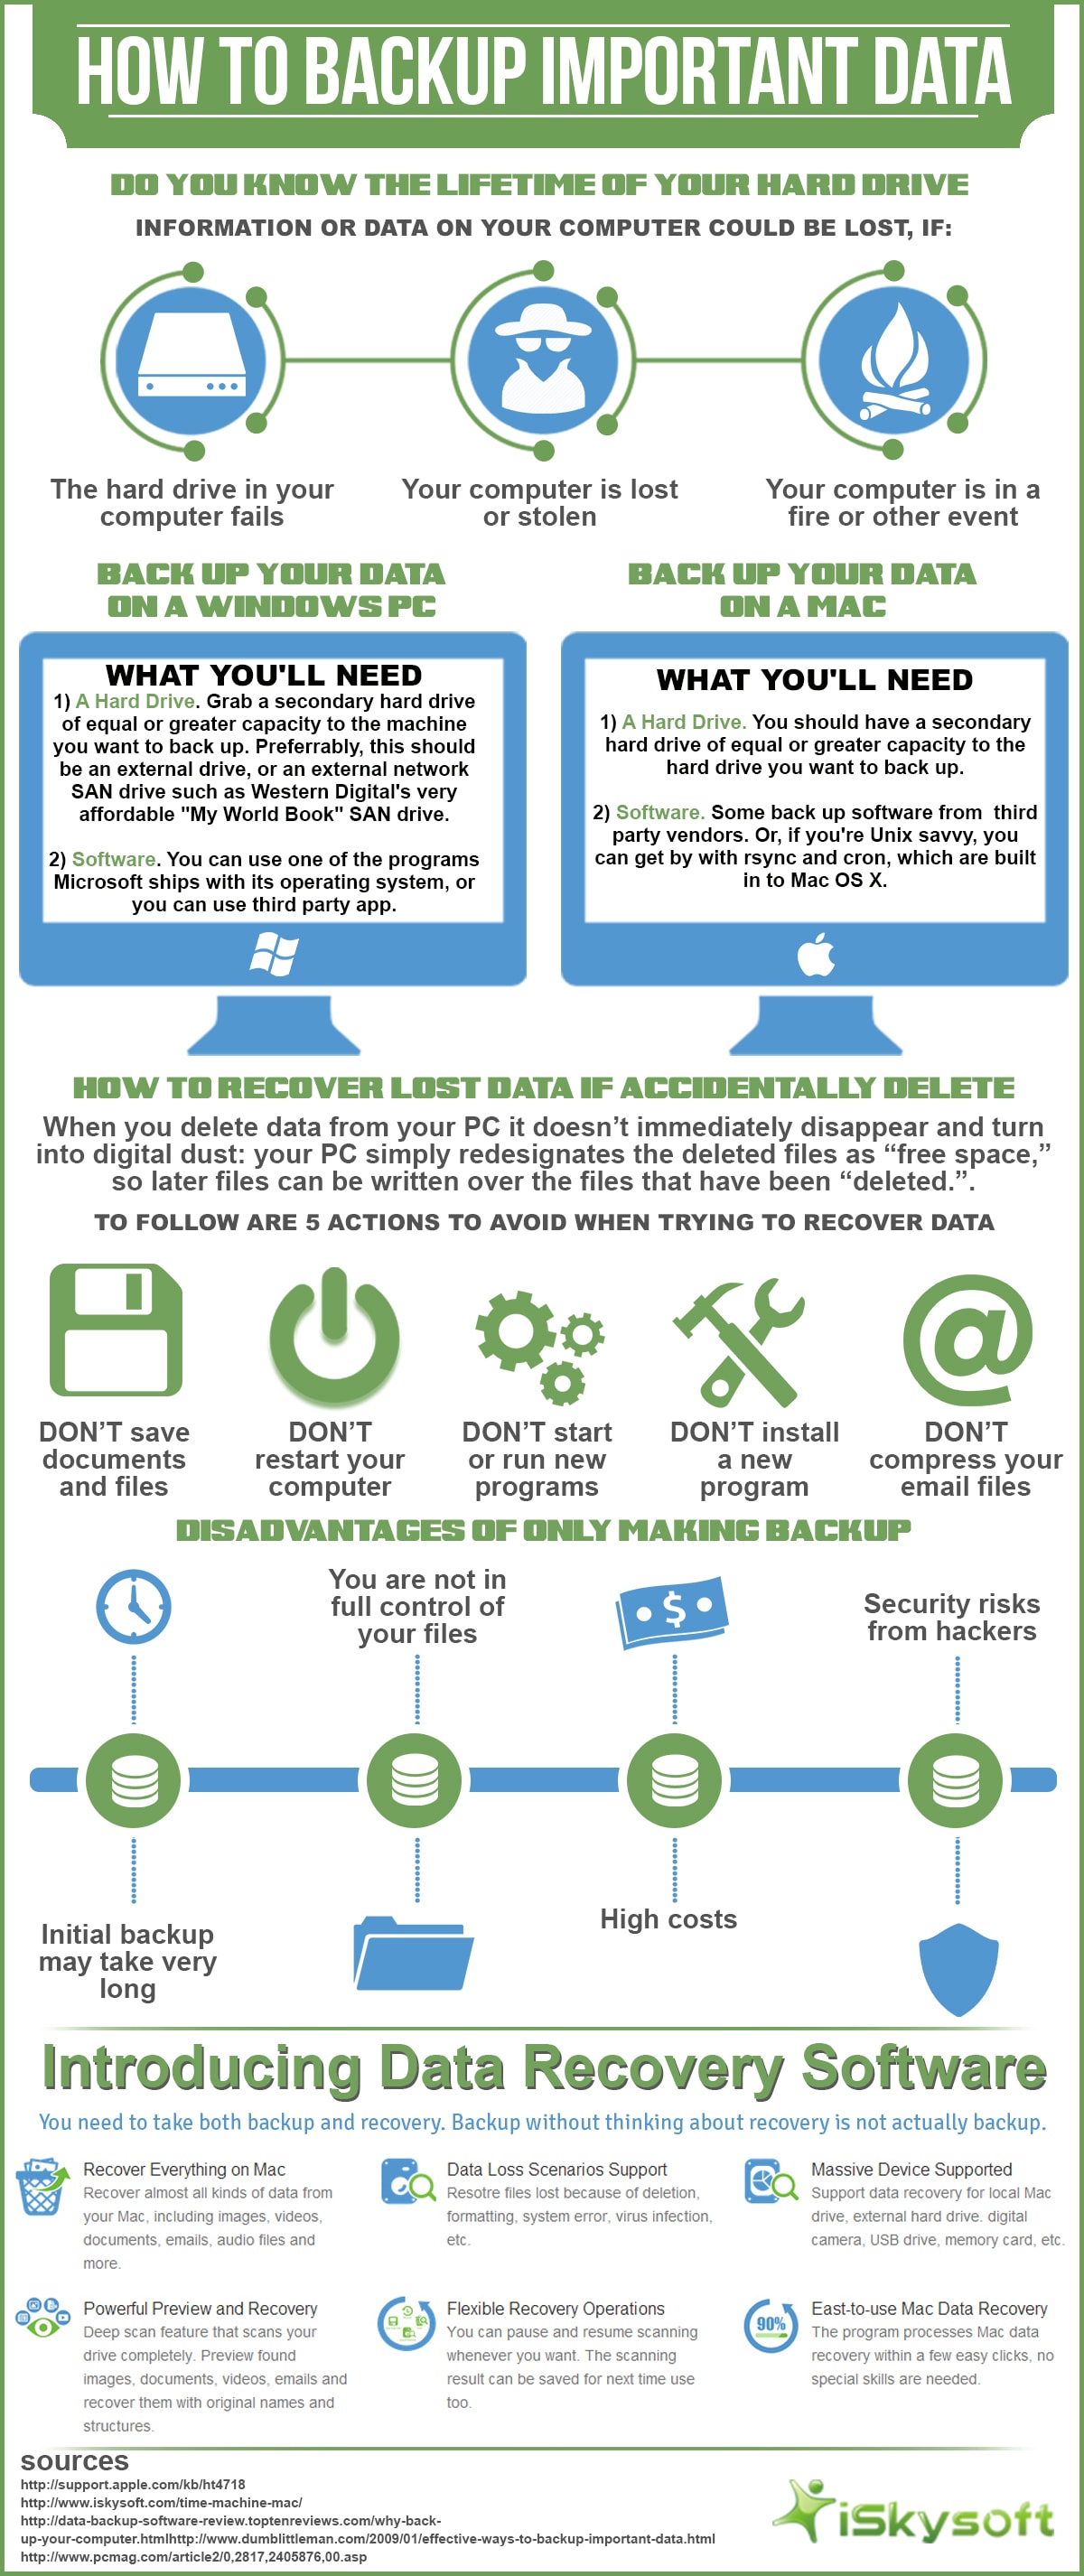
Making backup of important data is always a necessity but people always forget to. For Mac users, there’s a great application called Time Machine that is able to create backup of your Mac files, applications, folders, volumes and even the whole Mac system.
The most wonderful feature of Time Machine is that it automatically backs up your Mac everyday as long as the backup drive has enough space, so that you can select the version of the files that you want to restore depending on your need. With Time Machine backup, you’ll never be worried about losing important data from your Mac.
What can Time Machine backup
HFS + disks and partitions on Mac, as well as connected hard drive, USB, FireWire with HFS + system too. You can backup everything on your Mac, including Mac system, applications, accounts, preferences, emails, music, photos, audios and documents with Time Machine after activating it.
The space of a Time Machine
Since Time Machine would probably backup the entire Mac system and it updates every day, the backup can be very big. This is the reason why it’s strongly suggested to select a drive which is two times bigger than the system drive as the Time Machine disk.
The schedule of Time Machine
After the first set up, a Time Machine backup will be created. Normally, Time Machine works hourly (if your Mac is on and the drive is working). You can also click the “Backup Now” on the Time Machine icon bar to backup immediately.
The needed time of making a Time Machine backup:
It’s hard to tell. The backup time depends on the amount of data, the data transferring speed of your drive. Normally, the less files and the better drive speed, the faster.
Click here to view the official explanation of Time Machine.

Basic Time Machine Knowledgements
How to exclude data from Time Machine backup
To see Time Machine backups, you can input “Time Machine” in spotlight or select “Enter Time Machine” from the icon bar. Here you can check all Time Machine backups.
- Click the "Options" in the Time Machine preference.
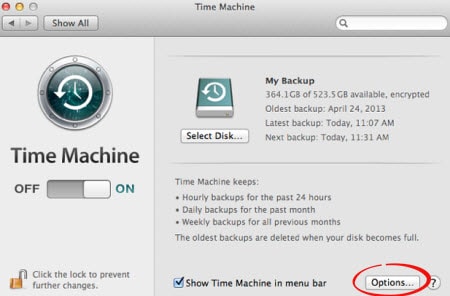
- Select "+" to add files you want to exclude then click “Done”
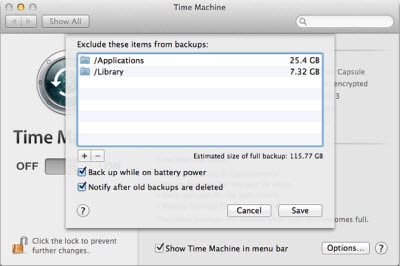
After the two steps, a new backup will be created automatically in 120 seconds and the excluded files won’t be contained.
Please note that if the Time Machine backup drive is not connected with your Mac, the whole backup will be excluded and you can’t exclude data from it.
How to see time Machine backup
o see Time Machine backups, you can input “Time Machine” in spotlight or select “Enter Time Machine” from the icon bar. Here you can check all Time Machine backups.
How to delete Time Machine backup
Actually, there’s no need to delete Time Machine backup if you just want to free space, because Time Machine will automatically delete the old one every time it makes a new backup. But if you do want to delete the Time Machine backup on local disk, you can:
- Search Backups.backupdb in finder or open backup drive using Finder and then drag the backup to trash. But if there’re more than one backup on that drive/partition, you’d better check the one that you want to delete.
- Come to “Star Wars” display of Time machine and select a single backup to delete.
Note: If the backup is set on an external hard drive, you need to make the drive connected with your Mac.
How to copy/transfer Time Machine backup to another drive/partition
This is easy, you just need to find the local backup file from finder and copy it to other place. But it’s not suggested, because as the backup grow bigger, it takes much time to transfer it and you can easily make a new backup on another partition or hard drive.
If you do want to copy it to another drive, please remind:
- The transfer might bring data corruption
- You can’t add two different backups together
- You can only transfer the whole Time Machine backup
Time Machine Icon on Menu Bar/Dock
Time Machine Icon in Menubar
The Time Machine icon in the menu bar allows you to launch the application to backup and restore even if it's closed.
If you haven't set this icon, you can go to Time Machine > System Preferences and switch Time Machine’s status to activate it.
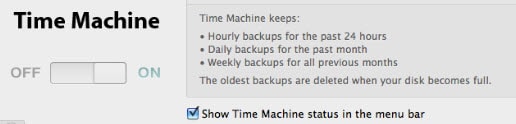
Click the “Show Time Machine status in the menu bar”, you can back up your Mac to the application whenever you want to.
This icon allows you to “Backup Now”, “Enter Time Machine” and “Open Time Machine Preference” directly.
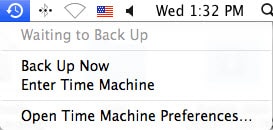
- The first part of the bar shows the stat of the last Time Machine backup;
- Click “Backup Now” you can make TM backup immediately;
- “Enter Time Machine” allows you to check the detail of Time Machine backups and restore data from it;
- “Open Time Machine Preference” helps you to enter the preference of Time Machine application;
The TIME MACHINE Icon in your Dock
Directly click the application icon, you’ll enter Time Machine backup interface.
If you right click or ctrl + click it, you’ll get options like “Open Time Machine Preference”, “Backup Now” and “Browse Other Time Machine Disks”.
How to Backup Mac with Time Machine on Local Drive
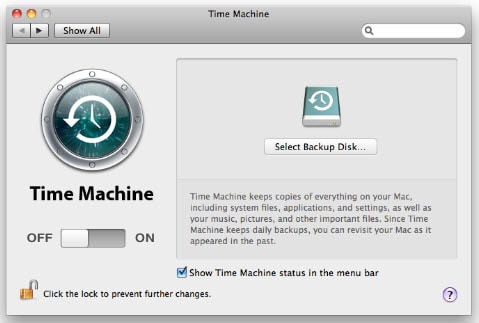
It’s quite easy and simple to backup Mac with Time Machine. Please follow the below steps to set up Time Machine backup on Mac.
Step 1 Launch “Time Machine” application by inputting “Time Machine” in “Spotlight” or from the Application folder.
Step 2 Click “On” to activate the backup and you need to "Select Backup Disk" to set as backup drive. The startup drive can’t be chose here. You’d better select another local drive, or any external hard drive, USB, as well as FireWire disk and Apple Time Capsule to create the backup disk.
Set Time Machine backup on external hard drive or FireWire drive
It’s quite easy and simple to backup Mac with Time Machine. Please follow the below steps to set up Time Machine backup on Mac.
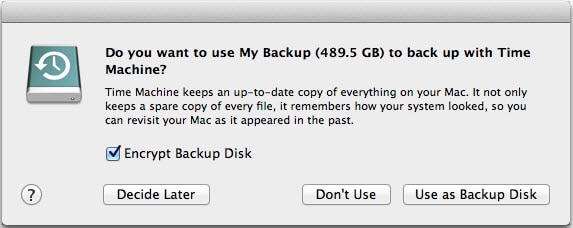
Enter Time Machine preference and connect the drive to your Mac. If it's the first time you setup Time Machine backup on your Mac, you'll get a notification asking if you with the drive as the backup drive. Select “Use as Backup Disk" and then the backup will automatically start.
Note: If you’re going to select external hard drive as Time Machine backup drive, it's better to get a drive with twice the capacity of your system disk.
Frequent question about setting Time Machine backup on external hard drive:
1 Making more than 1 Time Machine backup on a drive: This can be done. But it’s better to save two backups on different partitions.
2 Set Time Machine backup on a drive/partition with data on it: You can transfer data and clear the drive/partition before making backup on it. In a word, it’s better to keep an empty partition on your drive.
Create Time Machine Backup Using Time Capsule
You can also make Time Machine backup with Time Capsule if you have an AirPort Time Capsule on your home network.
- Set Time Capsule on your Mac (How to set Air Port Time Capsule on Mac)
- Click “Select disk” after opening Time Machine preference.
- Select the AirPort Time Capsule as backup disk.
Note:
1 If you want to use Time Capsule to store other data, you’d better separate the internal disk of Time Capsule to different partitions and choose one of the partitions as the Time Machine backup disk.
2 When you’re going to make Time Machine backup on Time Capsule or restore from it, please make sure it’s well connected with your Mac
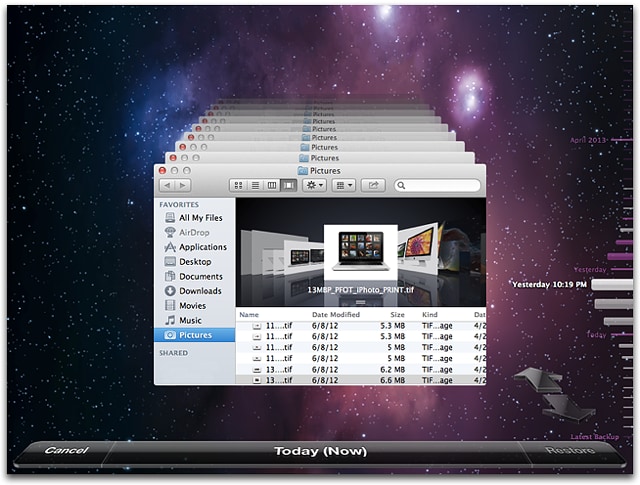
How to Restore Files with Time Machine
To restore from Time Machine backup, you need:
Enter Time Machine backup from the menu bar icon or spotlight or application folder. You can see a backups listed in “go back in time” mode. They’ll be listed according to time line. The timeline shows the times of all backups on your backup drive.
Timeline shows the times of all backups on your backup drive.
If you’re going to restore a specific item or folder, you just need to select a specific backup, and preview file you want to restore: just highlight the file and press the Space Bar to bring up a quick look.
Then choose the item or folder and click the "Restore" button. The item will be restored to the desktop or folder.
Note: If the restored item has another file with same name in its location, you should choose which file to keep or keep both.
How to Restore the Whole Mac System
To restore the whole Mac system from Time Machine backup, you need:
- Reboot your Mac from the recovery partition by pressing (and holding down) Command + R at startup.
- Then the OS X utility window will be shown in the window. Please select “Restore From Time Machine Backup”.
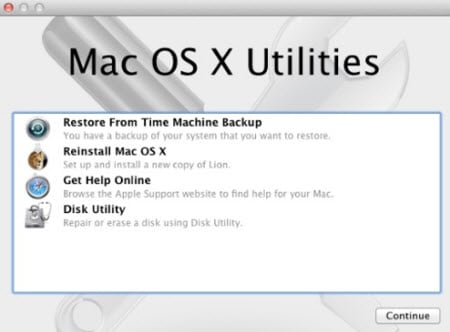
- Click “Continue” and then select the Time Machine backup drive.
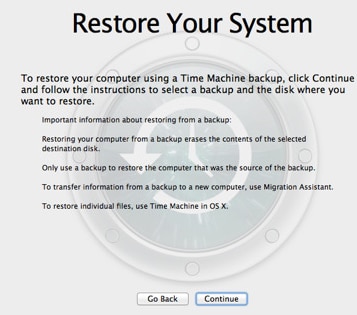
- Choose the backup that you want to restore from and follow the rest operations. The Time Machine backup will restore your whole system then.
Note:
1 Restore the whole system will remove old data on your system disk, please ensure there’re no important data on the drive.
2 If the backup is set on external disk, please make it connected.
Restore (new) Mac from other Time Machine Backup
To restore Mac from other Time Machine backup, you need:
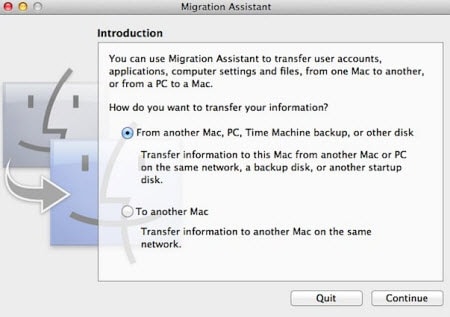
Step 1 Launch Migration Assistant from Utility folder or spotlight, you’ll see a window as below. This application helps you transfer data from one Mac and Time Machine to another one.
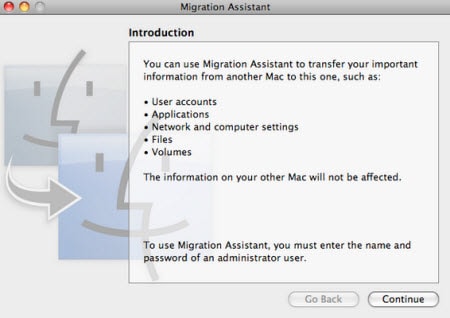
Step 2 Select “From another Mac, PC, Time Machine back up, or other disk” and click “Continue”.
Step 3 Click “Continue” to quit other running applications.
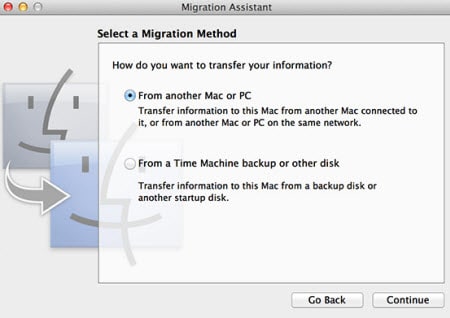
Step 4 Then Choose “From a Time Machine backup or other disk” and click “Continue”.
Step 5 Select the Time Machine backup drive and choose files or the whole backup, then click “Continue” to start restore from other Time Machine backup.
Tips about Using Time Machine Backup
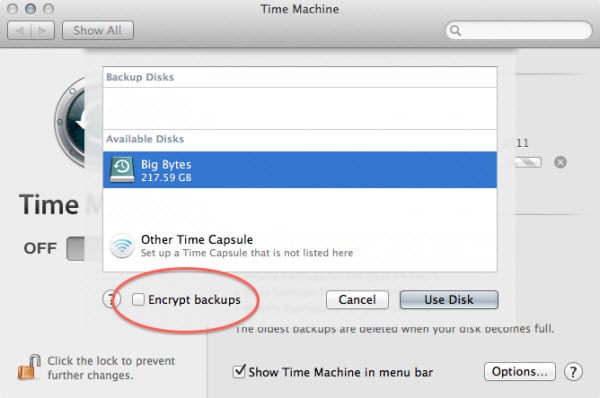
Encrypted Time Machine Backup: You can encrypt the backup and complete backups when the Mac is in Power Nap. ou can enable "Encrypt backups" after entering Time Machine's preference.
Time Machine Notification: If it's the first time you use Time Machine backup, a notification will be displayed in top right corner after the first backup is complete, or if any issues arise during the initial backup.

External Time Machine Backup Drive: If you’re going to select external hard drive as Time Machine backup drive, it's better to get a drive with twice the capacity of your system disk. Connect the drive to your Mac.
Devices Support Time Machine Backup: Time Machine works fine with external hard drive, USB (which is the cheapest), FireWire and Time Capsule (using Wi-Fi connection).
Restore File from Time Machine Backup: If you want to restore an item from Time Machine to a different location on your drive, you can right click it and choose "Restore to...", then you can select a destination from the popping up Find window. Otherwise, the file will be restored to the original location.
Restore Mac from Different Time Machine Backup: Time Machine also allows you to restore data from a different Mac to a new one. Just connect the drive with Time Machine backup and select restore from Time Machine backup on the new Mac.
Mac Time Machine not Backing Up: This happens for different reasons, such as the drive doesn't have enough space, backup volume can't be mounted, files can't be backed up, etc. When facing these erros, you can try another drive or just exclude files which can't be backed up.
For more Apple Time Machine troubleshootings, you can visit this page. It offers solutions for almost all Time Machine issues.
Time Machine Doesn't Support Windows Drive: If your drive is a NTFS or FAT one, which is not supported by Mac OS X, you'll need to erase drive to make Time Machine backup on it. This process will remove all files on the drive.
Common Backup Failures
A Time Machine can’t be set on the drive: When this issue happens, please make sure your disk has enough space for the backup, also check that the external hard disk or FireWire drive is connected with your Mac
B Initial disk issue: If it’s the first time your set your drive as Time Machine backup drive, please ensure it’s a OS X supported disk (normally with HFS + data system). Normally format your drive can solve this problem.
C "Aborting backup because indexing a file failed": Usually, wait for next backup schedule or select “Backup Now” will solve this issue. Otherwise, there might be something wrong with that file. You can find that file from finder and check what’s wrong or directly remove it, and then the backup will continue.
D Backup is slow: It’s slow might because there’re too much data, the data transferring speed is slow when using external hard disk or FireWire as backup disk, or the space on backup drive is not enough. You can wait or clean backup disk.
E Unexpected delete backup: This is because the system is automatically deleting or thinning the backup. As we all know, the backup keeps growing as we use the Mac. It’s not a big problem.
F "The backup disk is full," or "This backup is too large": When this messages shows, the space on your drive might not be enough for a new backup. You’d better select a bigger drive to create new backup or delete needless data on that drive.
Disadvantages of Only Making Backup
Though creating backup of important data using Time Machine, or Time Machine alternatives like cloud backup and other software is a great way of avoiding data loss, there’re still disadvantages.
- Backup might fail while using third-party backup software or online backup services due to internet condition and some other reasons.
- Some users might forget using Time Machine to create backup or don’t want to use it because it takes too much space.
Data Backup and Restore
Actually, you need to take both backup and recovery seriously. Backup without thinking about recovery is not actually backup, and backing up is just the very first step. When disaster like data loss happens, and you don’t have backup or the backup fails, there’re several tips for you to keep in mind:
- Files are not really lost from your drive. When they’re lost or deleted, they’re not permanently removed. They’ll be marked as inaccessible data and awaiting new data in the drive to overwrite them. The truth makes it possible to recover your precious files without Time Machine backup or other backup formats.
- The priority to get lost files back is to stop using your drive or device as quick as you can. Any minor activity on the drive might cause data overwritten.
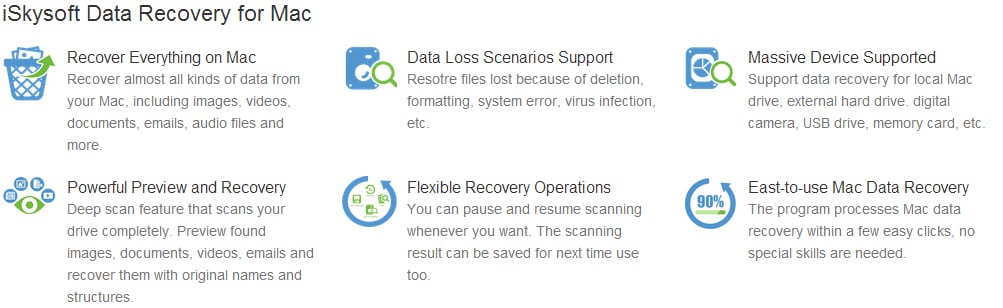
- Then you can look for a reliable and powerful Mac data recovery utility from the internet. Here I would like to recommend iSkysoft Data Rcovery for Mac for you, which has helped thousands of Mac users to reclaim their lost, deleted, formatted and even corrupted files from Mac device, external hard drive, USB flash drive and many more devices with ease.
- About Data Rcovery for Mac