


So You've decided to sell your iPhone for a little extra cash? Or maybe you want to switch teams and play for Android. Or maybe you just want to get the new iPhone 7 and want to offload the old one. Whatever the reason, we hope you know that you can't just meet a buyer and hand over the cell phone in exchange for cash.
While the end point may be that you will indeed hand over the device for cash, there are several things you need to do to prepare to sell iPhone. You prepare your device for sale so as to avoid your personal information getting into the wrong hands. Keep in mind that you do sign in to almost every service so there is login information to be cleared as well as other data that you don’t want the final buyer to be privy to. Don’t have an idea as to how to prepare the iPhone for sale? Worry not! This article will show you exactly what needs to be done. Let’s begin by erasing all the data on your device.
The Full Guide to Safely Prepare to Sell Your iPhone
Part 1 Erase All Data on iPhone
This is the ultimate 1st step when you want to sell your iPhone. But depending on how much data you have on your device (and we are sure it’s a lot) it wouldn’t make sense to try and delete the files one by one. Not only is this completely counterproductive, it is also time consuming and we are sure you don’t want to spend hours deleting files from your device. It is also very likely that you could miss some files.
That is why we recommend using a data eraser program such as iSkysoft dr.fone - Data Eraser for Mac (or iSkysoft dr.fone - Data Eraser). This program is specifically designed to erase all data from your device in one easy click. It is also the ideal tool to use in this case simply because all the data that is erased using this program is 100% unrecoverable. This gives you an added security blanket, ensuring that the data you delete will never be seen by anyone.
Key Features of dr.fone - Data Eraser:
- It allows you to erase data on your device in a few simple steps and in no time at all.
- The data erased using dr.fone - dr.fone - Data Eraser for Mac is unrecoverable even by some of the best data recovery software in the world.
- By allowing you delete private information such as login details, emails and browsing history, dr.fone - dr.fone - Data Eraser for Mac guarantees your security.
- It can also be used to erase junk files form your device and may come in handy even after you sell your device. You can use it to regularly clean the new iPhone and create more storage space or improve the device’s performance.
Step-by-Step Guide to Delete All Data from Your iPhone
Step 1. Download and install dr.fone - dr.fone - Data Eraser for Mac to your computer and then follow these very simple steps to erase all data on your iPhone. Once you launch the program, connect the iPhone to your computer using USB cables. The program should detect the device and display information about the device.
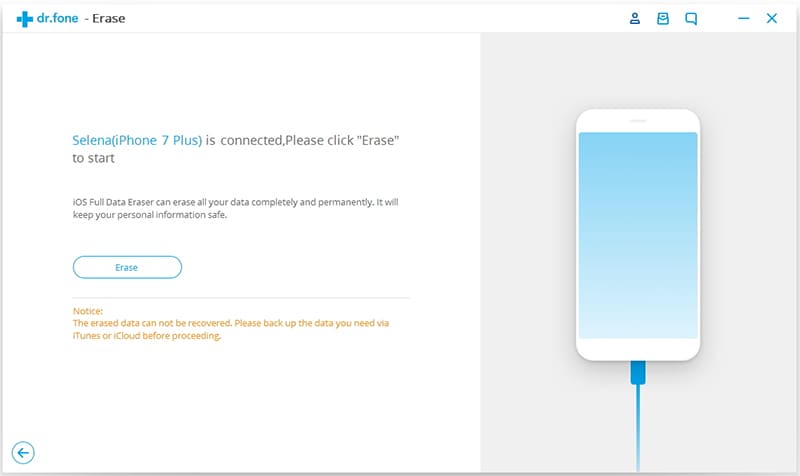
Step 2. To erase all the data on your iPhone, select the "Erase All Data" option from the options on the left side.
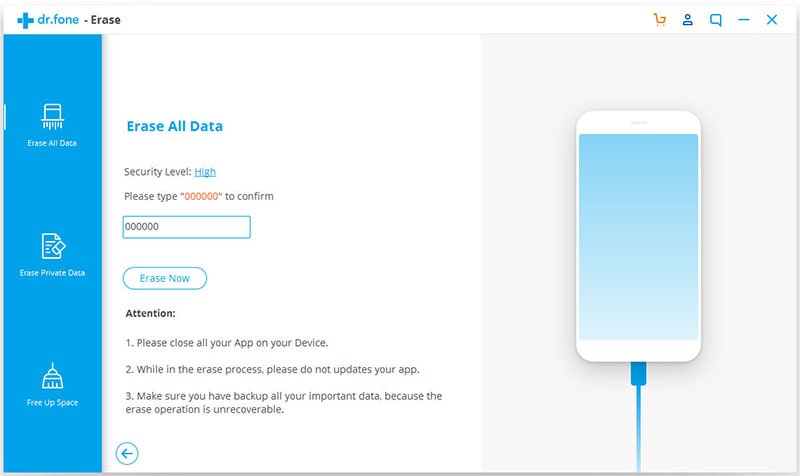
Step 3. Click "Erase Now" and then type in the word "delete" in the text box displayed. This is just to confirm that this is what you want to do. Click "Erase Now" again and all the data on your device will be completely erased.

When the process is done, you should see a conformation window indicating that all data has been erased. Keep the device connected through the entire process. Next, we are going to take a look at a number of other things you should do to prepare your device for sale. All of them are important in ensuring that the iPhone is ready to be transferred to a new owner singe they ensure that the device is not linked to you in any way.
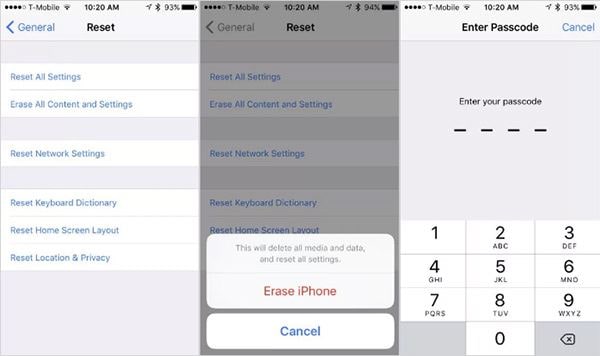
Note: We should also mention that if you decide not to use a third-party program to erase all data on your device. you can still do it by using the “Erase all Contents and Settings” setting on your device. It may not be as effective as dr.fone - dr.fone - Data Eraser for Mac and the data may be recoverable, but this is a logical place to start when you want to sell your device.
To erase all data on your device in this way you need to go to settings > General and then scroll down to find "Reset". Next, tap on "Erase All Contents and Settings". You may need to enter your passcode to complete the process.
It is recommended that you complete this process only after creating a backup of the data on the device to iTunes. We know that you want to sell your device, but you may need this data later on when you are setting up your new device. It will be easier when you have a full backup of the data on your old device.
Part 2 Disabling Find My Phone
Disabling Find my iPhone is another really important thing you must do. It is really easy to so this on your device. You can do it by simply going to Settings > iCloud and then tap on the "Find My iPhone" button "OFF". Complete the process by entering your iCloud password.

Part 3 ID Wiping
If you are using the iPhone 6 or iPhone 6 Plus, any credit cards and fingerprints you may have been using will be disabled when you erase all the contents and settings. It is also very likely that you may get a number of emails from your bank notifying you that your credit card has been deleted from Apple Pay.
If you want to wipe your ID and Apple Pay credit card manually you can do that by going to Settings > Touch ID & passcode and turn everything off.

Remember that your iPhone can still store credit card numbers for some Safari Web transactions. You can erase these by going to Settings > Safari > AutoFill > Credit Cards.
Part 4 ESN/IMEI/MEID
Because buyers of used iPhones want to avoid purchasing stolen devices or devices that are under contract, they will often check the IMEI number to be sure. The IMEI number is a unique 14-digit code that identifies your device, you can view it by going to Settings > General > About > IMEI or MEID.
If you bought your iPhone outright (without a contract) or have completed paying for the contract, the serial number will be clear to transfer to a new owner. But just to be sure, it is a good idea to check the status of the IMEI number. If it is not clear for transfer and you know you have completed payments for the contract, you can contact your carrier for assistance, asking them to unlock the device so you can sell it. There are a lot of third-party sites that offer this unlocking service but it is a good idea to have your carrier do it. The process isn’t long or difficult, you carrier should guide you through it.
Keep in mind that a device that has a clear IMEI number will probably sell quicker and even have a higher asking price. In fact, buyers are keen to ensure that the IMEI number is clear before purchasing a device. Some buyers may even go as far as checking the number themselves.

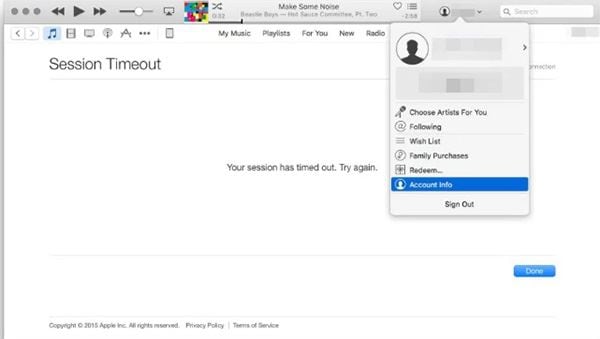
Part 5 iTunes and iCloud
For some reason, erasing your iPhone only partially removes the iPhone form your iCloud account. It is therefore very important that you remove it here as well. To effectively do this go to OS X’s Apple Menu on your Mac and then choose System preferences. From here select "iCloud" and then click "Account Details". Select the "Devices" tab and then highlight your iPhone and choose "Remove from Account". Click on "Done" to complete the process.
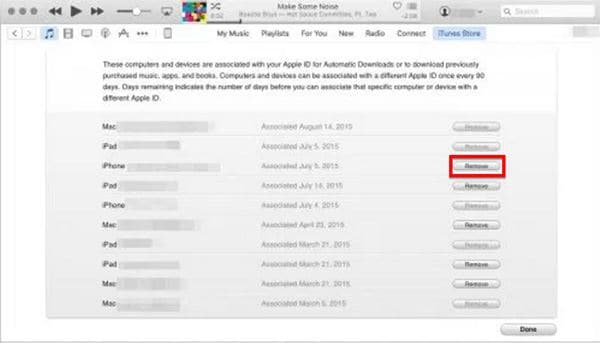
While we are making sure the device is completely removed from all your accounts, don’t forget iTunes in iCloud. This is a service that Apple launched in 2011 that allows users download previously purchased iTunes content for free. A lot of times, removing your iPhone from your iCloud account doesn’t remove it from iTunes in iCloud.
To do that you will need to open iTunes and then go to your account and sign in. scroll down to find "iTunes in the iCloud" and choose "Manage Devices". You should see your iPhone in the list. Click on the "Remove" button and then click "Done" to complete the process.
Part 6 Manage Trusted Devices
Your iPhone is probably linked to a lot of places online and the Apple Identity Verification website is another. So you may want to take a moment to unlink the iPhone from AppleID.apple.com before passing it on to the new owner.
Doing this is very easy, you just have to navigate to this website and then log in to your account. Once logged in, click on "Password and Security" to "Manage your Trusted Devices". If your iPhone is still on the list of devices you can simply remove it by clicking on the "Remove" button. This will prevent the iPhone from being used as a device to verify your identity for any two-factor authentication process.

Part 7 Remove the SIM Card
Now that we’ve done Part 1 through to Part 7, you are almost ready to sell your device. all the critical security aspects are done and dusted and now are just a step away from confidently handing over the device. so far we have done everything possible to clear the iPhone’s data, cloud associations and carrier contract. It is now ready for sale. All you have to do to complete the process is to remove the SIM card. You can use wither the Apple SIM card tool or a paperclip to open the side compartment.
We know you probably want to insert this SIM card into your new phone. So if you have the new phone, go ahead and insert the SIM card. Otherwise, store it in a safe place awaiting use.
Part 8 Physically Clean the Device
This is not mandatory but one of those nice things you can do for your buyer. Cleaning the iPhone before selling it also one way to have it looking fresh and shiny for the eventual buyer, who knows, this may even aid you in slightly increasing the selling price. Cleaning your device doesn’t have to take too long. You can use two lightly dampened fiber-cloths to clean the iPhone’s exterior. Begin by gently removing the debris that may be on the device’s body and wiping the glass and metal or plastic parts, clear of dust.
Bit don't use the dampened cloths near the speaker, microphone or any accessory port holes, the last thing you want to do is damage the device in any way. Once your device is clean and shiny, assemble the iPhone and all its accessories such as its earphones, earphone case, wall charger and USB cable. If you have the original box, even better.
Finally, depending on how you plan on selling the device, take a few photos to post online and wait for an excited buyer. We hope you are able to prepare and sell your iPhone easily.


