


Did you know that your web browser tends to hold onto your browsing history over time? When you go online, your iPad’s browser keeps the record of your internet habits. It has a lot of personal information about you. This includes the exact websites you visited, passwords, usernames and more. You may be sharing your iPad with family members, relatives or friends and in order to hide your browsing history, you should explore and learn how to clear history on iPad. This will maximize your security and even improve the performance of your browser. Hackers, fraudsters, and viruses can also access your browsing history and glean the valuable personal information.
Part 1: How to Clear History on iPad in 3 Steps
dr.fone (Mac) - Data Eraser (IS) (or dr.fone - Data Eraser (IS)) is the best software you need to download, install and run on your PC, in order to clear history on iPad with ease. This is the world's first iPad, Android, iPhone and iPod and Data Eraser. It has the ability to securely erase browser history, login information, cache data, messages, videos, music files, photos and more from your iPad with 100% unrecoverable. When you decide to sell, recycle or donate your iPad, you should always ensure that you clear your browsing history as well as other personal data. dr.fone - Data Eraser (IS) ensures that private data remains private and cannot be accessed by data criminals even if they use the latest data recovery software.
Key Features of the Software
- The program secures your personal information. You will never be worried about your browsing history, banking information, emails or other personal data on your iPad or any other supported devices anymore. All these information are erased permanently and deleted with unrecoverable to secure your personal information.
- Junk files, as well as the unnecessary files, can be cleared with the software with just one click. Therefore, you can clean your iPad, iPhone, iPad or Android device and boost the storage space, which will eventually speed the device and enhance performance. It also features a file compressor that is helpful in compressing files and save space with quality lossless.
- Permanently overwrite the deleted files. Did you know that simple deletes and factory reset doesn’t remove the data from your device completely? Yes, these data can still be recovered with the data recovery software. dr.fone - Data Eraser (IS) ensures that the deleted data are unrecoverable.
- It supports a variety of files. This includes, iPad, iPad mini with Retina Display, iPad with Retina Display, iPad Air, The New iPad, iPad 2, iPad Mini, Android tablets and phones running Android 2.1 to Android 6.0, iPod touch and iPod touch 4, iPad, iPhone 4, iPhone 4S, iPhone 3GS, iPhone 6 Plus, iPhone 6S, iPhone 6S Plus, iPhone 6, iPhone 5, iPhone 5S, iPhone 5C, iPod touch 5 and iPod touch 4.
- iSkysoft is easy to use. You don’t have to be a computer expert to clear your personal data.
Steps Guide on How to Clear Search History on iPad
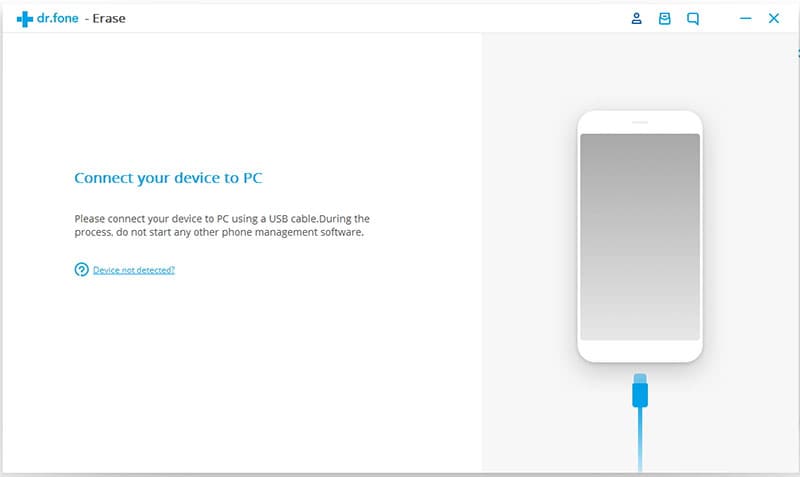
Download, install and launch dr.fone - Data Eraser (IS) on your PC. Connect your iPad to the PC by using a USB cable. iSkysoft will detect the iPad and show its details on the software’s interface. Follow the following 3 steps to delete data.
Step 1: Choose Erase Private Data mode
Click the "Erase Private Data" option, which appears in the main window. Then click "Start" button, the software will start to scan your iPad data automatically.
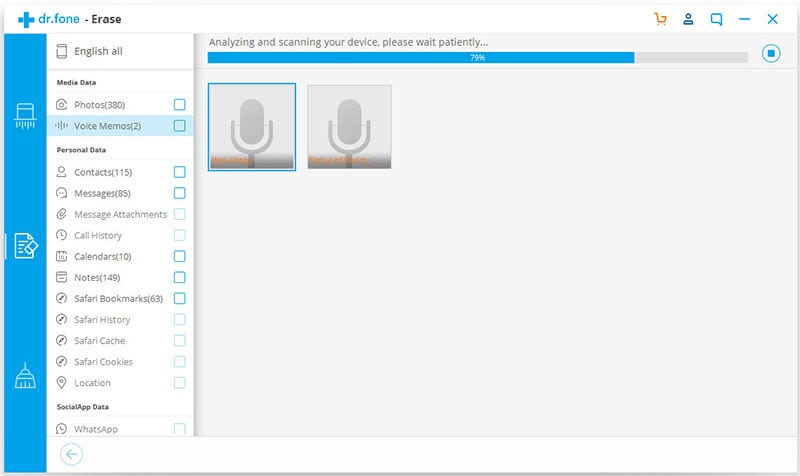
Step 2: Check and choose the data you want to delete
When the scan is complete, you will be able to see all your private data in the software’s interface. You can check any data to view more details and select the data you want to delete.
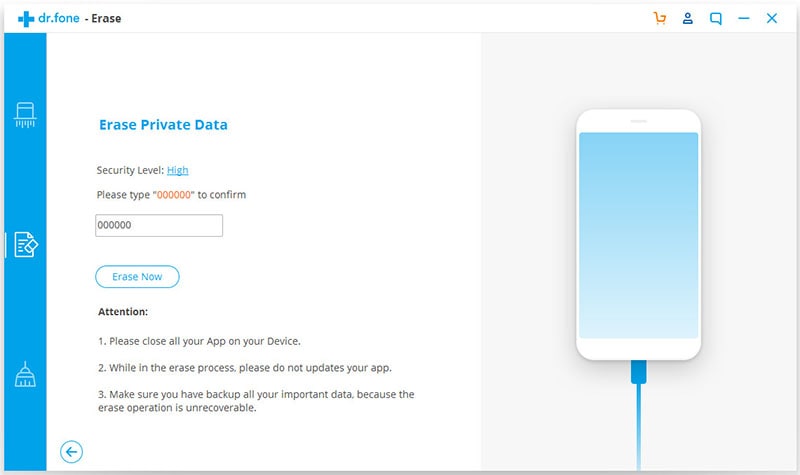
Step 3: Click "Erase Now" to clear history on iPad
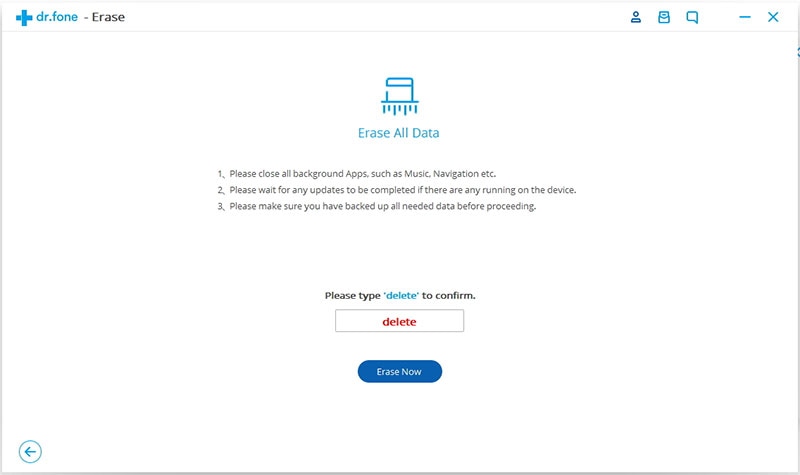
Click the "Erase Now" option. A pop-up window will notify you to type the words "delete", just to confirm the deletion. Type the words and then click "Erase Now" to start erasing your browsing history as well as all the private data. A confirmation window will appear when finished.
Part 2: More Tips about History on iPad
What Is History on iPad?
This refers to information that your browser remembers and stores on your iPad as you enjoy browsing the web. This includes the data that you have entered in the forms, sites that you have visited, logins and passwords. The browsing history on iPad makes your browsing experience better.
How to View History on iPad
Apple offers the Safari app for browsing the web. It is convenient and easy to use, but a few features, such as browsing history are hidden in order to make browsing a little easier. Tapping the back button leads you to the last website that you viewed. However, this works perfectly only for the recently viewed websites and can be cumbersome if you would like to view the website that you visited some weeks or months ago. Here are the simple steps to view your browsing history on iPad and locate particular websites with ease.
- Launch Safari app on your iPad by tapping its icon on your Homescreen.
- In the bottom part of the navigation menu, there are controls that are effective in moving pages back and forward. Tap and hold the back button located on the bottom left of the iPad screen.
- Safari browser history will then appear. You can then select and visit your preferred website.
Cannot Find Where to View History on iPad
- Safari App Crash
- Safari Browsing History Missing
- The Clear History in iPad is grayed out in Safari Settings
Safari app may close unexpectedly when you try to view your history, especially when there are multiple tabs open. In order to fix this problem, go to the settings>safari and, then tap Clear History as well as Clear Cookies and Data. If this doesn’t solve the problem, factory reset your iPad or use iSkysoft as explained above. Ensure that you back up your data before you can delete them. You can also decide to use the third-party browsers such as Google Chrome, Mozilla Firefox or Opera.
Ensure that private browsing is off when you are browsing. The easiest way to determine this is by checking whether the URL line is black text on white-private browsing is off, or white text on black- private browsing is on.
This happens when you have the "Restrictions" enabled on various websites. Go to the settings> General> Restrictions and then check if it’s on. If it does, enter your pin and go to the "Allowed Content" section. There is an entry for websites under this section. Tap it and select the "All Websites" option. This will bring back the "Clear History" Button and the "Private Browsing" Button.
How to Manage Browsing History on iPad
- Tap on the Settings icon on the Home screen.
- From the left side of the settings screen, select Safari Option.
- Safari Settings will then be displayed on your screen. Tap "Clear History" and you will get the prompt to clear your internet history.
Alternative Method
The above method removes the browsing history with no exception. If you would like to remove some of your browsing history and not all, then you will have to follow these steps.
- Launch Safari browser.
- Tap on the Bookmarks button located at the top of the browser.
- Bookmarks Menu button will be displayed on your iPad screen. Tap history located at the top of the menu. The browsing history is separated into sub-menus by date. You can simply select the appropriate date from the menu to view particular days browsing history.
- You can then choose to delete the iPad history records by just hitting the "Clear History" option from the upper right corner.


