


Did you know that simple deletes and factory reset settings can be easily recovered using the right software? In the modern day, an iPhone is a treasure trove of an individual’s personal information, with access to a variety of online accounts, contacts, messages, and more. Before you can sell or give it away, you should ensure that you perform an iPhone wipe process that will clear all your personal data completely, so that they can be inaccessible and unrecoverable. This article will teach you how to wipe an iPhone.
Part 1: How to Wipe Your iPhone
iSkysoft MobileTrans for Mac is all you need to wipe iPhone, iPad or iPod device permanently, so as to prevent identity theft and to clear junk files. It is simple to download, install and use. This is probably the most popular software that a high percentage of individuals are using to clear their private information from their devices.
Key Features of iSkysoft Phone Transfer:
- The already deleted files are permanently deleted. The previously deleted files will be gone forever and will no longer be accessible or recoverable.
- The "Erase you old phone" mode wiping iPhone all the information and ensures that your data ends at your own hands regardless of the next persons whose hands will fall into.
- Private data such as browsing history, search history, keyboard caches and more can be permanently deleted with Safe Eraser. All the information that you don't want the public to know about is effectively deleted.
- It also has the phone transfer and phone data backup function.
How to Completely Wipe an iPhone
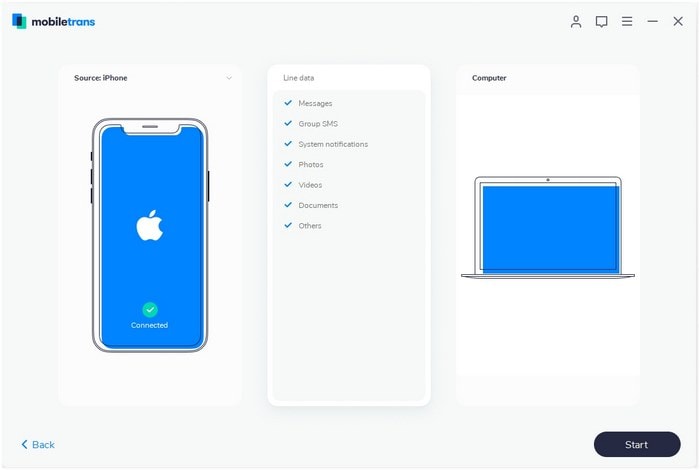
Step 1 Download and install the program on your Mac
Download, install and launch the iSkysoft Phone Transfer program on your Mac.
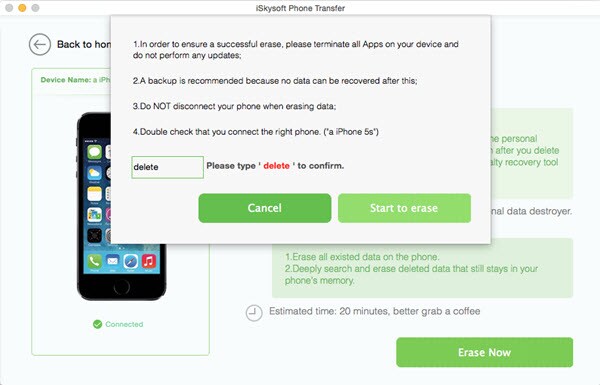
Step 2 Enter the data erasing mode
Now click on the "Erase your old phone" option to open the erasing window. And then use a USB cable to connect your iPhone to the PC. The program will detect your iPhone automatically. And click "Erase Now"

Part 2: How do You Wipe an iPhone with Factory Reset
Factory reset is required only when your iPhone is frozen or you are thinking about selling it. If you are going to delete all your data through factory reset option then here is a step-by-step guide to help you in this regard.
Steps for How to Completely Wipe iPhone Through Factory Reset
Here is a step-by-step guide to completely wipe your iPhone through factory reset option.
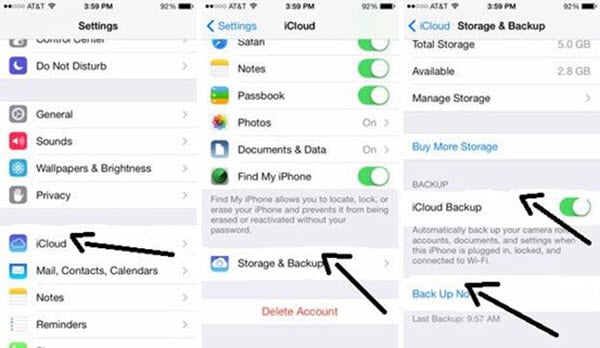
Step 1: Backup your iPhone data
First, back up your mobile data through iCloud or iTunes. For iCloud; go to ‘Settings’, tap ‘iCloud’, then tap ‘Storage & Backup’, then enable ‘iCloud Backup’ and then tap the ‘Backup now’ option to backup your data.
For iTunes; first link your iPhone with your PC, then launch the ‘iTunes’, then select the ‘iPhone’ shown at the top of the window, then click ‘This Computer’ and then press the ‘Backup now’ button to start the backup.
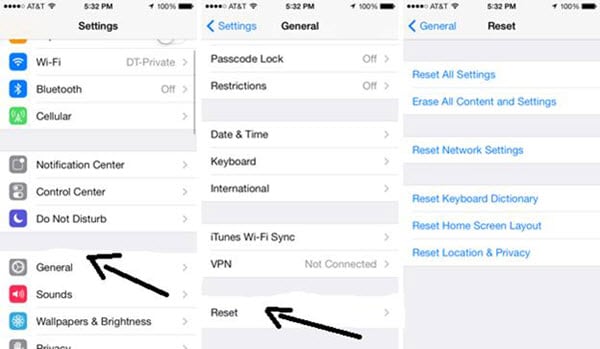
Step 2: Open ‘Settings’ and tap ‘General’
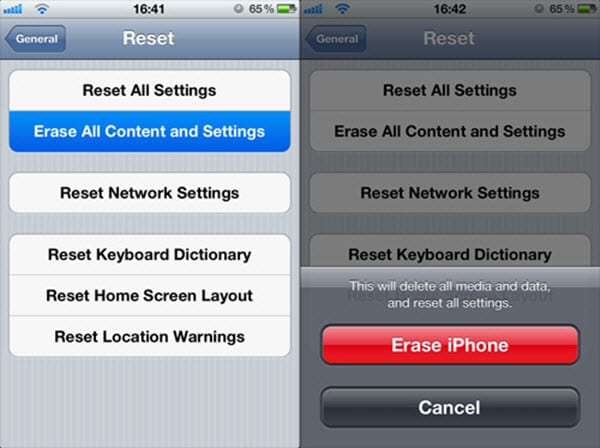
After backing up the data, open ‘Settings’ and tap ‘General’. Move down to tap the ‘Reset’ button.
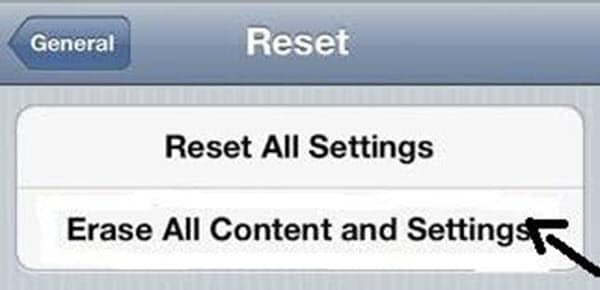
Step 3: Tap ‘Erase All Content and Settings’
Tap ‘Erase all content and settings’.
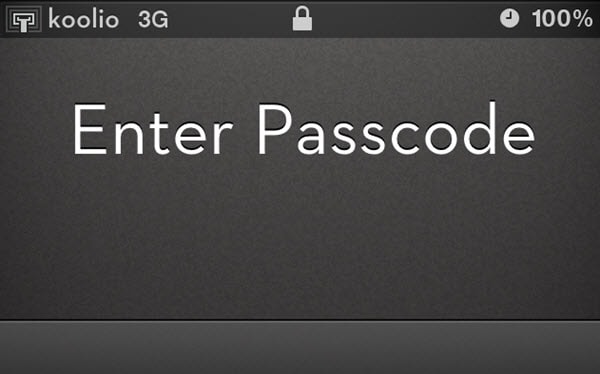
Step 4: Enter Passcode
Enter your passcode to proceed.
Part 3: 10 Things You Need to Do Before Selling Your iPhone
If you are planning to sell your iPhone then there are 10 important things which you have to consider before selling it up.
- Backup your iPhone
- Turn iMessage and FaceTime off
- Disable your iCloud account
- Log out of Apple ID
- Restore to factory settings
- Unregister your device at supportprofile.apple.com
- Call your carrier to disassociate your device
- Don’t manually delete contacts, photo streams, and others from iCloud
- Wipe iPhone data with dr.fone - Data Eraser (IS)
- Erase iPhone with Find my iPhone
Before selling your iPhone, it is very much required to first backup your mobile data. You can do it either through iCloud or iTunes.
iCloud: First of all connect your device with a suitable wireless network. Then go to ‘Settings’, tap ‘iCloud’, then tap ‘Storage & Backup’, then enable ‘iCloud Backup’ and then tap the ‘Backup now’ option to backup your iPhone data.
iTunes: First attach your device with your personal computer. Then launch the ‘iTunes’, then select the ‘iPhone’ shown at the top of the window, then click ‘This Computer’ and then press the ‘Backup now’ button to start the backup.
The second thing which you need to do before selling your iPhone is to turn off the iMessage and FaceTime. If kept turned on, then the other person can get your messages and video calls. To turn them off; go to settings, turn off iMessage and FaceTime.
iCloud allows you to have all the latest versions of your photos, videos and documents. So, it is also necessary to disable your iCloud account before selling the iPhone. In order to disable the iCloud account; go to settings, tap ‘iCloud’, move down to bottom and tap the’ Delete Account’ option.
It is also very important to log out of your Apple ID. In order to sign out; go to settings, tap the ‘iTunes and App Store’, tap on your Apple ID and log out.
Your all data is backed up so you can easily restore your iPhone to factory settings. Go to settings, tap on ‘General’ and move down to tap the ‘Reset’ button. Then tap on ‘Erase all content and settings’, enter your password and tap ‘erase your iPhone’ to restore your iPhone to factory settings.
It is also required to unregister your iPhone by clicking the above link. Enter your Apple ID and password and then unregister your device to sell it to the other person without any hesitation.
It is also required to call your carrier to help you in transferring the service to the new owner of your iPhone.
Also there is no need to delete anything from iCloud manually like your contacts, photos or videos.
To delete all your precious personal information from your iPhone, it is better to go for dr.fone - Data Eraser (IS) to delete everything from iPhone in just a one click.
The last thing which you require to do before selling your iPhone is to turn off the ‘Find my iPhone’ option. To do this; go to settings, tap on ‘iCloud’, move down to tap on ‘Find my iPhone’ and turn it off.
Part 4: How to Restore an iPhone from iCloud Backup or iTunes Backup
You can restore your iPhone from iCloud or iTunes backup with ease. Both the procedures are different from each other and can take time to restore depending upon the size of the data and speed of your wireless connection. But it is much better to go for the iSkysoft MobileTrans for Mac (or iSkysoft MobileTrans for Windows) to restore your iPhone from iCloud or iTunes backup. It can restore your data without any problems and can transfer files in their original forms. So, it is highly recommended to restore your iPhone from iCloud or iTunes backup through the iSkysoft Phone Transfer.
The software is a complete solution to transfer all your data back to your iPhone in just a single click. It is capable of transferring all your complete data in its original form. No matter, what type of data you are going to restore from iCloud or iTunes backup, just install the software and see the magic. This software is fully compatible with iOS 8.1, iOS 9.1, iTunes 12.1 and iTunes 12.3.1.
This multipurpose software not only transfers data from phone to phone but also works as a backup tool to backup all your phone data to your computer safely and securely. It not only supports iPhone but also transfers data between BlackBerry, Android and Symbian operating systems.

Key Features of the Software
- Backup and restore intelligently.
- Backup phone safely and securely.
- Retrieve data to phone.
- Transfer iTunes to your phone.
- Retrieve from iCloud backup.
- Restore data from phone transfer.
How to Restore iPhone from iCloud or iTunes Backup Files
Step 1: Launch the program and connect iPhone to computer
First of all, download and install the iSkysoft Phone Transfer. After installing the software and connect your iPhone to computer. Launch the program and press the "Restore From Backups" tab.

Step 2: Select the backup file option
Now select the backup file option. Then click the "iCloud" icon to restore your iPhone from iCloud backup. Insert your Apple ID, select the iCloud backup file and download the iCloud backup.
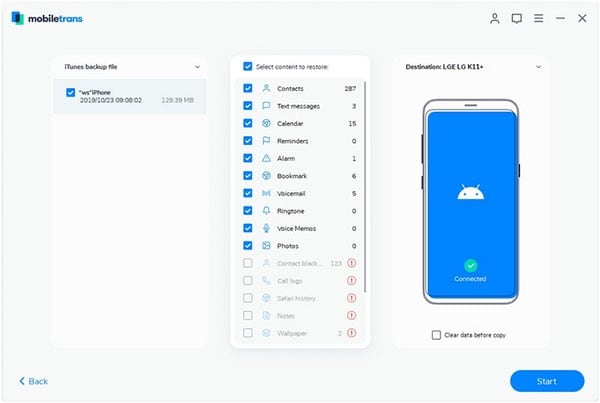
Step 3: Click the "Start Copy" button to start restoring iPhone
Choose the contents which you want to restore and press the "Start Copy" button. To restore from iTunes backup file; click the iTunes icon, select the contents and click the "Start Copy" button to start restoring.


