


Clearing up the data of your iPhone is very much required when either your phone is freezing or you are going to sell it. Your phone contains all of your precious data and it is required to erase it all before giving it to others. Some people manually delete all the data, some do a factory reset and some use the restore option but it all depends on you to select a way to clean your device. Each and every option has its own way of cleaning your iPhone so select the best one according to your needs. But before doing any erasing process, it is recommended to back up all of your data. You can still use some data recovering tools to recover your data but backing up the data is the ideal option. So after having a successful backup of your files, start your wiping process. Follow this article to wipe and restore iPhone.
Part 1: Wipe and Restore iPhone, What Is the Difference?
There is a little difference between wiping and restoring an iPhone. Wiping an iPhone clears some or all of your data depending upon your preferences. Different bugs or the odd behavior of your phone will be resolved.
Restoring an iPhone will erase everything from your device. It will not only clear all of your data but also the current iOS and the firmware of your device. After restoring your iPhone, a fresh version of the iOS will be installed to your device or you can reinstall a backup which you have previously made.
Part 2: How to Wipe an iPhone
Wiping an iPhone is a simple and easy method. Here is a step-by-step guide to help you in wiping out your device. But keep in mind that your data can be easily recovered so use this method only when your mobile is creating problems in operations.
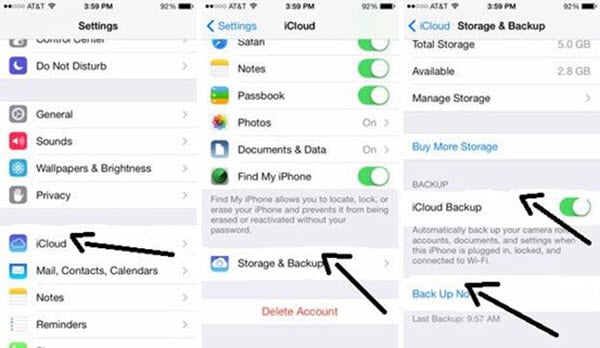
Step 1: Backup all data and tap "Settings" to start the process
The first step which you have to take is to back up all of your data. You can either use the iCloud or iTunes to back up your data. Now tap on the ‘Settings’ app to start the process.
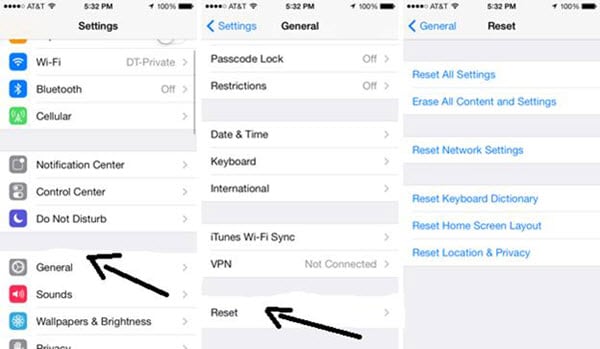
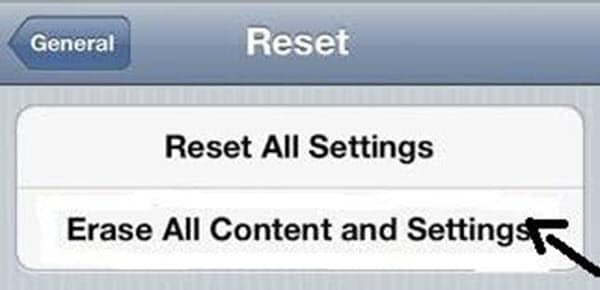
Step 2: Tap on ‘General’ and ‘Reset’
Now tap on ‘General’. Then tap on ‘Reset’.
Part 3: How to Restore an iPhone
If your device is creating problems and needs a fresh start then it is required to restore it. But before restoring your device, it is mandatory to backup your data. Because after restoring, your device will become absolutely new. So here is a step-by-step guide to restore your iPhone through iTunes.
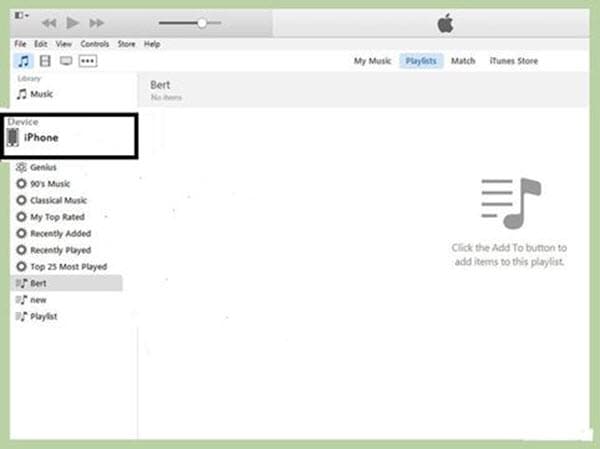
Step 1: Install iTunes and connect iPhone to PC
First of all make sure that you have the latest version of iTunes. For Windows, click ‘Help’ and then select ‘Check for updates’. Also for iOS, click ‘iTunes’ and select ‘Check for updates’. Then connect your device with your system with the help of USB data cable. The iTunes will automatically open. Now from the Devices menu select your iPhone. Your device will show on the left side of the screen. If you are not able to find your device then put it into the recovery mood.
In order to enter into the recovery mood, first of all disconnect your device. Now turn it off and press & hold the home button. Now again connect your device with the system. Continue holding the home button until you see the ‘Connect to iTunes’ logo. Now you will be directed to restore your device.
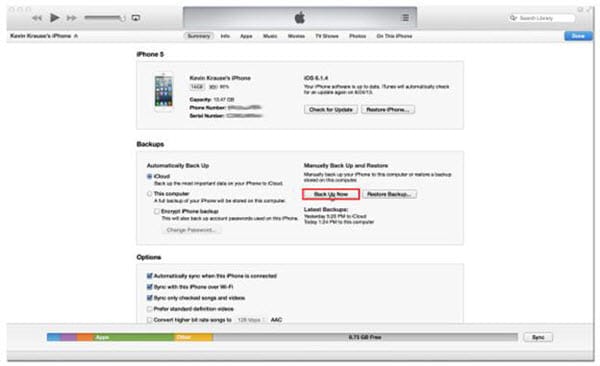
Step 2: Backup the data to the computer
Now back up your data to your computer by clicking on the ‘Back up now’ button.

Step 3: Hit ‘Restore iPhone’ to start the restoring process
Now click on the ‘Restore iPhone’ button to start the restoring process. Click on ‘Restore‘ again to confirm it.
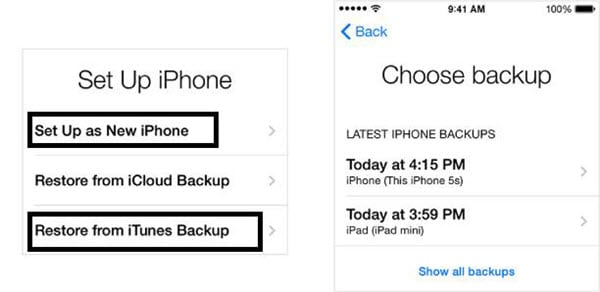
Step 4: Select options according to your needs
Now wait for few minutes to complete the restoring process. There are 2 options will be displayed in front of you. ‘Set up as new iPhone’ and ‘restore from iTunes backup’. Select any one according to your needs. So, follow these steps to restore your iPhone successfully.
Part 4: The Quick and Easy Way to Wipe iPhone
There are different ways of cleaning your iPhone. It all depends on you to select a particular one according to your needs. Some people try to manually delete the data but it is not recommended because it cannot delete your data permanently. So, in order to delete all your personal information and data use the dr.fone (Mac) - Data Eraser (IS) (or dr.fone - Data Eraser (IS)). This tool is easy to use and deletes all your information permanently and also there is no chance of recovering the data back. So, use this amazing program to get rid of all your data.
The software is a complete package through which it has become much easier to wipe out all your precious iPhone data. No other tool in this world can work like it. The deletion is so much simple that you can delete all your data with just a single click. Also your data will be deleted safely and securely so you can use it without any hesitation. Despite using different advanced data recovery tools, this program ensures no chance of recovering back your data. Also there are different options in this program for deleting your data from iPhone 5 so select the best one according to your needs.
Key Features of the Software
- Deletes all iPhone data safely and securely.
- Boosts up the performance of your device by deleting junk or unwanted files.
- 3 data deletion modes are available: erase all data, erase private data and erase deleted data.
- Photo compressor mode is included to create more space for you.
How to Wipe an iPhone
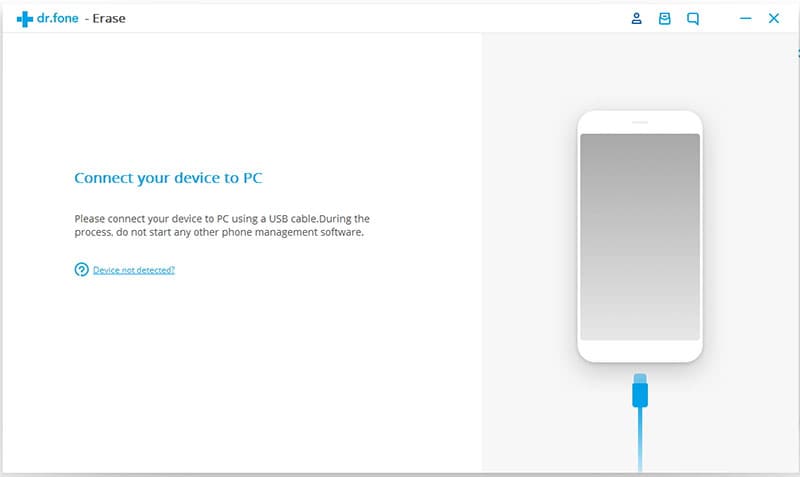
Step 1: Run the software and connect iPhone to Mac
First of all, download and install the dr.fone (Mac) - Data Eraser (IS) on your Mac. After installing, launch it to proceed. Now connect your iPhone with your Mac through USB data cable.
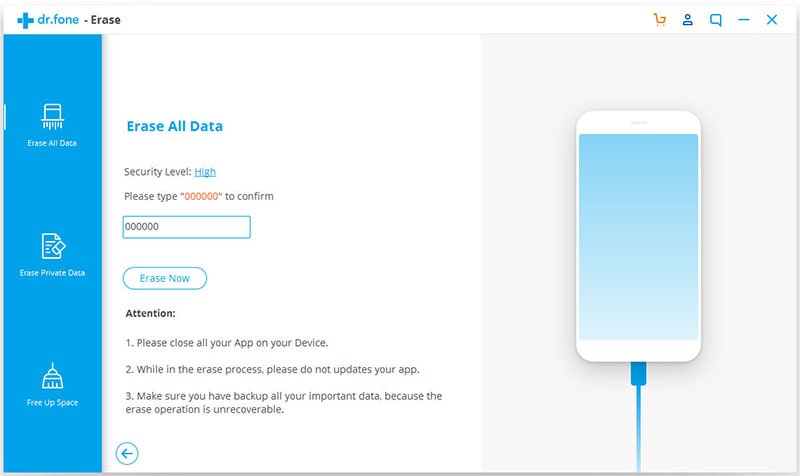
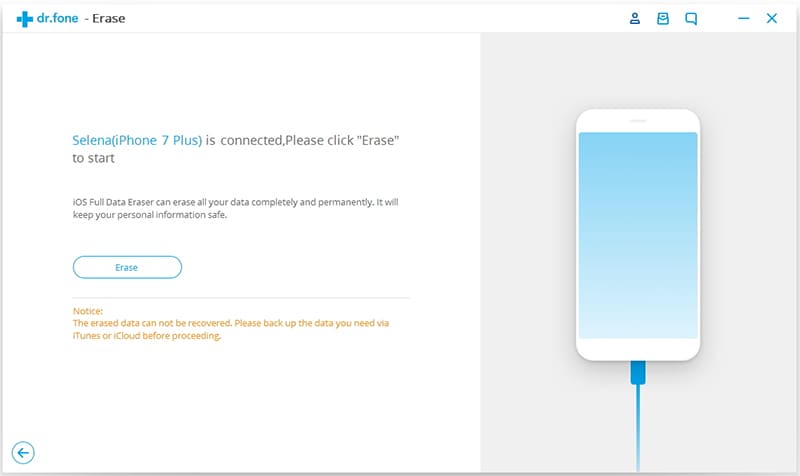
Step 2: Select the "Erase All Data" mode
After a successful connection, select the data erasing mode. As you want to delete all things completely so click the "Erase All Data" mode in the primary window. Now click "Erase Now". A new erasing window will appear.

Step 3: Wipe an iPhone all data
Type the word "delete" in the erasing window to confirm. Finally, click on the "Erase Now" button to erase all data from iPhone.


