


If you find yourself in a situation with data loss, then you probably never heard of the cardinal rule of computing - all hard drives fail at some point in time. More importantly, you have no idea about how to restore documents by yourself. As this reason is unknown to the many computer users, they always find themselves in a troubled situation and panic when they lose data.
The first thing that you need to determine or confirm whether it is really the hard disk failure or countless equipment glitches that cause boot failure, corrupted files, and eventually loss of data. If you can obtain access to an additional computer, you can remove the troubled hard disk and replace it with the new system as a secondary drive. If you are lucky, the computer will recognize the hard drive and display the partitions. If it did not, then probably the hard disk failure led to the loss of data. Under such circumstances, you do have options available that will help you restore the necessary files contained in the hard disk by yourself. You do not have to look for an expensive solution of an expensive recovery expert to retrieve information from the troubled hard disk.
Part 1: The Best Method to Restore Documents by Youeself
The methods explained above have limitations and did not guarantee the recovery of the lost documents. It would be painful to hear this, but in practicality, it is the truth. If you are worrying about data loss and find yourself deserted because you are unable to find a proper solution, then you are at the right place. iSkysoft Data Recovery for Mac (or iSkysoft Data Recovery for Windows) is a single solution for all your recovery requirements. The reason behind its excellence is the innovative recovery modes that the application uses in retrieving as much data as possible. It works for not only a computer or Mac but also all the external storage devices such as USB drives, flash drives, compact discs, compact drives, memory cards, and clouds storage such as Google Drive.
Key Features of Recoverit (IS):
- Pause and restart a scanning process using a single button
- Save the scan information to carry out the recovery at a later time
- Search for particular file formats using filters and folder trees
- Distinguish between invalid and valid data before recovery

Step-by-Step Guide to Restore Documents by Yourself
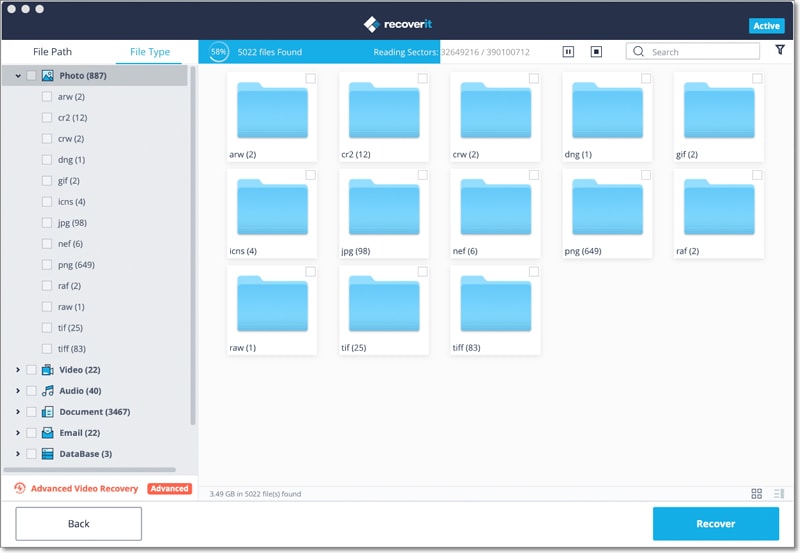
Step 1. Visit the official website to download Recoverit (IS) for Mac. You can drag the executable file to the Applications folder and double-click it to begin the installation procedure. Once it is complete, you can launch the program by clicking the icon appearing on the desktop. The Interface for this program appears on the screen with the 6 file type tabs. You have to choose the "Document" tab and hit the "Next" button.

Step 2. As soon as you click the "Next" button, a new window opens up, where you will notice the list of the partitions present on your Mac. If you are unable to see the partitions or any other attached media such as USB sticks, you can click the "Refresh" icon to allow the program to refresh the "External Removable Device" list. After you notice the presence of the partition, choose the one from which you wish to retrieve the lost documents. You can then click the "Start" button at the top to begin scanning the partition.

Step 3. After completing the scan, the program will display all the recoverable data. You can review the content of the files by selecting an individual file from the window. You can begin marking the files that you wish to retrieve, and then press the "Recover" button on the bottom to save the selected files to the hard disk.
Part 2: How to Restore Documents from Time Machine
Time Machine is a useful application as it allows the user to back up all the content and provides the opportunity to restore individual files. The following are the steps involved in restoring documents individually using the Time Machine application.
Step-by-Step Guide to Restore Documents
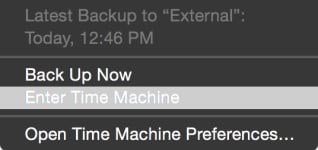
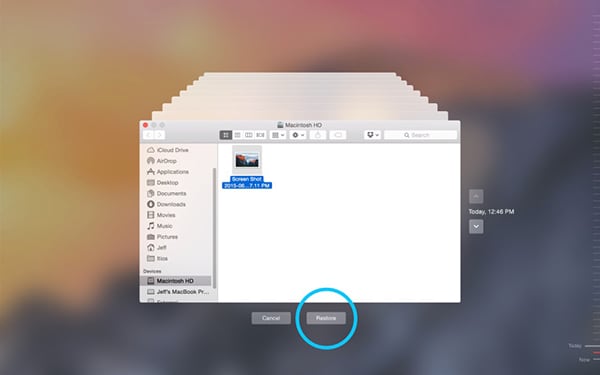
Step 1. Launch the Time Machine application via the menu bar. If you are unable to see the option in the menu bar, you can enable it under System Preferences.
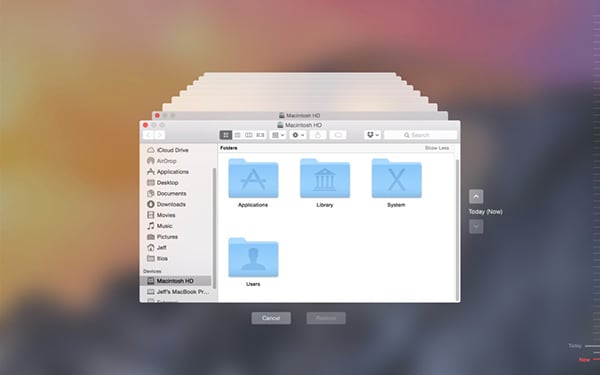
Step 2. Once the Time Machine application opens, you need to navigate to the folder that contained the files that you are looking forward to restoring.
Step 3. You can use the tile provider to the right side of the application to go back in time under you see the document appearing in the folder. You can now open the file by double-clicking it or press the space bar to see the preview of the content. The additional steps below will help you to restore the document.
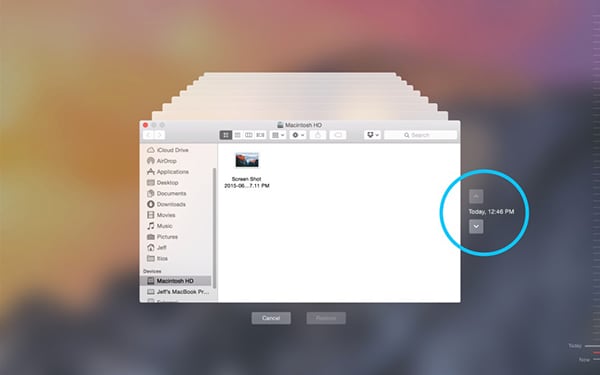
Step 4. You can select the file that you wish to restore and then press the "Restore" switch at the bottom of the interface to restore the file from the backup folder.
Congratulations! The file that you want to restore back to its original condition before it deleted is now on your Mac. With the help of the Time Machine application, you can quickly preview files and restore them back to their original condition. The use of the application is a lifesaver when you accidentally delete a document.
Part 3: How to Restore Documents Deleted from Recycle Bin
The Recycle Bin on the computer is similar to "Trash" on the Mac system. It is the location where the system stores all the deleted files from the computer. There is a possibility that one can retrieve data from recycle bin if they did not empty it or deleted many files such that the total size exceeds the provided space limit. When the total capacity of the recycle bin exceeds the allocated space, Windows removes few of the files automatically in order to add just the total capacity of the content. In such cases, it will be difficult to recover the content because Windows randomly picks the files based on the file size.
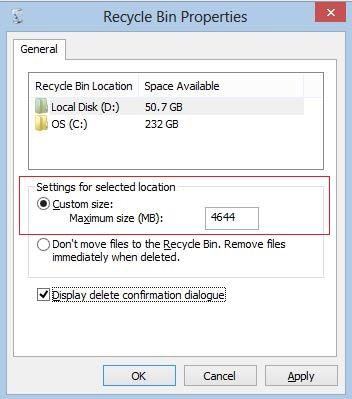
Luckily, Windows provided the feasibility to adjust the space limit for recycle bin. Using the properties window, users can change the default size of the recycle bin. There is further the occasion to modify the location of the recycle bin, which by default is the local disk "C". An important detail to memorize is that the custom size of the recycle bin should not exceed 50% of the local disk C. Anything more than this storage space will slow down the performance of the computer.
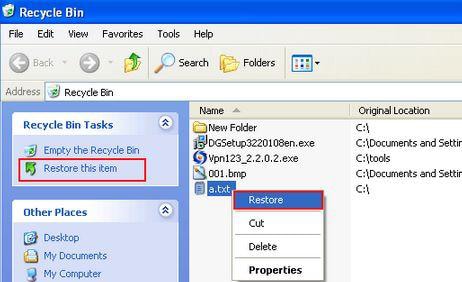
As stated earlier, if you did not empty the recycle bin, there is an opportunity for you to find the deleted content. To retrieve the deleted documents, you can open the recycle bin by double clicking the icon on the desktop. Once the folder opens, you can look for the files that you wish to recover. You can then select the ones that are important and then right-click the mouse and choose "Restore” to get back the files to their original location. It is the easiest and the most common way of restoring documents from the recycle bin.
Part 4: How to Restore Documents in Google Drive
It is likely that you will deal with support requests from people who lost to work and restored the same in the Google Drive. Google Drive made numerous changes to the application, which is unnoticeable to the regular user. The best feature of Google Drive is the autosave ability, which saves the work of the user at frequent intervals of time. You can forget about power loss, accidental deletion of a document, and other reasons that possibly cause data loss. If the system crashes, all you would be losing are the last few words entered into the document.
In addition to the autosave feature, Google Drive also creates different versions of a single document. The revision history will be helpful for users who wish to retrieve content to an earlier date. If you lost valuable documents from Google Drive, you have the opportunity to retrieve them back using the following simple steps.
Step-by-Step Guide to Restore Documents by Yourself
Step 1. Using the computer, navigate to drive.google.com/drive/trash. Input your login details to enter to your Google Drive account.
Step 2. Once the trash window opens, you can then find the file that you would like to restore. You can select it, right click the mouse, and click restore to take the file back to its original location in Google Drive.


