


Accidentally deleting photos can cause a lot of tension and distress. In fact, accidentally deleting any sort of data is a source of great frustration and it has caused the best of us to clutch our heads in despair. Whether it was an ancient and long-treasured family portrait in .jpg format, or an important document that you put your sweat and tears in, we understand the pain that goes into data that has gone AWOL. However, just like every disease has a cure that is just waiting to be found, you can retrieve deleted photos by yourself. Furthermore, deleted photos from your Facebook or Instagram account can also be retrieved. You need to have a little bit of patience and access to a computer to recover that missing photo.
- Part 1. How to Retrieve Deleted Photos on Mac and Windows
- Part 2. How to Retrieve Deleted Photos From Facebook
- Part 3. How to Retrieve Deleted Photos from Instagram
Part 1. How to Retrieve Deleted Photos on Mac and Windows
Mac and Windows users: there is good news, and it comes by the name Recoverit for Mac (or Recoverit for Windows). Recoverit is comprehensive, powerful, effective, and most importantly, it is easy to use. The user-friendly interface allows even the most amateur of users to retrieve their photos using this efficient tool.
Why Choose This Software to Retrieve Deleted Photos:
- You can recover images, audio files, videos, documents, emails and archives from digital cameras, USB flash disks, music players, computers, memory cards and hard disks.
- All it takes is three basic steps to get Recoverit to retrace that photo: scan, preview and recover.

Recovery is virtually risk-free as Recoverit only scans data that already exists on your system without making unnecessary changes to the files.
Step-by-Step Guide to Retrieve Deleted Photos on Mac
Step 1. Download Recoverit for Mac, install it, and run the program. Once you run the program, you’ll be greeted with the following dialog box. Now you are allowed to choose "Photo" tab and click "Next" to go to next step.
Step 2. A window will come up showing the list of drives on the Mac computer. If your connected drive is not appearing on the list, click "Refresh" icon right beside "External Removable Device". Click on the drive you lost the photo from, and click "Start". Recoverit will begin scanning the drive for deleted files, and will show you a preview of the list of scanned files

Step 3. Click on the file you want to restore then click "Recover". Choose the destination path you want the file to be restored to. Avoid choosing the same location you initially lost the file from. And there you go, photo restored!

To enhance your Recoverit experience, use the following tips:
•Since you're specifically looking for a photo, use the filter option and prompt Recoverit to search for image files only. This way, you'll save time that would otherwise have been spent waiting for Recoverit to scan all sorts of documents and videos when you just needed the one photograph.
•The Validity attribute informs you of the health of the file: if it's Good, it can be restored in perfect condition, but if it is Poor or Bad then there are chances it shall be recovered as a corrupt or unreadable file.
•If your file has not come up, opt for a Deep Scan. It takes longer but it is sure to drag your missing photo out from the deepest trenches of the deleted realm.
Part 2. How to Retrieve Deleted Photos from Facebook
Facebook’s popularity as a social media platform has not diminished much with the recent ascent of Twitter and Instagram. We love to share images of the last burger we ate or of random cute cats, and let’s face it; we get pretty upset when a picture goes missing from our Facebook accounts. Especially when we accidentally delete it ourselves! But there is no reason to worry as measures can be taken to prevent something like this happening again in the future.
Step-by-Step Guide to Retrieve Deleted Photos from Facebook
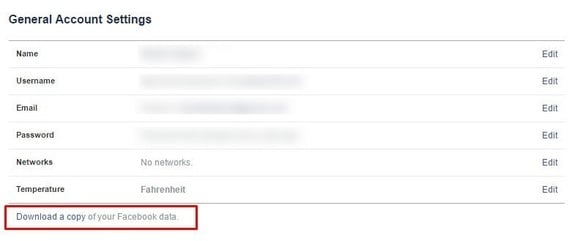
Step 1. Log onto your Facebook account, go to Settings, then to General Account Settings. The following will come up.
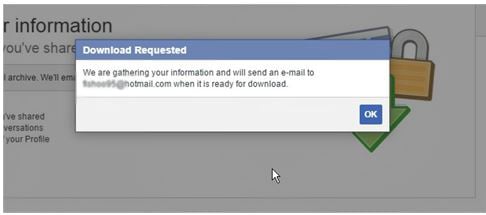
Step 2. Click on "Download a copy of your Facebook data". A page will come up, click on "Start my archive". You will be informed that your information is being gathered and an email will be sent to you when your archive file is ready.
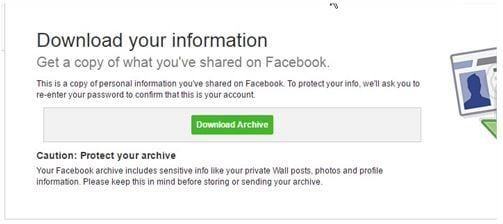
Step 3. You will be sent a mail informing you that your archive is ready. Follow the link given in the email. Click on "Download Archive". After reentering your password for security purposes. This will start downloading a .zip folder containing all your Facebook data.
You can extract the files, and you'll find all your messages, pictures, and videos in there. It should be noted that this method is to prevent future data loss from Facebook. If you have already deleted pictures and are looking to recover those, it appears that there is no failsafe way to do so yet.
Part 3. How to Retrieve Deleted Photos from Instagram
The youth is becoming increasingly obsessed with Instagram's many features. But what if a picture goes missing from here as well?
Step-by-Step Guide to Retrieve Deleted Photos from Instagram
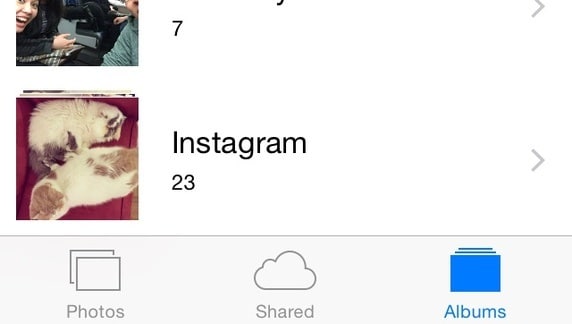
Step 1. If you have an iPhone, click on the "Photos" icon. Click on "Albums".
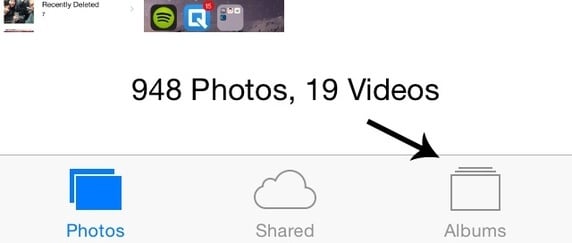
Step 2. Click on the album labelled "Instagram". You'll see archived versions of every photo you have uploaded on Instagram there.
Remember, just like on Facebook, if you delete a photo on Instagram, it's usually gone for good, but your phone can help you out in this department by storing archived versions of each photo you upload. So there is a way out of this sticky situation as well. Be sure to regularly create backups of all your data to avoid situations like these, no matter how lazy you are feeling and how much you want to procrastinate. Data is important!


