


Transfer of data between devices has become a regular part of daily life in a day and age where we all own at least two devices or exchange devices so often we need a credible way to move data from the old device to the new one. If you own and iPhone and have recently been wanting to upgrade to the new iPhone 7, you might be looking for ways to transfer your old iPhone’s data to the new device. The problem is that some of the solutions you may find online are either vague, or provide you with ineffective solutions. The ideal way to transfer data from one device to another should be easy, effective and take up as little of your time as it possibly can. Fortunately for you, this article will provide a comprehensive guide on how to transfer files from iPhone to iPhone 7. By the end of this article, you will be able to easily make the transition in one of the many different ways we choose.
- Part 1: How to Transfer File from iPhone to iPhone 7 Completely
- Part 2: How to Transfer File from iPhone to iPhone 7 Using iTunes
- Part 3: How to Transfer File from iPhone to iPhone 7 Using iCloud
- Part 4: How to Transfer File from iPhone to iPhone 7 Using AirDrop
- Part 5: How to Transfer File from iPhone to iPhone 7 Using SIM Card
Part 1 : How to Transfer File from iPhone to iPhone 7 Completely
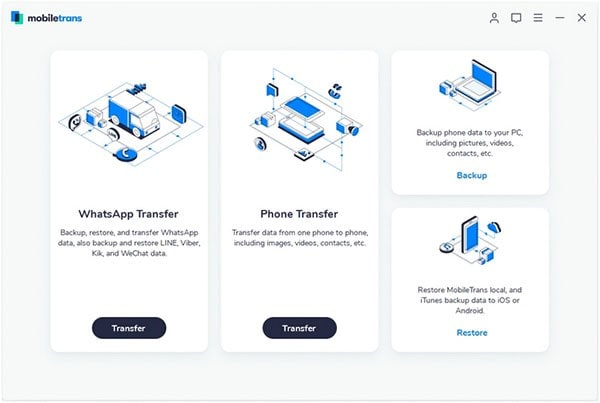
For a complete guide on how to transfer files from an iPhone to the new iPhone 7 it makes sense to begin with the quickest, easiest and most effective way to get all your files from one iPhone to another regardless of the data type. This method comes in the form of a third party data transfer program known as MobileTrans for Mac (or MobileTrans for Windows). If you are a little skeptical, you should be aware that this program is designed to make it very easy for you to transfer files between devices. It is also 100% safe. None of the files on either device are at risk of being overwritten and you also won't have to worry about any kind of damage to your device.
Key Features of MobileTrans:
- It is easy to use. All you have to do is connect the devices to the computer, select the files you want to transfer and the program does the rest.

- It is compatible with all iOS device and can be used to transfer all types of data from one device to another.
- You can use it to transfer photos, music, videos, documents, call logs, calendar, contacts, messages and so much more.
- It is also a very useful tool to have when you want to keep the data on your device safe.
- You can also use it to restore this backup or any other backup file including backup files in iTunes and iCloud.
Step-by-Step Guide to Transfer File from iPhone to iPhone 7 Completely
Step 1. Download the program on to your computer. Follow the prompts in the installation wizard to complete the installation process.
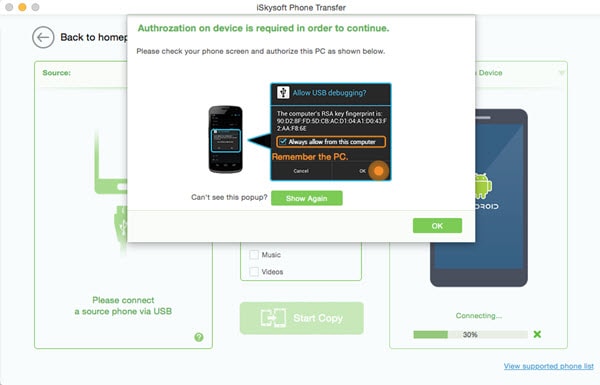
Step 2. Connect the iPhone and the iPhone 7 to your Mac using USB cables. If you need to authorize the Mac on any of the devices, do so.
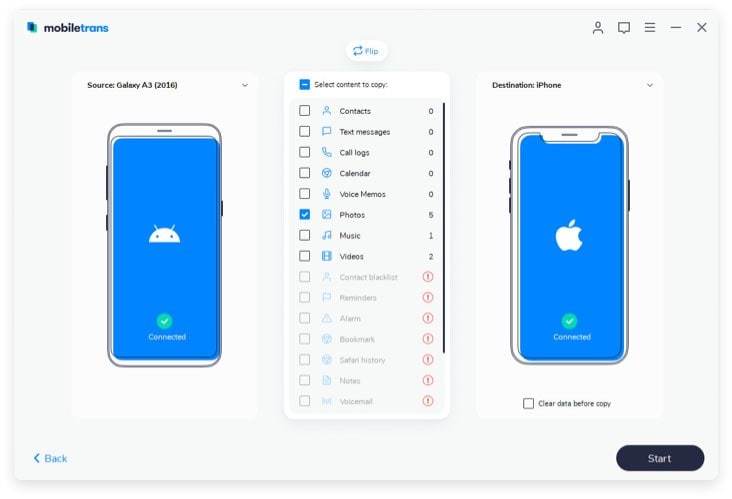
Step 3. Once the devices are connected correctly, you should see both devices in the next interface with the data from the source device listed in the Middle panel. At this point, take a moment to make sure that the Source device is the old iPhone and the destination device is the iPhone 7. If this order is not correct, you can simply re-order the devices by clicking on "Flip".
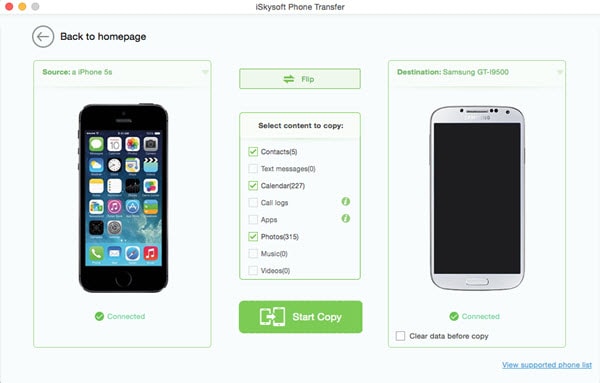
Step 4. Now all you have to do is select from the middle panel all of the files you would like to transfer to the iPhone 7. Click "Start Copy" and wait while the program transfers the files. Depending on the amount of data on your device, the transfer process could take some time. Ensure that you keep both devices connected through the entire process.
This program is your best bet not because it is simple to use, although that is a very good reason but also because it saves a lot of time. You can transfer file types regardless of how large they are or how many they are. It is a worthy investment if you want to switch devices.
Part 2 : How to Transfer File from iPhone to iPhone 7 Using iTunes
You can also use iTunes to transfer files from an iPhone to another iPhone. But in order to do this, you will need to first of all get all of the files you want to transfer from the iPhone to the computer. You can do this easily by connecting the device to your computer and then drag the files from the device's storage to the computer. You can use iTunes to do this or even a third party app such as MobileTrans for Mac to move the files to the computer. Once all of the files you want to transfer to the new iPhone 7 are on the computer, follow these simple steps to get them on the new device.
Step-by-Step Guide to Transfer File from iPhone to iPhone 7 Using iTunes
Step 1. Connect your iPhone 7 to the computer and launch iTunes. You can let the device sync if you want to but this is not necessary.
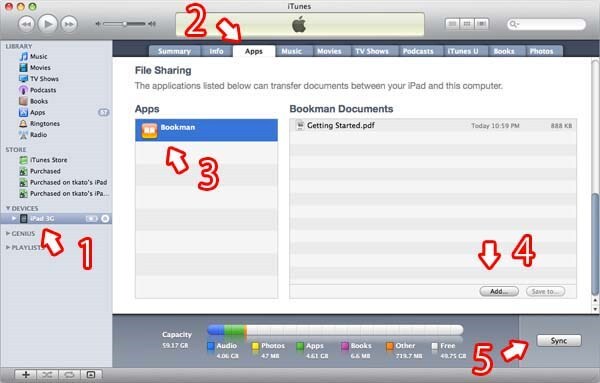
Step 2. You should see the device in the list on the left side of iTunes under the "Devices" tab. Click on it. Click on the Apps tab in the main panel of iTunes and then scroll down to find "File Transfer" section with a list of apps. From this list, select the app you want to transfer the files to. For instance, you can choose iBooks if you want to transfer an epub or PDF file.
Step 3. Drag the file from the computer to the space to right of the app list. Alternatively, you can also click on "Add" to browse for the file. As soon as you have chosen the file it will be moved to your iPhone 7.
There are a few shortcomings with this method. First of all, it is unclear what would happen if you wanted to transfer large files or multiple files. The process would probably take a very long time. There is also the problem of getting the files from the old iPhone to the computer in the first place. It may be ideal if you only want to move one or two files but it is hardly effective for larger file.
Part 3: How to Transfer File from iPhone to iPhone 7 Using iCloud
Step-by-Step Guide to Transfer File from iPhone to iPhone 7 Using iCloud
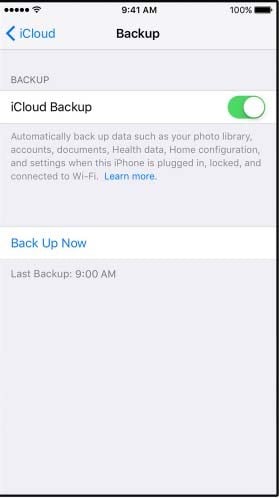
Step 1. On the old iPhone, make an iCloud Backup. To do this connect the device to a Wi-Fi network and then go to Settings > iCloud > Backup. Make sure that the iCloud backup option is turned on. Tap "Back Up Now". Stay connected to the Wi-Fi network until the process is complete.
Step 2. If you had already gone through the setup process on your iPhone 7, you may need to erase all contents and settings to get it back to the setup screen. You can do this by going to Settings > General > Reset > Erase All Contents and Settings.
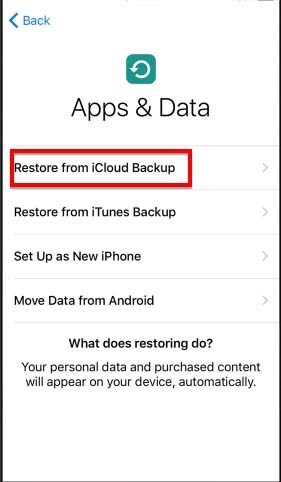
Note: It is worth noting that doing this will erase all of the data on your device. Once you are the set up screen. Follow the steps until you get to the Wi-Fi screen. Connect the device to a Wi-Fi network and then follow the steps on the screen until you get to the Apps & Data Screen. Here tap on "Restore from iCloud Backup" and then tap "Next".
Part 4: How to Transfer File from iPhone to iPhone 7 Using AirDrop
AirDrop provides you with an easy solution for sharing files between iOS devices. The process is fast powerful and efficient. Here's how to use Airdrop to transfer files from your iPhone to iPhone 7. Begin by tuning AirDrop on. To turn on AirDrop, follow these very simple steps.
Step-by-Step Guide to Transfer File from iPhone to iPhone 7 Using AirDrop
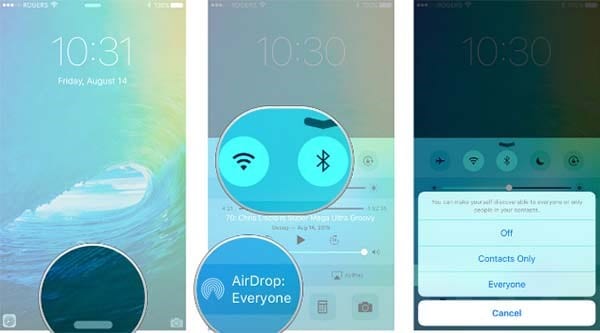
Step 1. Launch the Control Center by swiping up from the bottom on your iPhone or iPad.
Step 2. Make sure that both Bluetooth and Wi-Fi are turned on. You don't have to be on a Wi-Fi network but you're going to need it to transfer the files.
Step 3. Tap AirDrop and you should see a bunch of options. Tap on "Contacts Only" to enable only your contacts to send you AirDrops, tap "Everyone" to let everyone AirDrop you. If you choose Contacts only, make sure that you are signed in to your iCloud account.
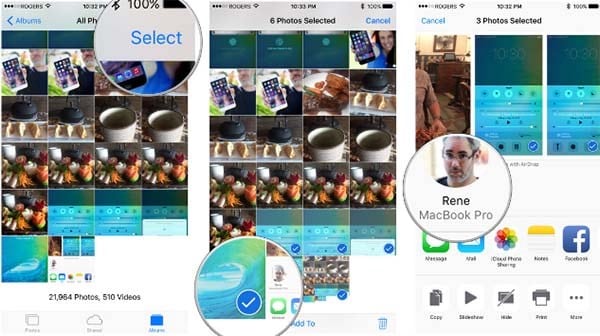
Step 4. Now that AirDrop has been turned on and set up, follow these very simple steps to transfer files.
1. Go to the file you would like to transfer and then tap on the "share" button.
2. Tap on the person and device you would like to share the files with. In this case, you will send files to the iPhone 7.
Airdrop is an easy solution. But it may also not be the ideal way to go if you are looking to transfer larger files or multiple files at once.
Troubleshoots on iPhone AirDrop
This method is not always fool proof and you may experience some problems when using it. The following are some of the easy ways to overcome the problem if you are unable to see the contacts in AirDrop.
- Try toggling the Bluetooth and Wi-Fi on and off and then toggle Airplane more to reset the connections.
- You can also try to turn off instant hotspot to free up the Bluetooth and Wi-Fi connections.
- If that doesn't work, you can try to temporarily switch to Everyone. This may work to remove any chance that there is a contact mismatch.
Part 5: How to Transfer File from iPhone to iPhone 7 Using SIM Card
If you have upgraded for an older model iPhone to the new iPhone, you can import your address book from an old SIM card. This is easily accomplished by simply using the import SIM Contacts feature in iOS. As you can probably already guess, you will only be able to transfer contacts in this way. The SIM Card method cannot work to transfer other types of data. To transfer the contacts from the iPhone to iPhone 7 using the SIM card, follow these very simple steps.
Step-by-Step Guide to Transfer File from iPhone to iPhone 7 Using SIM Card
Step 1. Remove the SIM card from the iPhone and then insert it into the new iPhone 7. If you need to, enter the PIN code to unlock the card and continue.
Step 2. Tap "settings" from the home screen of the iPhone 7 and then select "Mail, Contacts, Calendars" to launch the contacts settings.

Step 3. Tap "Import SIM Contacts" to import your contact list into the iOS device. Now remove the old SIM Card from the device and re-install the new iPhone's original SIM Card.


