


Recovering data from damaged or corrupted hard disk is no longer life or death situation. With the help of third-party recovery tools, it has become easy to get back the lost data in a few simple steps. Speaking of loss of data, we all lose documents, videos, photos, or any other files from our hard disk due to a corruption of software due to power failure or a virus attack. Any physical damage to the hard drive will also cause data loss. Rather than heading to the professional, you now have an opportunity to get back the data right at your home.
Part 1. How Does Get Data Back Work
Get Data Back is lightning fast recovery software that functions excellently for NTFS, FAT, and Linux EXT. With the help of the recovery tool, users gain the possibility to recover all the drives data in a few simple steps. The newly designed and rewritten algorithm helps in recovery of data even from formatted and previously deleted content.
Step-by-step Guide to Recover Data Using Get Data Back
Step 1. Download the trial version of the software according to your operating system. Get Data Back is available individually for both NTFS and FAT file system. Install the program and started by double-clicking the icon from the desktop.
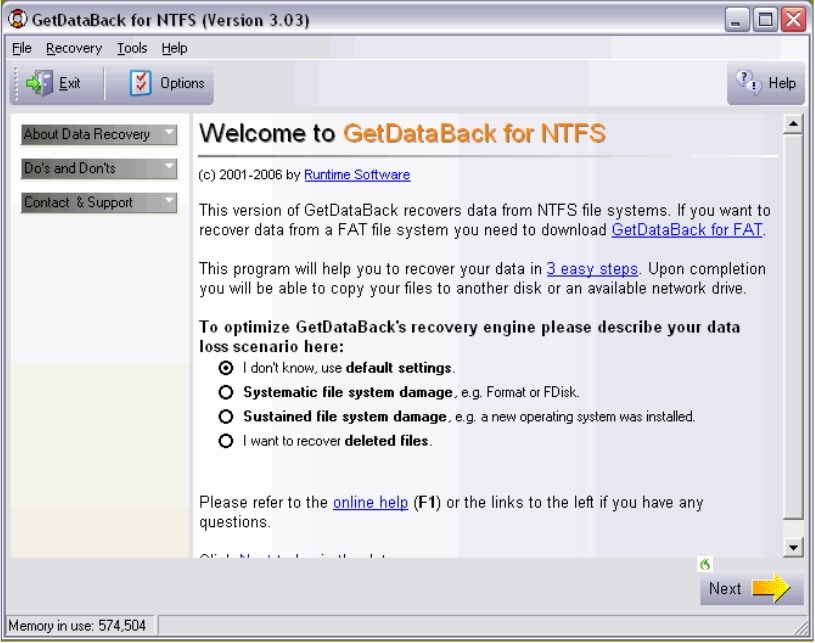
From the welcoming screen, you will have to pick the scenario under which you lost data. Carefully read the choices and choose the one that most applies to your situation. Press the Next button at the bottom.
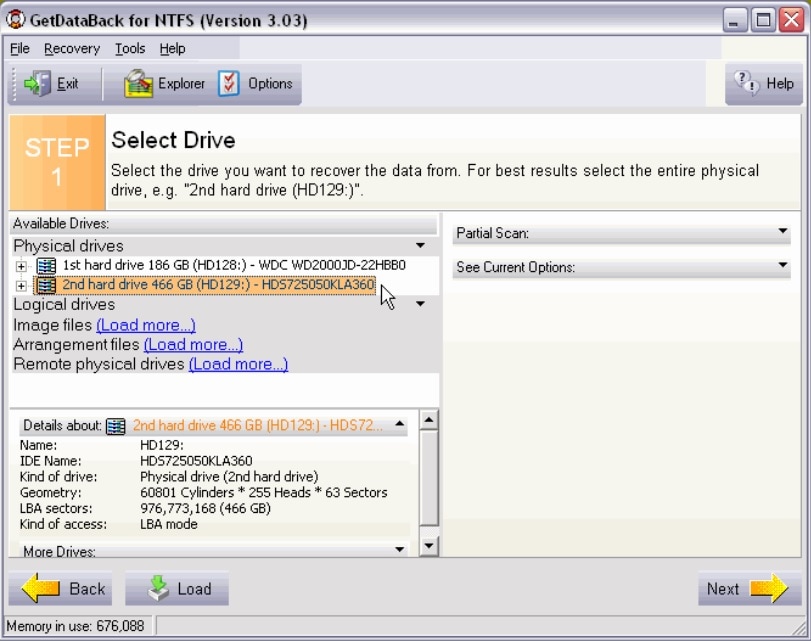
Step 2. In the next screen, you will notice the list of drives that are accessible from your system. You will have to select the problem and of the volume from which you wish to retrieve data. You can make the selection and of the physical drives. Press the Next button at the bottom.
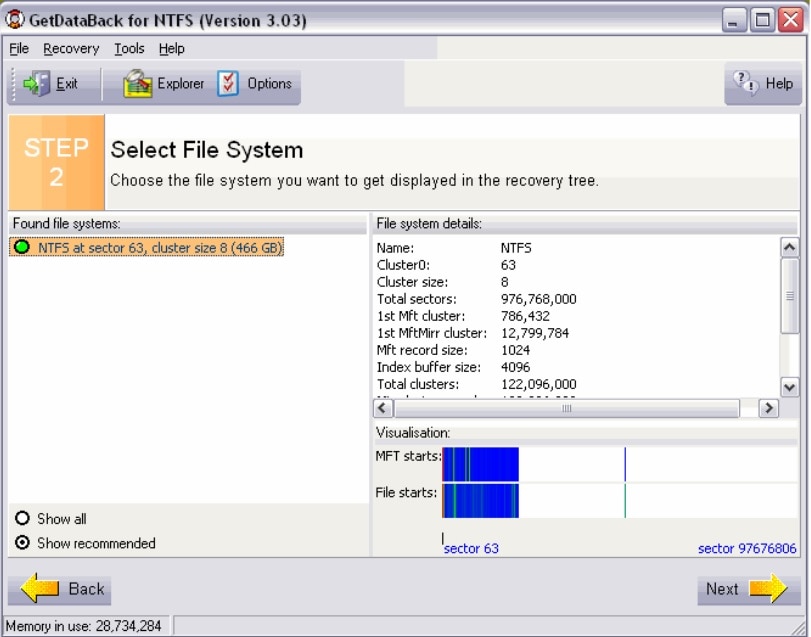
Step 3. The program will begin scanning the hard drive. After completion, it will display the file systems found on the disk. Choose the file system and press the Next button.
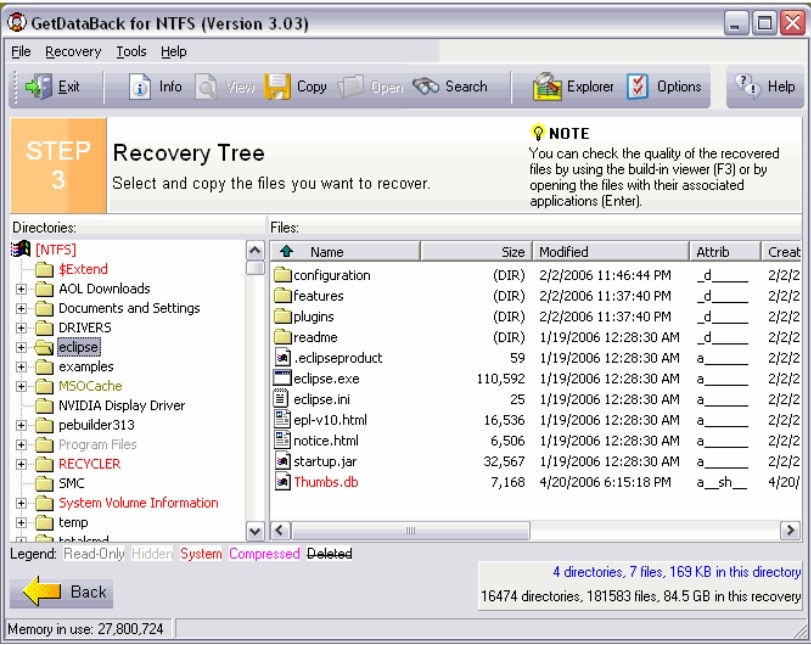
Step 4. Upon selecting the file system, Get Back Data will display the files as shown below. The left pane of the interface displays the folders recovered. You can select files within a folder to check for the content, which you can see on the right side. Based on this, you can make the selection of the folder. You can recover the content by clicking the Copy button or heading the Recovery tab in the menu bar and choosing Copy option. Ensure that the destination is the master drive or an external source.
Get Data Back Shortfalls observed:
- The copy feature becomes active only when you purchase a license key.
- The entire layout of the program can be confusing due to improper design.
- Rather than providing information directly, users have to select the file system before to see the content, which can be frustrating for many and tedious for those who are not much into computer engineering.
Part 2. The Best Way to Get Data Back
The above shortfalls observed could be the result of the improper design and the way the program functions in scanning the drive. A better way to get back the data from your Mac is by using iSkysoft Data Recovery for Mac (or iSkysoft Data Recovery for Windows). The software is a leading recovery tool for Mac and iOS devices. The reason behind its success is the simplistic interface and features. Even a rookie with no prior knowledge of a computer will find himself/herself recovering their data in a few simple steps.
Key Features of Recoverit (IS):
- Recoverit (IS) can recover data from deleted or resized partition

- The ability resume scan and retrieve content at a later time
- Flexible recovery settings
- Selective file recovery option
Step-by-Step Guide to Use Get Data Back Alternative
It allows the user to recover data that was lost due to emptied Trash bin, accidental deletion by Command + Delete, and corrupted files. Below is a guide on how to retrieve to retrieve you lost data using this mode.
Step 1 Download Get Data Back Alternative
You can download the program from the original website. Install the program by dragging the executable file to the Applications folder. After completing the installation, launch the program by double-clicking the icon from the desktop or the dock. Once the application launches, you will witness the primary interface displaying all the 6 different file type options. You have to press one or more options from them, then click "Next" button to go on.

Step 2 Scan the Drive
Clicking the option will open a new window. In the window, you will notice all the partitions of the Mac along with the size and file system details. If the connected external drive is not in the list, do not worry, just click the "Refresh" icon. It will then refresh and list the drive. From the list, you have to choose a particular volume from which you lost data or want to retrieve data. Select the partition and press the "Start" button appearing in the menu bar at the top.

Step 3 One Click Get Data Back
The scanning is dependent on the file format selected and requires some time to complete. After Recoverit (IS) completes the scan, it will display all the recoverable content in the next window. A benefit of the process it that it will list the documents along with the file validity attribute, which tells you about the condition of the file. If it is good, then you can recover it with ease. If it is bad, then it is impossible to recover. You can preview the content of the file by clicking it and seeing the content in the preview screen. Based on this, you can make selections. After finishing with the selection, you can press the "Recover" button from the bottom of the window. A small dialog box opens asking you to pick up the destination path. You have to pick other than the source drive, preferably an external hard disk. Allow the program to complete the process, before you can browse the folder.


