


Media recovery is an important task because it provides the chance to get back the lost data, which does happen in today's age. Software tackle, power fluctuations, virus attacks, and other known possibilities are the major reasons behind data loss. We often experience agony, frustration, and deprived of a solution to retrieve the content. The article presents you with the solutions that are easy and yet powerful to recover deleted or lost media from a computer.
Part 1. The Easiest Way to Creat Media Recovery If You Lost Files on Mac and Windows
As we speak about media recovery, it is important that the recovery tool possesses the structure to handle the large files of the media. Many programs do offer data recovery but fail to perform a media recovery when the need arises. The reason is the failure of the algorithm and the robust construction of the pulling out data from a corrupted hard drive. iSkysoft Data Recovery for Mac (or iSkysoft Data Recovery for Windows) is one such program that assists you in getting back the lost or deleted media content from your Mac or Windows PC in a few simple steps.
The robust construction of the algorithms and the layout ensure that the software is capable of penetrating the platter of the hard disk to read the sectors that usually store the data. The action helps in maximum retrieval of data, making the program a must-have tool for every Mac and Windows user.
Why Choose This Media Recovery Software:
- Four innovative recovery modes to retrieve maximum content from a system.
- Supports Mac 10.5 and above, and Window XP and above platforms.

- Functions smoothly on exFAT, FAT16, FAT32, HFSX, HFS+, and NTFS file systems.
- Settings to maximize the search and retrieval process.
- One-click button to start and stop scan.
Step-by-Step Guide to Recover Media Files
Step 1. Download and install the software for Mac version from the original site of iSkysoft. Drag the file to the Applications folder to complete the installation. Launch the program from the same folder by clicking the icon. The program window appears on the screen showing you the supported file types. Now you can choose the file types to recover and hit "Next".

Step 2. The lost data recovery mode is capable of extracting data lost due to accidental deletion or corruption of the system file due to a virus attack. It handles the media files very well and ensures that it gets back the maximum content with ease. The mode will open a new screen that lists the partitions of the drive along with their size and file type. If it is blank, press "Refresh Drives" at the end of the screen. Once the list appears, click the partition that contains the media files, and press "Start" from the menu bar to begin searching for the data.

Step 3. The program displays the recoverable media files from the drive arranged in an orderly fashion. You can use the preview screen to see the content of a file. Use this method to mark the files that you like to move from the system to an external driver. After marking, click "Recover" in the menu bar to allow the software to extract the files and save them at preferred location. Plug an external drive and use it as the saving location.

Note:
- Enable deep scan for enhanced file search from a formatted hard disk and partition.
- You can filter the file search using the name and the file type for a speedy recovery.
- Save the scanning information that you can use in the future for a quick recovery.
- The validity of the file tells you about the programs capability in extracting the data. Use it to mark good files and increases the recovery chances to the maximum.
Part 2. How to Creat Media Recovery Without a Software
If you are upgrading to Windows 8, the first thing that you require is creating a recovery media, which is an alternative method to boot the PC. There is a change in the process since Windows 7, and the latest update works for both disc and USB based recovery media.
Step-by-Step Guide to Recover Media Files Without a Software
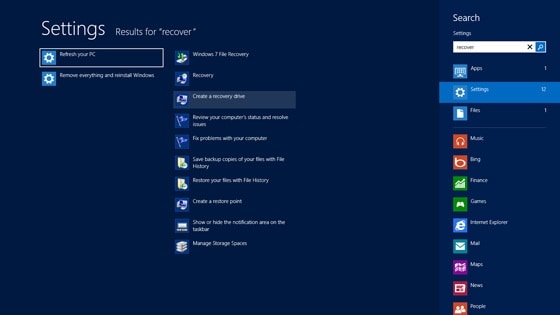
Step 1. Enter "Recovery" in the search box in the start page and then change to the Settings view. You will see the option as "Create a recovery drive" in the appeared list.
Step 2. The creator is a desktop wizard that guides you through the process. It will create the disc based on the bit version of the operating system. For instance, if you are running 32-bit, then you will need a 32-bit recovery media. The settings happen automatically, and you cannot share the disc with other computers if they are running on different bit version of the Windows OS.
Upon clicking Next, it will prompt you to connect USB drive or displays available drives. If you want to create a disc, and then choose the link with the title, "Create a system repair disc with a CD or DVD instead". However, we will look at USB because it is a new addition to Windows 8.
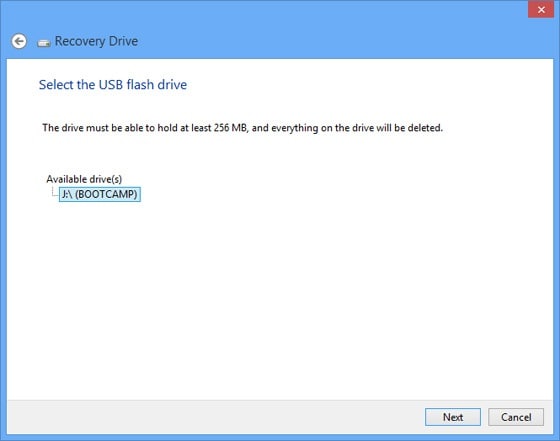
Step 3. You will see a message that states that it will erase the content on the USB because of the formatting procedure. You will see this message after clicking Next. The wizard will format the drive and then begins to copy the necessary files to the USB drive that make up the recovery environment.

After completion of the process, you can use the recovery media to boot your computer if you are facing issues during the startup with access to different tools. Please note that the recovery media a "last in case" resort for Windows 8. All you ought to perform is press "repair the computer option" during the "install now" screen on the computer. If you actually enter Windows OS, navigate to the settings, advanced startup options, and gain access to the same set of tools.


