


Which transition effect is best for the video? How to use a dissolve transition in the video?
A dissolve transition is a wonderful video effect made by transitional video editing technique. If you would like to represent the time passing in your video, you can use a dissolve transition on your video. Through fast motion can also be a great editing feature to show the passage of time. A dissolve transition should be the best choice. In this article, we will share tips on how to use a dissolve transition in the video. And you will get the best dissolve transition video editing software. Read on and learn the details.
- Part 1. What is the Dissolve Transition?
- Part 2. How to Add Dissolve Transitions in Video or Film
- Part 3. Do's and Don'ts When Using Dissolve Transitions
Part 1. What is the Dissolve Transition?
What is a dissolve transition effect? Dissolve is an effect that is used in post-production in film making and video editing. A dissolve transition is to make gradual transition from one picture to another. It presents the effect of showing overlaps between two frames that is from the end of one frame to the beginning of the next frame. A dissolve transition effect might be also used in montage sequences. When using the dissolve transition effect, it means that a period of time has passed between two shots. To use the cross dissolve effect is very easy, but you have to pay attention to the sound of the video. Do not forget to adjust the audio accordingly while doing dissolve. If not, you will find that there is no sound in the scene or the sound does not belong to the scene correctly. In addition, it is important to learn that when and where to use the dissolve transition. The dissolve transition effect needs to correctly use on passing time of two scenes. And you just apply the effect between the scenes, which also is to connect your video clips from one to another.
Part 2. How to Add Dissolve Transitions in Video or Film
When searching around the internet for how to do dissolve transition on the video, you can find many solutions. While the best way is to use Filmora Video Editor for Windows (or Filmora Video Editor for Mac) to create dissolve transition on the video. Filmora Video Editor is a very easy-to-use video editing software that enables the dissolve transition effect. You are able to use this video editor to create movies and edit videos without too much learning. This video editing software supports to create and edit videos from any format and any type. You can make the video with dissolve transition effect with the video from your computer, mobile devices, YouTube, Facebook and other sources. It is also possible to use the dissolve transition effect between two images. And there are a large number of audio tracks that you are able to add to your video as background music.

Why Choose Filmora Video Editor:
- This video editor provides you with various video effects, including transitions, filters, texts, elements, overlays, green screen, and more.
- You can use the built-in transition effect to any frame of your video and edit the duration of the transition to fit your scene.
- There are video editing tools like crop, rotate, trim, split, combine, and audio editing tools for you to adjust the audio to fit the dissolve scene.
- To make your own masterpiece, you can use the advanced video editing tools to stabilize video, adjust the color and sound, enhance video, etc.
- To share the video with dissolve transition effect, you can choose the option of special format, DVD, social media sites, and others.
Easy Steps to Use Dissolve Transitions in Your Video
Here are steps on how to create cross dissolve transition in the video with Filmora Video Editor.
Step 1. Set up and launch the Filmora Video Editor
The first thing you have to do is to install the Filmora Video Editor on your computer. You can have on screen guideline for program installation. It is as simple as installing other programs. Just follow up the indicated instruction in every step until you finish the installation. And then launch the program on your computer.

Step 2. Open the editing window and import media files
In the program main interface, choose the "FULL FEATURE MODE" option to open the video editing window. On the left side of the program interface, you will see the media library. And you can use the "Import Media Files Here" button to choose videos or images from your computer and import them to the program. The media files will be loaded to the media library.
Alternatively, you can click on the "IMPORT" button and choose the media files from your phones, cameras, Facebook or YouTube.

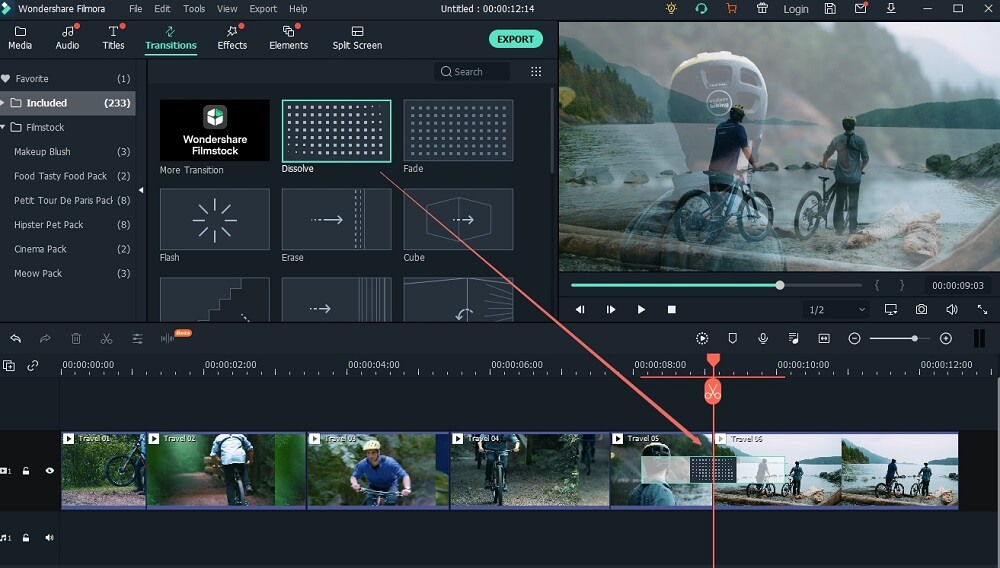
Step 3. Create cross dissolve transition on the video
Now drag more than two videos and images to the timeline. And then click on the "TRANSITIONS" button above the timeline. It will open the library for the transition templates. Choose the dissolve transition effect and drag it to the frame between the videos or images. And click on the play button on the upper right side of the program window to preview the video with the dissolve transition effect.
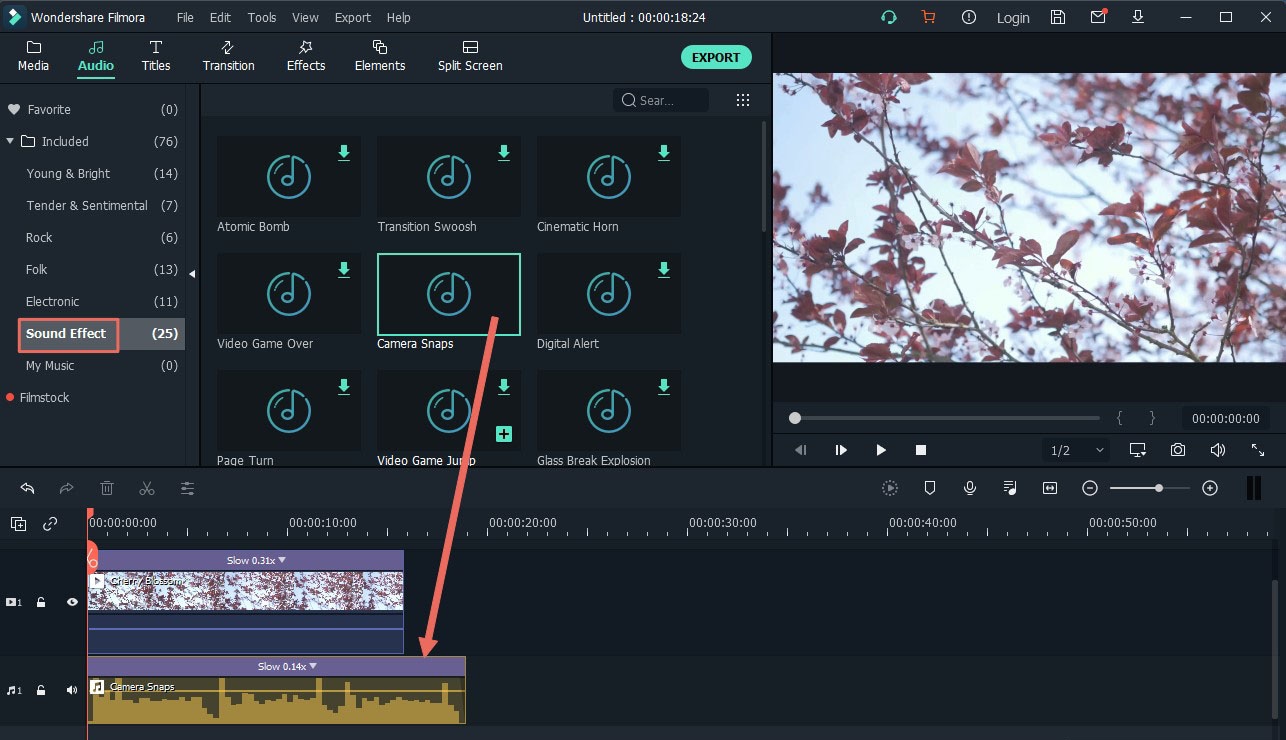
Step 4. Add music to the video
You are able to add background music to the video. Just click on the "MUSIC" button above the timeline and you can find there are audio tracks in many types. Click on the music file you want and drag it to the timeline. And then adjust the music duration to fit your video.
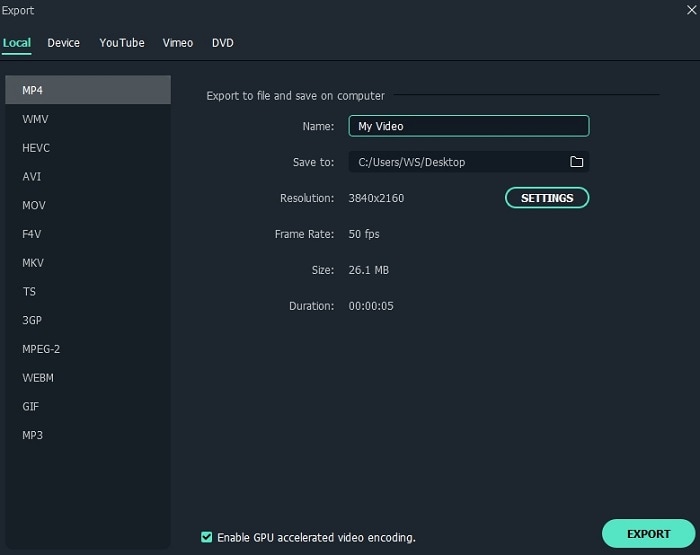
After that, click on the "EXPORT" button to save the video.
Part 3. Do's and Don'ts When Using Dissolve Transitions
When using the dissolve transition effect, you have to learn the do's and don'ts when using dissolve transitions.
1. Do not use the dissolve transition between every individual shot in your clip.
2. Do not use the dissolve transition in the case that two people converse with shots of two over the shoulder. It might look very silly on the shot. You can just apply a transition for the conversation and turn into a new scene.
3. When using dissolve transition, make sure the sound of each scene does not overlap. You can just mute the sound of each scene out or in. And also adjust the footage with fading in and out to make the dissolve transition look great.
Conclusion
The cross dissolve transition is a great effect, especially in the time passing scenes. Just get the proper video editing tool to make the dissolve transition effect on your videos and images.


