


Did the 20-page report that you have been working on for the past one week disappear suddenly from your computer? Did you misplace your data due to a corrupted operating system? Although we may think that such actions would result in loss of data permanently, there is an opportunity to solve the problem of how to retrieve deleted word documents. There is a high probability that the documents leave traces behind on the computer system, which makes it easy for a data recovery tool to retrieve them when you make a mistake. The current article discusses in detail about the tips and tricks related to the retrieval of deleted Word documents from a computer.
- Part 1: The Best Way to Retrieve Deleted Word Documents
- Part 2: How to Retrieve Deleted Word Documents from the Recycle Bin
- Part 3: Retrieve Deleted Word Documents by Searching the Original
- Part 4: How to Retrieve Deleted Word Documents from Word Backups
- Part 5: How to Retrieve Deleted Word Documents by Creating a New Word Document
Part 1: The Best Way to Retrieve Deleted Word Documents
The most recovery methods for have limitations in terms of recovering lost a Word documents from a computer or Mac. It will be painful to learn about the loss of data after an individual spends a lot of time in preparation of the documents. At this point, a better way to retrieve the lost or deleted Word documents from a computer is by using iSkysoft Data Recovery for Mac (or iSkysoft Data Recovery for Windows).
It is an all in one solution to retrieve both comprehensive and unique data from Windows and Mac. The program ensures that the user has full control over the procedure and adopts an appropriate recovery technology in finding the lost files. An additional characteristic of the program is its capability to recover data from formatted hard disk, infected partition, media devices, or retrieving data after the installing the operating system. Users can also use the program to recover data from external devices such as memory cards, flash cards, USB sticks, and CF cards.
Key Features of Recoverit (IS):
- Humanized recovery settings for complete control of the recovery process

- Provides capacity to start and stop scanning of the drives, and also the ability to save the scanning results for future use
- It displays the recoverable data with original file structures and folders
- It shows images, e-mails, text files, Word files, and other data in its preview screen as long as the files are in their original format
- It mentions the file quality - valid or invalid, which is helpful in adding a particular file to the recovery process
Step-by-Step Guide to Retrieve Deleted Word Document
Step 1 Install and Launch the Software
Users can download Recoverit (IS) from its official website. Installation is like any other publication on Mac. They just have to drag the executable file to the "Applications" folder and double-click the file for installation. Launch the program after installation is complete. Once the main interface of the program appears, users will notice the 6 file type options appearing on the screen. You will have to select "Document" tan and click "Next" button.

Step 2 Choose the Location
The application will display the partitions on the hard disk. Users have to choose a drive from which they wish to search for the deleted Word documents. After selecting the drive, press the "Start" button appearing at the bottom. Additionally, if you do not see any connected external hard disk, use the "Refresh" icon. After the program finishes the scanning of the selected drive, it displays the files that are recoverable in a new window.

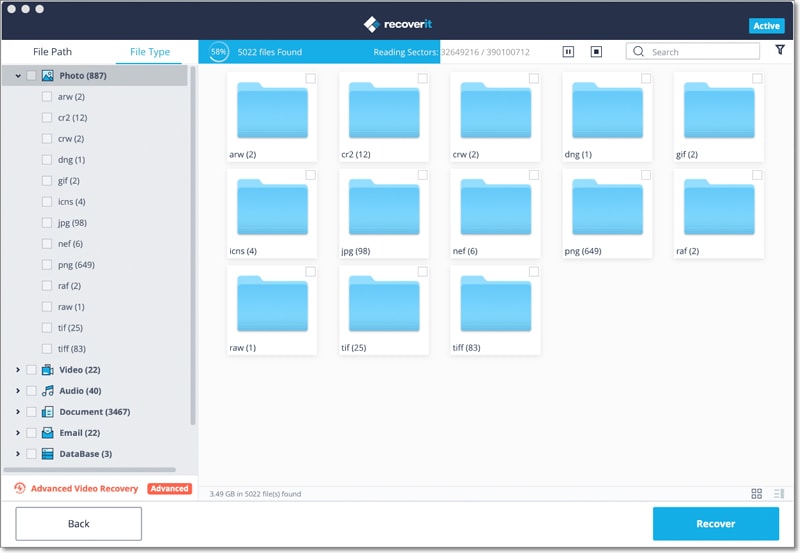
Step 3 Scan Deleted Word Document
As it does not view the contents according to the file names or folders, you need to go through every file or choose a category and look at the preview of the file in the preview window. Although it is a tedious process, it will save time in searching for crucial documents. From the list, mark the checkboxes alongside the files and press "Recover" button at the bottom to begin the recovery process. Assure that you do not accept the local hard disk as the destination path. It is advisable to use an external source such as USB stick or external hard drive. Mention the path and allow the program to complete the recovery process.
Note: If you want to advance the process, you can use the following two options:
- Using scan deleted files: the process will allow the program to look for files and folders lost or removed from partition or a logical disk from the hard drive. It will save plenty of time, as there are only a few files and folders misplaced due to accidental deletion of the corrupted partition of the hard disk.
- Using filter options: By choosing the filter options, users gain the possibility to search for only a specific file type such as images, videos, documents, archives, and so on. An additional advantage offered by this feature is that users have the opportunity to select sub category under each particular file format. For example, under documents, users can look for Word documents rather than Excel or PowerPoint documents. One can also use the Disk Region tab to select the starting and ending sector of the scan from the selected partition or hard drive. It not only saves time but also becomes an accurate method for recovering data if users are confident about the location where the previously stored all the relevant documents.
Part 2: How to Retrieve Deleted Word Documents from the Recycle Bin
First of all, do not panic about losing a document. There is a high probability that you moved the file accidentally to a different location. If so, you can simply search for the document using the Windows search feature. If you failed in retrieving the document, then it is because you have entered from title or searching for the file in the wrong location. If the Word document is still nowhere, then the probability is that you have accidentally deleted it, and lucky you did not empty the recycle bin. If you did not empty the recycle bin, then follow the steps below to retrieve the deleted Word document.
Step-by-Step Guide to Retrieve Deleted Word Document
Step 1. Click the icon of recycle bin appearing on the desktop. You can also open at by right clicking the mouse button and selecting "Open" choice.

Part 3: How to Retrieve Deleted Word Documents by Searching the Original Document
If you are lucky, then there is a probability that the original document still exists somewhere on the computer. The following steps will be helpful in looking for the same using the original document.
Step-by-Step Guide to Retrieve Deleted Word Document
Step 1. Press the Windows icon to open the menu bar. From the window, choose "Search" option.

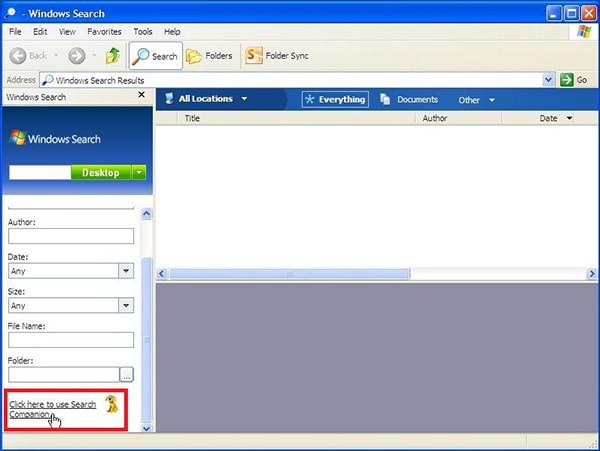
Step 2. In the Windows desktop search pane, choose "Click Here to Use Search Companion" option, if that is available.
Step 3. Once the search companion window opens up, select "All Files and Folders" option.

Step 4. Enter the title of the document that you wish to find in the file name box.
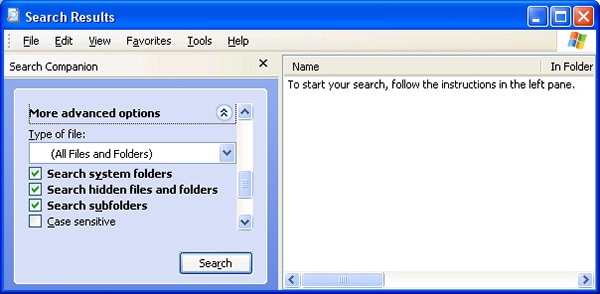
Step 5. Click the search button to allow Windows to search for the emotional document.
In the search results window, if you do not notice any list containing the documents with the name entered in the search box, you can initiate a new search by using the file format of the document. Rather than entering the title of the document, you can search for *.doc or *.docx format, which will in return open up all the files ending with that format. You can then look at for the file that you wish to retrieve from the list generated by the search result.
Part 4: How to Retrieve Deleted Word Documents from Word Backups
If the steps mentioned above did not retrieve any documents that you are searching for, you could use the Word backups, a place where Microsoft Word creates a backup of the original document. Retrieving deleted Word documents using Word backups is only possible when the backups feature is active in Word. Secondly, it is also necessary to know the location of the deleted file. If you have the backups enabled, follow the steps below to retrieve the deleted files.
Step-by-Step Guide to Retrieve Deleted Word Document
Step 1. Open the Word document and choose the file type from the upper left corner of the screen.
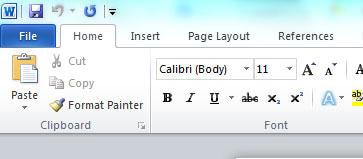
Step 2. From the menu opened under the File tab, select "Open" feature.

Step 3. Selecting the feature will allow you to browse to the folder where you last save the document. From the file formats, you have to select *.wbk to look for the backup file created by Word. You can then select the document that you wish to recover and click "Open".
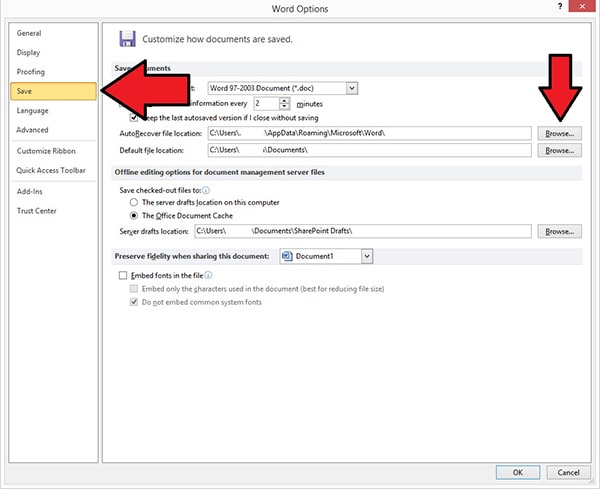
If the process was not successful, then you can carry out a manual procedure, where you would be opening the folder containing the backup files created by Word. You can access the folder by navigating to the Options tab.
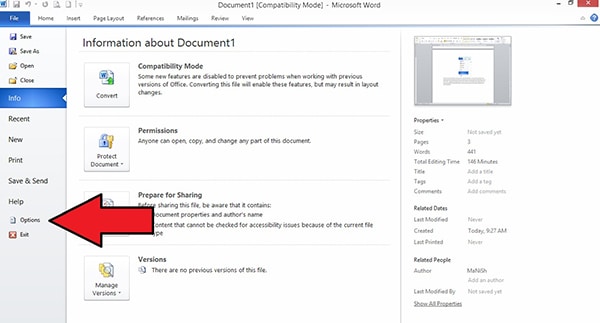
Once the menu of the options tab opens up, you need to choose "Save" from the left side of the screen. Selecting this feature will provide information containing under me the category on the right side of the screen. In the same screen, under the Autorecover file location, you will notice the path of the folder where Microsoft Word stores the backup of the documents. Click the "Browse" button to open the folder directly. You can then search for the files within the folder.
Part 5: How to Retrieve Deleted Word Documents by Creating a New Word Document
Retrieving deleted Word documents by setting up a new Word document is only possible if you were unable to locate any evidence of the file on your computer using the above methods. In order to carry out the search, you first have to create a document that is similar to the one that you lost. It means that the file name and the format of the document will be the same as that of the earlier version. You can follow the below steps to search for lost Word document by creating a new document.
Step-by-Step Guide to Retrieve Deleted Word Document
Step 1. Open Microsoft Word document and choose blank document. Enter the content and ensure that the format is similar to that of the earlier version. Save it using the same file name that you previously gave to the previous document.
Step 2. Save the document probably in the same location as that of the earlier document. Now, right click the save the document to enter the properties. From the properties window, choose previous versions. If you are fortuitous, you will be able to see all the versions of the Word document previously stored on the computer. You can then choose the most appropriate file format based on the date and time, and click Recover to get back the lost Word document.
As said earlier, the process is only useful if you remember the format and title of the document. It could be a tedious procedure, but there are chances that you might find previous versions of the document stored by the Word application.
Given the options and advantages provided by iSkysoft data recovery, using it is preferable choice to recover the lost or deleted Word documents from your Mac. With the support offered by it, you can avoid frustration and agony felt due to the loss of data. Get your trial copy today!


