If you've accidentally deleted a critical document on your Mac, it may seem that it's gone forever. However, if you can act quickly, you may be able to recover deleted document with the right data recovery software. You don't even have to be a brainy computer nerd to recover the deleted documents successfully. After reading this article, you'll realize that you should have never panicked when you realized that your important document is missing due to accidental deletion.
- Part 1: How to Recover Deleted Documents Easily
- Part 2: How to Recover Deleted Documents in SharePoint
Part 1: How to Recover Deleted Documents Easily and Completely

Recovering deleted documents on Mac has never been as easier as with Recoverit for Mac (or Recoverit for Windows). The comprehensive program is designed with top notch data recovery modes that enable you to retrieve data lost due to various scenarios such as improper operation, virus infection, formatting, deletion, unexpected power failure and other unknown reasons.
Recoverit (IS) uses the latest powerful scanning algorithms to scan Mac based hard drives and external hard drives with extremely fast speed, and without destroying any data. Once you install the program on your Mac, you'll be able to recover almost any file, including documents, videos, photos, music, email, archive files and more from Mac and other devices that can be connected to your Mac.
Why Choose This Deleted Document Recovery Software
● You can preview your files and even distinguish the valid and invalid files before recovery.
● Lost data is recovered in original quality with just a few clicks.
● The software recovers data from HFS+, HFSX, FAT16, FAT32, exFAT as well as NTFS file systems.
● You can pause or restart the scanning process at any time.
● File filters and folder tree allows you to find your files in seconds.
Step-by-Step Guide to Recover Deleted Documents
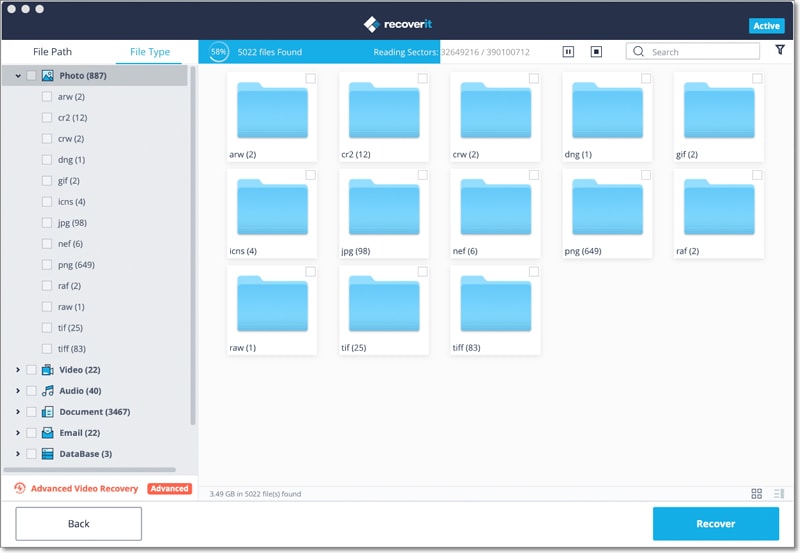
Step 1. You should be aware that continued operation of your drive, including the download and installation of the program in the exact location where you lost your documents, can cause permanent data loss. The more the hard drive is used after deletion, the more difficult it can be to retrieve the lost documents. We recommend that you use another Mac computer to download the software, install it to a USB flash drive and perform data recovery with the program installed on USB flash drive. Once you launch the software, you'll see the 6 file type options displayed on the main interface like in the picture below. You can select "Document" in this situation and click "Next" button to continue.

Step 2. Recoverit Deleted Document Recovery tool helps you recover lost data due to accidental deletion through the Command + Delete, corrupted files, emptied Trash and more. In the next window will display the logical drives. Click on the drive where your lost documents were saved and then click on the "Start" button located on the top of the software's interface to start the scan.
In case your connected external drive isn't listed, click the "Refresh" button located at the right side of "External Removable Device" and it will appear. Once the scanning process is complete, a new window will open with a list of files that can be previewed before recovery.
Step 3. Check the documents in the list of scan results and then click the "Recover" button located on bottom of the software's interface. Your documents will be saved to the selected path and not to the drive where you lost your documents. We highly recommend saving the document to external drives.
Part 2: How to Recover Deleted Documents in SharePoint
When you delete a document in SharePoint, it's moved to one of the two Recycle Bins, (one bin for the site of workspace and the other one for entire site collection). These Recycle Bins acts as a safety net from where deleted documents can be restored with ease. In this section, we outline how you can recover the deleted files from both Recycle Bins.
Step 1. Access the First Stage Recycle Bin. Click on the "Site Contents" link in the quick launch bar.
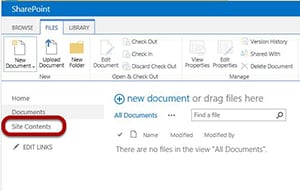
Note: If you are using SharePoint 2013 or you are unable to see the "Site Contents" link in the quick launch bar, directly select the "Site Contents" link and then you'll find the recycle bin.
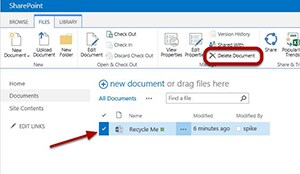
Step 2. Recover Deleted Document from First Stage Recycle Bin. Click on the recycle bin icon, also known as the first stage recycle bin, end-user recycle bin or site recycle bin. The recycle bin allows users with the appropriate permissions to recover items just like it was deleted from the desktop. If you can notice the document in this recycle bin, you can restore it right away. Just select the document and choose to restore it. The document will be saved back to its original location.
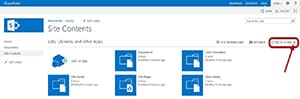
Step 3. Access the Second Stage Recycle Bin (Site Collection Recycle Bin). If you didn't see the document in the first stage/site recycle bin, it might be in the "Site Collection" recycle bin. Most end users may not be aware that this second stage recycle bin exists and that they simply need to ask a Site Collection administrator to restore the document.
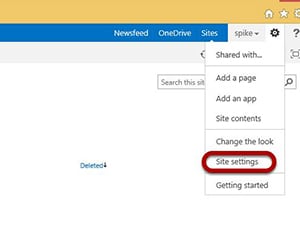
As a site collection administrator, go to Site Actions (or click the gear) Site Settings to get the Site Collection recycle bin link.
Click the Site Collection recycle bin link.
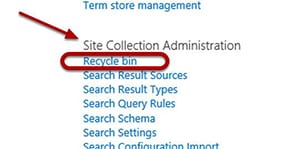
When you click on the recycle bin link in "Site Collection Administration" section of "Site Settings" page, you'll be taken to the Site Collection Recycle Bin page.
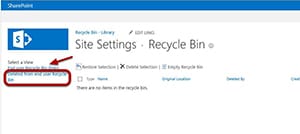
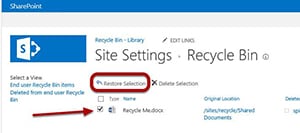
Step 4. Recover the Deleted Document from the Second Stage Recycle Bin. From Site Collection recycle bin page, you'll be able to see the documents that were accidentally deleted and are still sitting in the first stage recycle, as well as the documents that were deleted from the document library and are now in the second stage recycle bin. To recover the deleted document, click the "Deleted from end user Recycle Bin", link, select the document and click the "Restore Selection" button. The document will be saved back to its original location "Documents library", and not to the first stage recycle bin.