Data recovery has become an important task in the technology-driven economy. It is common for any individual to delete files accidentally. Not only the act leaves one with a sickening feeling but also in a state, where it becomes impossible to recover erased files. We all think that deleted data no longer exists in a system. However, there is a high possibility that the documents, photos, and any other files present on a computer or an external device such as an SD card, leave traces of their whereabouts within the system. Due to this, it is possible to use data recovery tools to retrieve information. In this article, we will be looking at the information that will be helpful in recovering erased data from different sources.
Part 1: The Best All in One Tool to Recover Erased Files
Many data recovery solutions have certain limitations. They make it difficult for any individual to retrieve entire data from a USB thumb drive or an external hard disk. An all in one solution that is capable of recovering data without limitations is iSkysoft Data Recovery for Mac (or iSkysoft Data Recovery for Windows). The data recovery from iSkysoft uses innovative recovery modes to unerase files from any device at a faster pace.
Key Features of Recoverit (IS):
- Flexible recovery settings
- One-click pause and restart of the scanning process
- Allows the user to save the scan results for future use
- Allows to scan data for a particular file format
- Increase the speed of search using filters and folder trees
- Helps in retrieving documents with original filenames and directories

Step-by-Step Guide to Recover Erased File
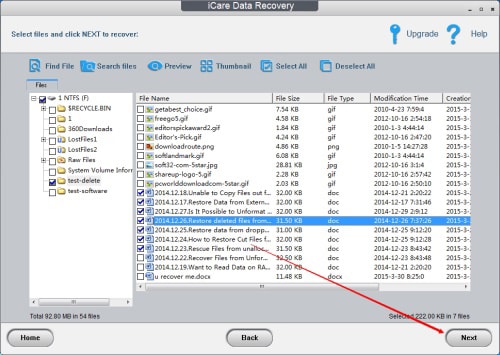
Step 1. Visit the iSkysoft official website to download the Data Recovery for Mac. You can install the application by dragging the executable file into the applications folder. Follow the on-screen instructions to complete the installation. Launch the program. From the main screen, choose the types for erased files and hit the "Next" button.

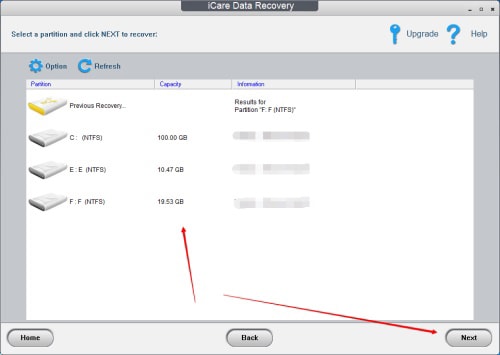
Step 2. The recovery mode allows the user to recover deleted or lost data from the system, from the trash, and files lost due to a virus attack. Selecting the recovery mode will display a new window as shown in the picture below.
From the window, you can see that the program shows the partitions of the hard disk. You can now select a particular hard disk from which you wish to recover content. You can initiate the scanning process by pressing the "Start" button located at the top of the menu bar. For any reasons, if you do not see any external hard disk, you can click the "Refresh" icon next to "External Removable Device".

Step 3. After click the "Start" button, Recoverit (IS) will begin scanning the selected partition of the hard disk for recoverable content. The time needed to complete the scan is dependent upon the size of the partition. Once it completes the scan, it will display all the recoverable files along with their validity. Validity is the source of information that tells the user about the retrievable condition of the file.
Based on the requirement, users can then begin selecting the files that the wish to recover from the selected partition. They can select all the files or records belonging to a specific file format. Once done, the user can click the "Recover" button to allow the software to recover the files. It is preferable to choose a location other than the selected partition to ensure that there will be no further loss of data. It is always desirable to use an external hard disk or a USB thumb drive and save the recoverable files.

Tips:
- If you are examining for a particular file format such as e-mails, word document, MP3 file, or any other file format, you can use the filter provided to select the file format and speed up the scanning process.
- Deep scan technology recovers a number of files. You can enable the option and re-scan the hard disk to look for additional content.
- You also have the opportunity to save the scan results, which you can use it in the future for easy recovery of data.
- Rather than selecting the files blindly, it is important to consider the validity attribute to ensure that the software recovers the chosen files with ease.
Part 2: How to Recover Erased Files from SD Card
We all use SD card regularly to store documents, messages, pictures and other media files. It will be heartbreaking for any person who loses data in their SD card. A highly recommended program, which is available on its website, is a wise choice that will quickly scan an SD card and helps an individual recover the lost data from it. The software that is available for download is EaseUS Data Recovery application.
Step-by-Step Guide to Recover Erased File from SD Card
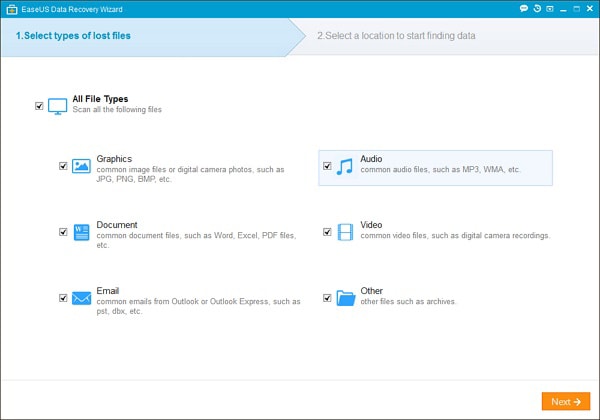
Step 1. Customers can download the program from the official website. They can follow the on-screen guidelines to install the same. After finishing with the installation, they can connect the SD card to the computer using a card reader. From the primary interface of the software, you can check the file types that you wish to recover.
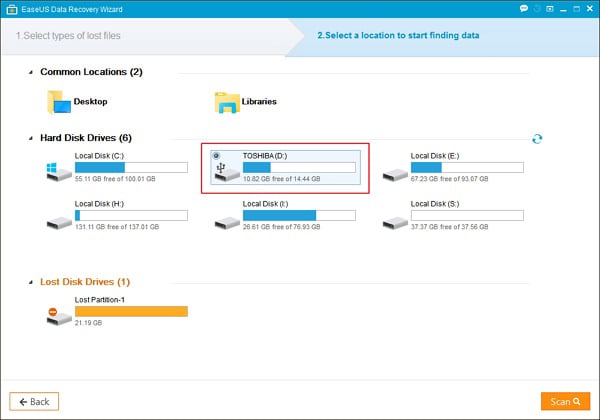
Step 2. Now select the SD card and click the scan button at the bottom to allow the software to begin scanning for the chosen file formats.
Part 3: How to Recover Erased Files from USB
USB thumb drive is the easiest mode of transferring data between systems. It not only is capable of storing a large volume of a filesystem but also readily accepted across different devices regardless of the operating system. It is quite common for people to face troubles and data loss from time to time. The reason behind this could be due to an attack of a virus, which naturally targets the USB thumb drives. Nonetheless, there is a possibility for users to get back the loss of data on a USB stick with the help of a recovery tool.
We are going to consider PhotoRec, which is a free utility software for recovering data loss from a USB thumb drive. An interesting specialty of the software is its ability to retrieve data from a USB drive. In fact, in many ways, the application is a powerful resource for users who would love to get back on the lost data from the USB drive.
PhotoRec is an exciting development by Christophe Grenier, as it can easily recover files from any device whether or not mounted with a drive letter, as a partition, or even formatted. The application is available for different platforms - Windows, Mac, and Linux. According to the developer, the software package is capable of recognizing over 390 file formats and not just photos as the name suggests. Due to this, it is interesting to use the application to recover deleted or lost data from a USB drive. However, the interface of the application inevitably puts off the interest with which a user operates the program.
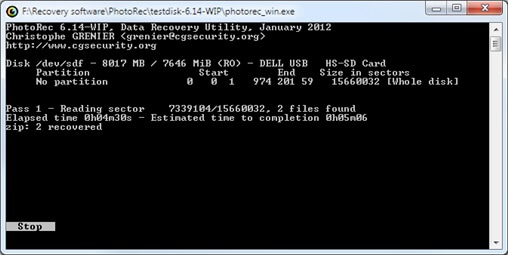
After launching the program, it will display the list of available storage devices connected to the system, which includes a hard drive, removable drives, and loaded card bays. The entire process works like a charm. Users have to select the removable device - in this case, the USB thumb drive. They can then set the search parameters and choose the location to save the recoverable files. The program will then begin scanning the device based on the search parameters and provides information about the recoverable files from the USB drive. The time taken to complete the search parameter is dependent on parameters set by the user and the size of the retrievable data.
The program also gives the opportunity for the user to pause and resume a recovery pass. It is useful in cases when the recovery time runs into hours. In addition, the program provides the chance to perform a free scan of the free space or on the entire drive regardless of the file format selection. A significant element of the software is its “unformat” feature, which analyzes the USB stick for file system rather than just looking at blocks. The feature is helpful for individuals who wish to retrieve directories rather than just files.
Part 4: How to Recover Erased Files from External Hard Drive
It is not strange that you do not find a few files from your external hard drive. Bad sectors and virus attacks often delete files from their original location. There are also instances where users delete content accidentally. Nevertheless, what you should understand and keep in mind is that it is still possible to retrieve data from an external hard disk using a recovery tool. The reason behind this is the traces left behind by the file in sectors of the hard disk. A recovery utility tool scans the unused sectors of the disk and recovers the content with ease.
Step-by-Step Guide to Recover Erased Files from External Hard Drive
Step 1. Download the application from the official website. Install the software by following the instructions. Launch the program, and connect the external hard drive to the computer. The program will display the external drive.
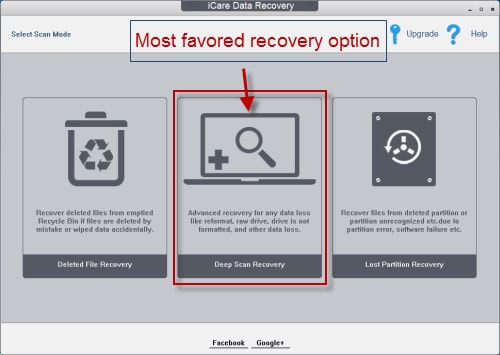
Step 2. From the main interface, choose an appropriate recovery mode. It is advisable to go with the deep scan recovery mode, as it helps in recovering larger content from the external hard disk. In the next window, you have to determine the external hard disk from which you would like to recover data. After selecting the specified drive, click "Next" and wait for the program to complete the scanning procedure.
Step 3. After the application completes the scan, it will display the recoverable content from the external hard disk. You can then make a selection of the files that you wish to retrieve and hit the "Next" key located at the bottom to save the files to a new folder on your computer's hard disk.