A word document is a critical application. Students, working professionals, homemakers, and others use the program to create a document, which they can send it to anyone at any time. Although technology has given the advantage of setting up the documents at a faster pace, there is still the chance of losing them due to corrupted hard disk, improper functioning of the operating system, and loss of data due to a power outage. Losing data, especially Word documents will put anyone in agony and pain because one spends a lot of time in creating a document. If you are among those who lost data and wishes to restore word document to the initial state, then, this article is for you.
Part 1: The Best Way to Restore Word Document
If there are plenty of documents to restore, there is no need to use a tedious and troublesome way. It is here that you can look forward to the use of iSkysoft Data Recovery for Mac (or iSkysoft Data Recovery for Windows) to restore deleted Word documents from the computer. The application is a single solution for data recovery that is capable of identifying different file formats. Due to its in-depth scanning technology, it helps the user in retrieving most of the deleted files from the computer.
Key Features of Recoverit (IS):
- Innovative technologies to recover data
- Flexible recovery settings
- Risk-free data recovery
- Deep scan technology

Step-by-Step Guide to Restore Word Document
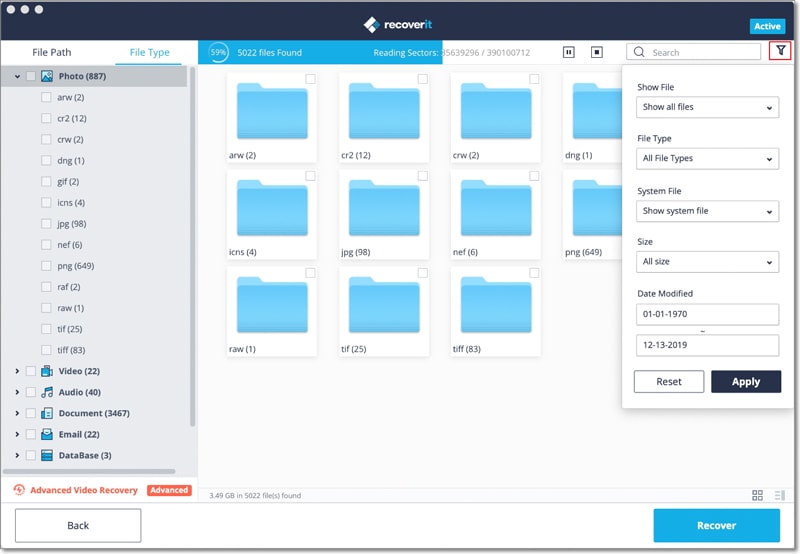
Step 1. Visit Recoverit (IS) for Mac website to download this software. You can drag the executable file to the "Applications" folder and double click the icon to install. Once done, launch the program. To restore Word documents on Mac or Windows, now please select the "Document" option and then hit "Next".

Step 2. From the next window, please select the drive where you have lost your Word documentse and then click "Start". The software will start scanning your lost Word documents for you.

Step 3. After the scan is complete, you can choose the files that you wish to recover by marking them. After marking the files, press the "Recover" button at the top to allow the program to get the back selected files back to the computer's hard drive. The process is the easiest way to restore deleted all lost or Word documents from your Mac. As the deep scan technology scans for the entire computer, you are bound to see even the older versions of a particular file would. It is only possible unless there have been no changes made to the permanently deleted files.
Part 2: How to Restore Word Document from Recycle Bin
The recycle bin offered by Windows is a storage location where accidentally deleted files reside on the computer. It is similar to the "Trash" feature on Mac. Usually, the data within the recycle remain until the user chooses to empty the trash. However, in the files within the recycle bin exceed the space limit, Windows performs an automatic cleanup that deletes large files within the folder.
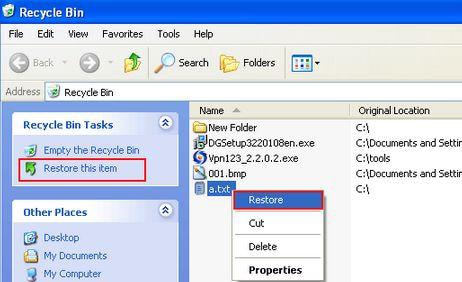
If you have accidentally deleted Word document from your computer, then there is the chance that it is still present on the computer in the recycle bin folder. If you are sure that you did not empty the recycle bin, then there is a chance that you can find the documents in the recycle bin. All you need to do is select the file from the recycle bin that you wish to restore and right click to choose "Restore" option. Selecting this feature will get back the file from the recycle bin to its original location. It is the easiest and common way to recover deleted files from recycle bin.
Part 3: How to Restore Word Document After Crash
The Windows system crash is a notorious element that could make your documents disappear from the protection right before you press the save button. Additionally, there are also moments where we tend to close the document without saving it in a hurry. So, how do you recover an unsaved Word document after Windows crash?
Step-by-Step Guide to Restore Word Documents
Step 1. If you have recently closed a document without saving, or the Windows crash closed the Word document, then you can quickly fire up Microsoft Office application once again. In doing so, you are looking out to recover the close to document using the Windows recovery option. This functionality is only helpful if you have the "recover unsaved documents" option checked in the settings. So, after opening MS Word document again, navigate to the File tab and choose manage versions under the Info tab.
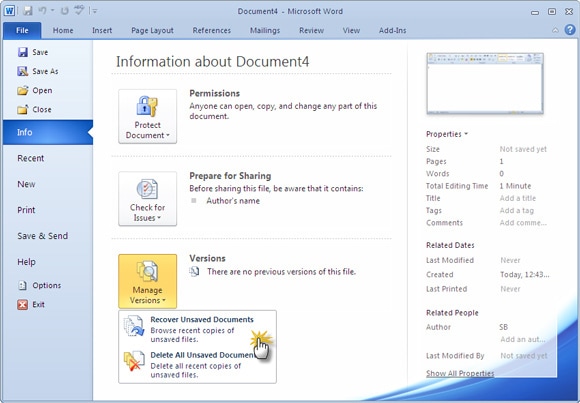
Step 2. Selecting the option will entitle Microsoft Word to open the folder where a backup of the document resides. From the folder, you can search for the file that closed abruptly due to Windows crash.

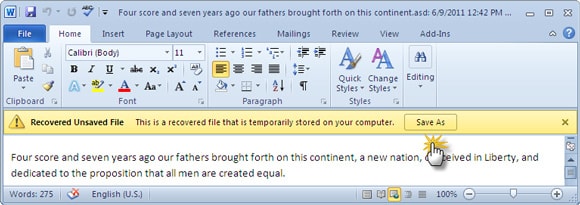
Step 3. To restore the document back to its original state, you need to open the draft as a fresh MS Word document. Upon opening the document, Microsoft will prompt a message that the document is recovered file and temporarily stored on the computer. Pressing the "Save As" button will save the document in the preferred location.
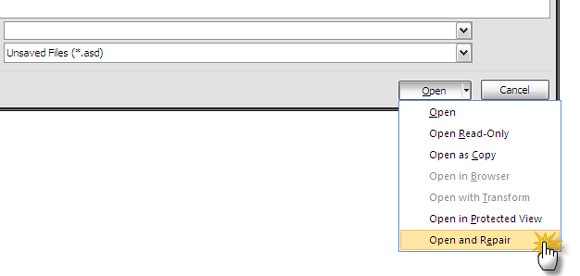
Step 4. There is also a probability that an unsaved document may not open correctly. Under such cases, users can utilize the open and repair feature provided by Microsoft office to troubleshoot reports.
Step 5. Microsoft office provides the opportunity to save the drafts automatically. The Autorecover option is a helpful feature provided by Microsoft. The default is 10 min, which the user can change it to 3 or 5 min based on the requirement. Changing the time will help Microsoft office to save a document at the prescribed interval.

The above settings will help any individual running Microsoft Office platform to save their documents or recover unsaved documents due to Windows crash.
Part 4: How to Restore Word Document After It is Closed Without Saving
Microsoft office has a few safeguards that will help users to recover lost or unsaved documents. Retrieval of a document is dependent on the version of the Microsoft Office and the conditions under which one lost a file. The following steps will be helpful for users to restore their Word document after they closed it without saving.
Step-by-Step Guide to Restore Word Document
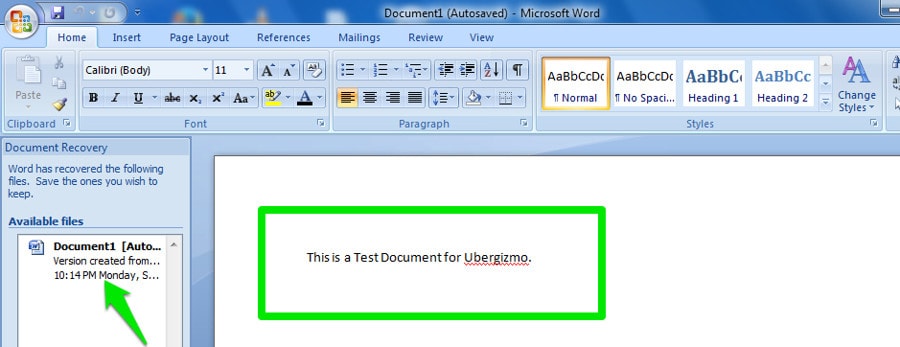
Step 1. Autosave is the preferable way through which anybody can recover his or her unsaved Word document. By default, Word saves a document for every 10 min. Users have the possibility to increase or decrease the time based on their requirement. Using the option is the simplest way to recover an unsaved document. For example, if a user close to the document without saving it accidentally, they can recover it by relaunching the Microsoft Word application. Upon opening, Microsoft Office will open the latest unsaved file. Users can then validate the content of the document and save the file to their hard disk.
Although autosave feature from Microsoft Office is capable of recovering unsaved documents, relying entirely on it is not feasible.
Step 2. Another method through which you can recover an unsaved document is by using the temporary file location. Microsoft Word creates a temporary file of an existing document. There is a chance that your computer still has the temporary files, and you have the opportunity to recover data. Temporary files have ".TMP" extension and use a different application to open the file. Being a temporary document, it also has an additional data apart from the original content. Therefore, it is important that the user studies a temporary document thoroughly and selects only the original content. They can then paste the content into a new document and save the file at preferred location.

Users can access the temporary files folder in the following directory: C:\Documents and Settings\Administrator\Application Data\Microsoft\Word
Part 5: How to Restore Word Document to Earlier Version
Step-by-Step Guide to Restore Word Document
Step 1. Previous version is a fantastic feature incorporated into the Windows operating system. The feature allows the OS to record and view earlier versions of a document. The feature goes one step ahead of the functionality offered by the recycle bin because it allows you to recover permanently deleted files, restore a document to its previous version, and gives you the ability to compare the current and previous versions of the same document. It is quite common for users to delete a file accidentally or rename a file to a different name.
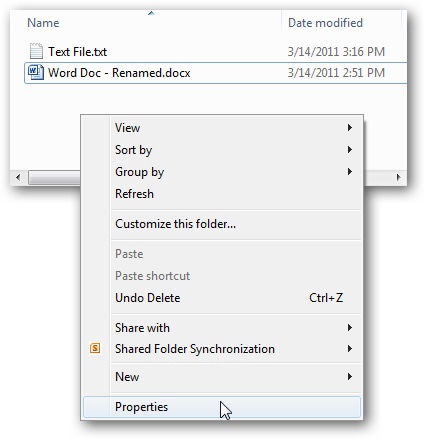
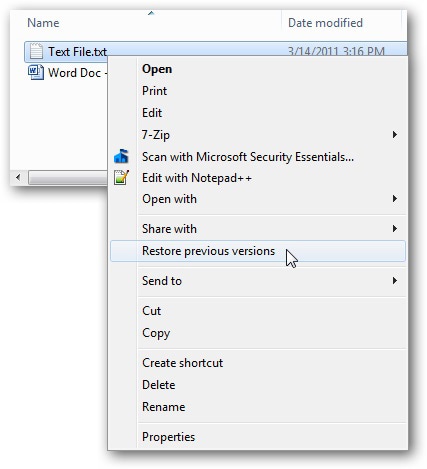
It will be impossible to undo the changes after saving the file. Therefore, to get back to the earlier version of the document, users can simply right-click on that particular document and choose "Restore Previous Versions" option from the submenu. Selecting this option will open the files properties dialogue where Windows will display all the previous versions related to the file. Users can then select an appropriate version and press the restore button to save the file to the computer.
Step 2. If there were modifications made to the file name or deleted from the system, then it is impossible for windows to display the earlier versions related to the file.
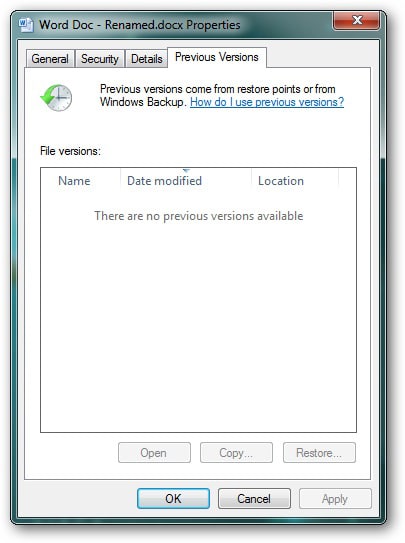
Step 3. Regardless of the deletion of the file or renaming the title, you have the chance to retrieve back to the previous version by right-clicking the file and selecting the properties option. Under the previous versions tab, you will be able to see the folder that stores the snapshots of all the earlier versions of the file. Double-clicking the folder will open the content, from where you can view or copy respective versions of the file. You can use the restore button to save a particular version of the file at desired location.