"Hi. My name is Tina. I have been using my Gmail for quite a while now. However, yesterday I accidentally deleted few emails. I am posting this to know if there is a chance for me to recover those emails, as they contain valuable information." --- From a user.
You might have come across such questions from different discussion forums. We are humans and tend to make mistakes. Of course, Gmail email recovery is a risky process, but you do have the opportunity to try out the methods to see if you can retrieve what you have lost quickly.
Part 1. What to Do If Gmail Recovery Email Not Working
Gmail provides the opportunity to retrieve deleted emails using the Email Recovery option. However, it is a risky process as one might lose the account altogether. The following information we are offering you gives the chance to carry out the operation of retrieval with ease.
Steps to retrieve emails from Gmail using Gmail Email Recovery
Step 1: Google removes deleted emails or accounts in two days. Therefore, you have to act quickly.
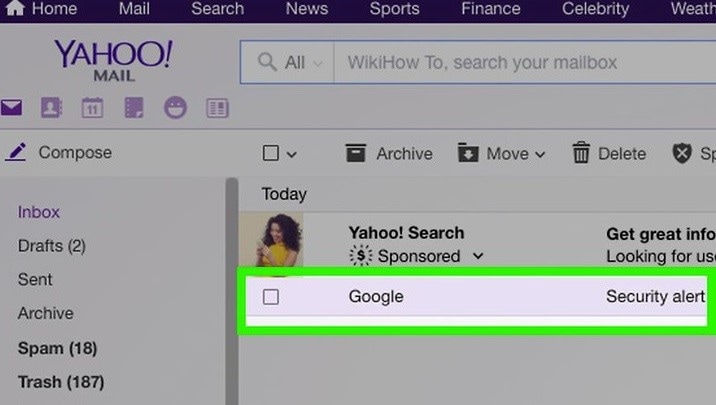
Step 2: In the sign in page, enter the Google Password Assistance, and choose "I am having other problems signing in" feature. Enter the deleted email address and click "Continue".
Step 3: Google will ask you to enter the last password that you remember. Enter the same and press "Continue".

Step 4: Press on the "Submit a recovery request" option. Upon entering the password, you will head to a fresh page. In the same page, you will see a link to the recovery request form. If you do not see a link, then Google deleted your account permanently.
Step 4: Press on the "Submit a recovery request" option. Upon entering the password, you will head to a fresh page. In the same page, you will see a link to the recovery request form. If you do not see a link, then Google deleted your account permanently.
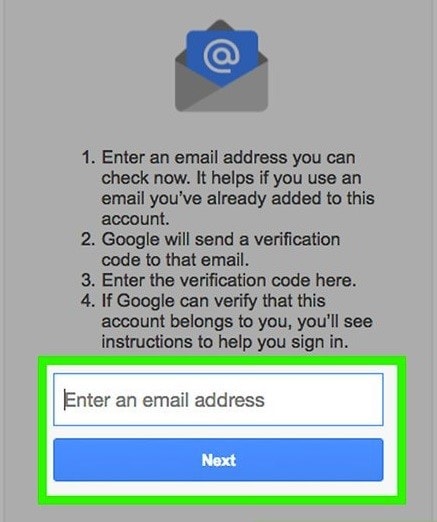
Step 5: After clicking the request form link, you will have to go through series of verification steps to proceed further. You will have to enter an email address and answer the questions related to your password, the last account activity, and the approximate creation of the account. Google verifies these answers. Even if you do not possess answers to several questions, you can still submit the recovery form by explaining circumstances and wait for the response.
Step 6: Google will send an email that you have provided for communication. Check the email and click on the enclosed link to create a new password. It completes the resurrection of your deleted account. At the same time, you will also get back all the data. However, it may take a little time to download all the content at once.
Part 2. How to Complete Gmail Email Recovery on Mac and Windows?
Recovering Gmail emails on Mac and Windows is a tedious process. In some cases, it is impossible because Google provides you a maximum of two business working days before it deletes contents permanently. In such situations, you will require a third party application that is capable of recovering deleted emails on Mac and Windows in a few simple steps.
The software that we are going to talk about today is Recoverit (IS) for Mac (and Recoverit (IS) for Windows). Developed by iSkysoft keeping in mind about the data loss problems, the data recovery program for both Mac and Windows offers an array of features that make it a simple task to recover deleted data.

Step-by-step Guide on How to Do Gmail Email Recovery
Before proceeding, install the free-to-use trial version provided by iSkysoft of the software. Download it from the official website for your Windows PC or Mac.
Step 1 Launch the Gmail Email Recovery Software
Launch the program, and choose "Emails" from the options as shown in the image below and press "Next".

Step 2 Choose the Location
Choose the target location for scanning. iSkysoft has four categories – common location, external removable device, I cannot find my partition, then hard disk. Choose the location and press the "Start" button.

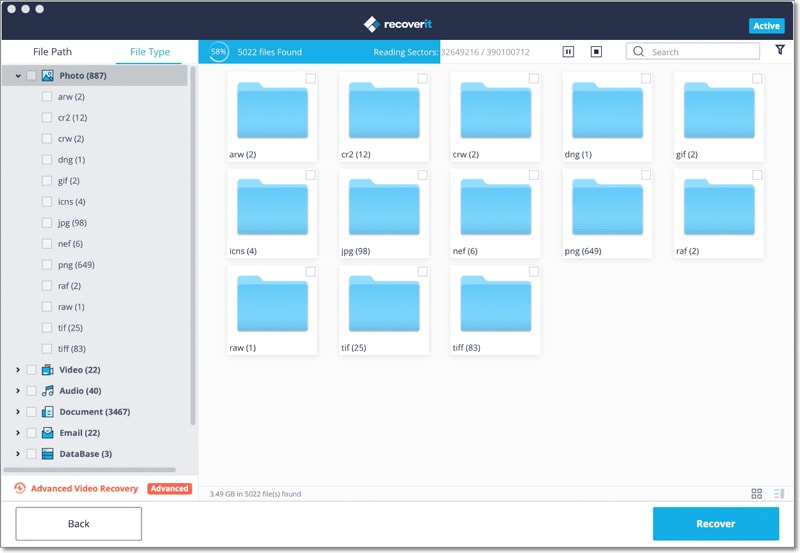
Step 3 Scan the Files
You can opt for quick scan technology to retrieve information in a few seconds. Upon completing the scanning process, iSkysoft will display the results in the window. You can select the specific file and view its content. You can mark the emails that you wish to retrieve, and press the "Recover" button at the bottom and save them onto your Mac.
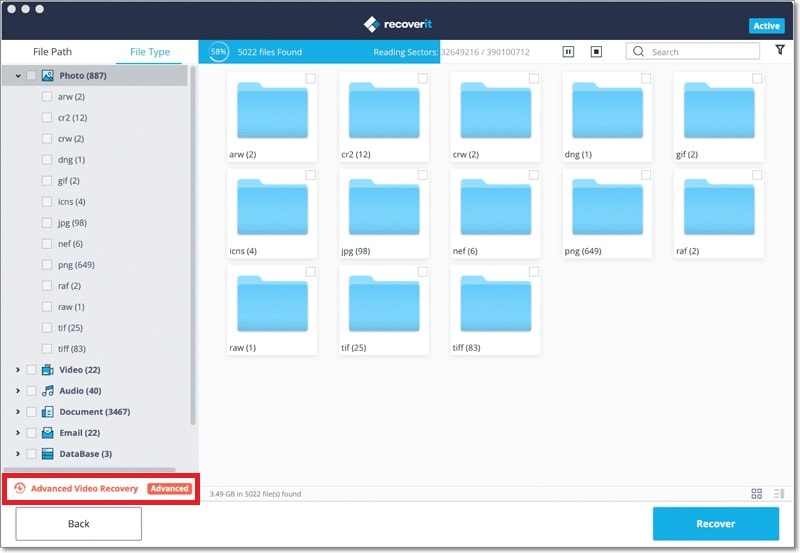
Step 4 Turn to Deep Scan
If quick scan did not return any results, choose for "Deep Scan" technology. Click the "Deep Scan" link at the bottom of the window to rescan.
Step 5 Complete the Scan and Preview the Results
After completing the scan, the program will display the files that are recoverable. You can select the emails, mark in the checkboxes, and click "Recover" to save them onto your Mac.