


VirtualLab Data Recovery is a data recovery tool that helps in recovering stolen, accidentally deleted, or from a corrupted hard drive. Losing data is a fearsome event in case you do not possess any backup. But, do not worry! You do have the option to get back the data using data recovery tools, which are now offering the chance to retrieve data eliminating the chance for the need of a professional. The current post gives you information about the process of recovering data using such tools.
Part 1. The Best Virtuallab Data Recovery Alternative Software for Mac and Windows
VirtualLab Data Recovery has achieved a good place in the recovery tool category over a period. However, new technologies and pricing are helping iSkysoft Data Recovery for Mac (or iSkysoft Data Recovery for Windows) achieve success within a little time. With the support of the software, it is now possible for Mac users to get back all the lost or accidentally deleted content in a three simple step procedure.
Key Features of Recoverit (IS):
- Has the ability to retrieve content from deleted or resized partition
- Gives the user the ability to resume the scan at a later stage
- Identifies all the files format making it easy to get back any file from the hard disk
- Allows the user to save the scan results to initiate the recovery process in the future
- Distinguishes between valid and invalid sectors of files from the corrupted hard disk ahead of recovery
Step-by-Step Guide to Use Virtuallab Data Recovery Alternative
Step 1 Download Virtuallab Data Recovery Alternative Software
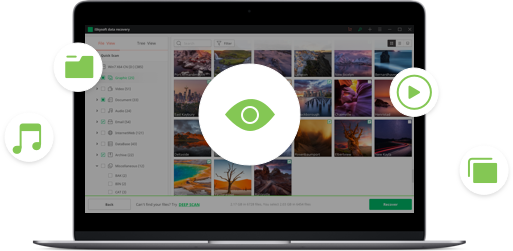
Visit original site of Recoverit (IS) for Mac to download the software offered by the company. You can install the program just like any other software on your Mac. After completion, launch the software from the dock or by double-clicking the icon appearing on the desktop. Once the program opens the interface, you will observe that it displays four different recovery methods. You have to choose the type of files and click "Next" button to continue.

Step 2 Select the Drive to Scan
Upon choosing the lost data recovery mode, iSkysoft will open a new screen that will show you the details of partitions of the Mac and all the connected external hard disks. If the "External Removable Device" list is blank, you can click the "Refresh" icon at the right side. You can then pick up the volume or partition from which you lost data and press the "Start" button from the menu bar. It will allow the software to begin scanning the hard disk.

Step 3 Retrieve Lost Data
Once Recoverit (IS) completes the scan, it will display all the recoverable files in sequential order according to files format. It will also show you the validity attribute that will tell you about the data status. You can also preview the context of the file by selecting one and seeing it in the preview screen. You can use this step to view the content and make selections. After completing the selections of the content that you wish to retrieve, press the "Recover" button on the bottom of the window. The application will ask you to pick the destination path to save the files.

Part 2. Troubleshooting on How to Use Virtuallab Data Recovery
You can use the data recovery from VirtualLab to get back all your lost data from hard drives, camera cards, deleted e-mails, content from CD or DVD, and any other storage devices. The promising features include disk recovery, recover deleted files, recover deleted emails, and photo recovery.
Step-by-step Guide to Recover Data Using Virtuallab Data Recovery
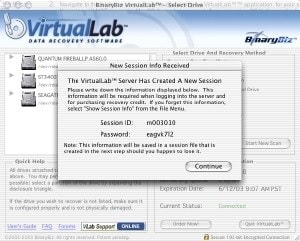
Step 1. Download the software for your Mac. You can begin the installation of the software like any other program on your Mac. Make sure to close all other applications before launching VirtualLab Data Recovery. As you are launching recovery for the first time, you have to select the reason as starting a new recovery from the welcome window. The application will then display series of messages that it is building an attempt to make a connection. After this, it will display the information related to the session. You are to note down the session ID and password for future use.
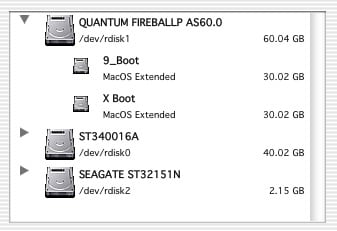
Step 2. After the application completes the creation of the session, it will open the recovery window. VirtualLab will display all the physical and logical drives found by it on the Mac.
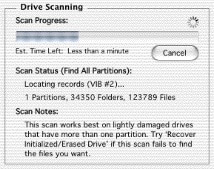
Step 3. After selecting the drive of the partition that you wish to recover, it is time for you to select the recovery method. You can choose between the search for lost partition, recover initialized/erased drive, and find all partitions. After making the necessary selection, press the Start New Scan button. Depending on the size of the volume, the time needed to complete the scan will be different from one partition to another. Allow the program to complete the scan.
Step 4. After the scan is complete, it is time for you to test the quality of the recovered files. You can do this by viewing the content of the files. Just double-click the file, and the program will open the content in the preview screen.

Now, make the selection of the files that you wish to retrieve and press the Save Selected Files button. The application will ask you to choose the location where you want to save the files. It is important to select the place on a suitable device or an external hard disk.
Troubleshooting of Virtuallab Data Recovery:
- The layout is not user-friendly, making it difficult for the user to perform the task in the simplest way.
- The trial version does not provide the chance to save files. You need to possess a license to save the files.
- The number of options provided within the software will make it difficult for users to understand the complete options thoroughly.
Part 3. Recoverit (IS) vs Virtuallab Data Recovery Comparison
|
Software |
Supported Devices |
Free Trial |
Customers |
Features |
Price |
|---|---|---|---|---|---|
| Windows and Mac | Yes | Personal and Business |
Raw Data Recovery Partition Recovery Resume Recovery |
$79.95 | |
|
Virtuallab Data Recovery |
Windows and Mac | No | Personal and Business |
Only Recover from damaged hard disk Recovers contacts and other data from iOS devices |
$36 |


