


After realizing that you have lost important XLSX files, you'll obviously try to look for them in all the partitions present in your computer-based or external hard drive and even check your backed up files. If you have been keeping your work in Microsoft Excel workbook without making a backup, you'll start looking for an Excel data recovery solution and then try to do XLSX file recovery. There are multiple ways for recovering lost Excel XLSX files. As a Mac user, you can save the file to thumb drive, view the contents of the thumb drive with "Finder" and you'll be able to see the file extension .xlsx. Change the file extension to .xls, open the file, perform a "Save As", and then save it with an .xlsx extension. Open the XLSX file with Excel to see if it has been recovered.
Other alternative methods include the repair method restarting the computer and reopening the file again, opening the file in safe mode, copying the file and renaming it with a .doc or a .txt extension, opening the file in a recent Excel version and more. However, all these methods are not 100% reliable. In this article, we focus on the simplest, fastest, safest and the best way for XLSX file recovery.
Part 1: The Best Way for XLSX File Recovery
iSkysoft Data Recovery for Mac (or iSkysoft Data Recovery for Windows) recovers the accidentally deleted, formatted or lost XLSX files from multiple devices including Mac internal and external hard drives, memory cards, flash drives and more. Its features four unique data recovery modes. These modes enable you to recover data lost due to various scenarios such as deletion, virus infection, formatting, improper operation, software crash, power failure and other unknown reasons.
The complete, affordable and DIY data recovery program is designed to restore not only XLSX files, but also other 200+ files, including but not limited to documents, video, music, photos, email and archive files. It uses the latest powerful scanning algorithms to scan Mac-based hard drives and external hard drives without destroying your data. Moreover, users can preview videos, photos, audio files, emails, documents and archive files, and distinguish whether they are valid or invalid before recovery.
Key Features of Recoverit (IS):

- The program comes with a user-friendly interface which is easy to understand and use.
- You can scan files of a "selected file type" and use filters and folder trees to find your files in no time.
- Lost data is recovered in original quality with file names and file folders.
- You can "Pause" or "Restart" the scanning process at any time and even save the scan result to resume the recovery later.
- It recovers data from HFS+, HFSX, FAT16, FAT32, exFAT, and NTFS file systems.
Step-by-Step Guide to Recover XLSX Files
Note: Continued operation on the hard drive, including adding more data, browsing the web for the data recovery solution, downloading and installing the software in the location where you lost your files can cause permanent data loss.
Step 1. First, use "ANOTHER" Mac to download the Recoverit (IS), install it to a USB flash drive and launch the software with the application installed on the USB flash drive. This helps you avoid overwriting the data that you would like to recover. Once you launch the software, you'll see the 6 file type options displayed on the primary interface. Choose "Document" tab according to your need, and click "Next" button.

Step 2. A new window will appear displaying the logical drives with their sizes and file systems. If your drive isn't in the list, click the "Refresh" icon located at the right side of "External Removable Device", and it should appear. Select the drive where you have lost your files and click the "Start" button located on top of the software interface to start the scanning process

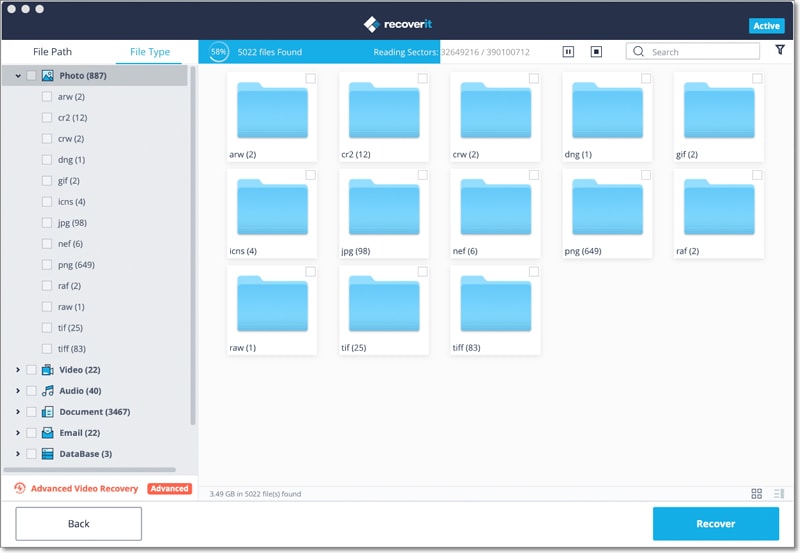
Step 3. When the scanning process is over, a new window will open that looks exactly like the one shown in the image below. Here, you are free to preview the files before recovery and determine the valid and invalid ones. To recover the lost data, mark the valid files in the list and then click the "Recover" button located on the buttom of the software's interface. Save files to the selected path and not to the drive where you lost the files. An external drive is highly recommended as a selected path.
Part 2: What is XLSX File and What Will Cause the XLSX File Loss
XLSX is a file extension for open XML spreadsheet file format used by Microsoft Excel. All the XML spreadsheet created with Microsoft Office 2007 and later versions use the .XLSX file extension. You can also install "Microsoft Office Compatibility Pack" so as to open, edit and even save XLSX files using the older versions of Excel. It’s what makes XLSX files to be compatible with almost all the versions of Microsoft Office Utility. Here are various scenarios that can cause the XLSX file loss.
Accidental Deletion
Most of us prefer saving Excel worksheets on locations where the tendency of losing data is high compared to other storage media, (external storage media or desktop).
Mistakenly Formatting a Drive
You may format an internal or external hard drive that contains your important XLSX files by mistake, or get rid of the drive corruption and formatting errors. If you did not backup the files, you’ll lose not only the XLSX files, but also all the other contents saved on the hard drive.
Unexpected System Shutdown
If your computer shuts down while you are transferring Excel XLSX files from one location to another, either from your computer to an external storage drive or within your Mac-based drive, you are likely to lose your files. Some of the causes of unexpected system shutdown include power failure, system errors and more.
Virus Attack
Severe virus or Malware attacks on your Mac can infect the XLSX files saved on the system's hard drive leading to deletion of your files or data loss.
Shortcuts
The use of "Cut" and "Paste" options instead of "Copy" and "Paste" may cause the loss of XLSX files since they are removed from their original locations.


