


Since its conception years ago, the iPhone has grown to become more than just a smartphone. It has become a necessity to most of its users due to the overwhelming support given by Apple and third-party developers manifested through the great number of apps and tools released for it. It isn't just a simple handheld device that people use to communicate. Nowadays, the iPhone is already used for professional and work-related concerns. Most people carry very important data with them as they bring their iPhones anywhere.
That is the primary reason why working between an iPhone and a computer seems to be so common these days. Since more and more people carry important data with their iPhones every day, it has become more important to make sure that these data have backup copies that are properly kept. To respond to this, different applications and methods have been made by developers for iPhone users to be able to transfer their files safely to their respective computers.
And aside from backup purposes, there are a whole lot of other reasons to make sure you have copies of your iPhone's files on your computer as well. But regardless of the reasons, you may want to read on to find the best free way to transfer iPhone files to your computer for you.
- Part 1: Transfer photos and videos using Windows Explorer
- Part 2: Transfer purchases using iTunes
- Part 3: Transfer app-based files using iTunes
- Part 4: Transfer any file using iFunBox
- Part 5: Transfer any file using Cepifx Free Edition (Mac)
Part 1: Transfer photos and videos using Windows Explorer
Although the iPhone is an Apple product, it's good to see that Microsoft offers some level of support for their competitor's flagship mobile device. Windows Explorer allows iPhone users to use their devices as a camera to transfer pictures and videos to their Windows computers. Here's how it's done:
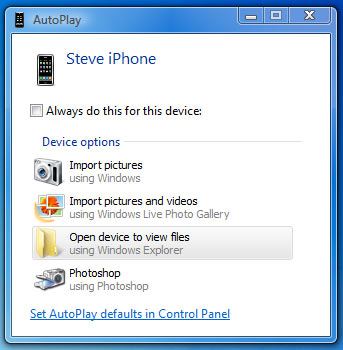
Step 1. Connect your iPhone to your Windows computer. Once it's detected, Windows' AutoPlay window will show up and present you with different options you can try out.
Step 2. Select Import pictures and videos to start copying photos and videos from your iPhone to your computer.
Step 3. Windows will then guide you through the process which will allow you to select the ones you want to transfer. Once you're set, Windows will start transferring the photos and videos to your computer.
Step 4. Wait until Windows finishes the process before disconnecting your iPhone.
Pros:
1. A quick, easy, and convenient way to import iPhone photos to your Windows PC.
2. Includes an option to erase the original photos on your iPhone once the import finishes.
Cons:
1. May seem limited to photos and videos if you're hoping to deal with more file types for the transfer.
2. Import/ transfer process may take quite a long time, especially for large photos and uncompressed videos.
Part 2: Transfer purchases using iTunes
iTunes offers a great deal of support for transferring files purchased from the store. Purchases such as music, video, and apps can be transferred from your iPhone to your computer using iTunes. This method works for both Windows and Mac systems.
Step 1. Using your iPhone's original USB cable, connect it to your computer. Open iTunes if it doesn't launch automatically.
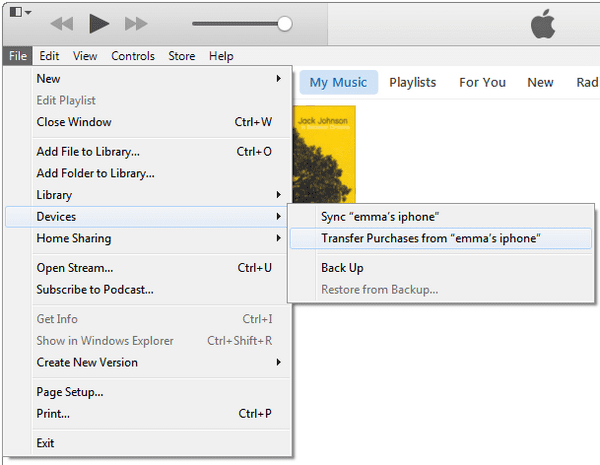
Step 2. Head to the sidebar and under the "Devices" entry, right-click on your iPhone's name and select "Transfer Purchases". If you can't see the sidebar, go to the "View" menu and hit "Show Sidebar".
Step 3. All that's left to do is to wait for iTunes to finish the transfer process and you're done. Now your purchases are safely kept on your computer and should you wish to transfer it to another device via iTunes, you may do so.
Pros:
1. All purchases made by the user on his or her iPhone can be transferred to a computer in just a few clicks.
2. Easy steps and few clicks make it very convenient to use.
Cons:
1. No direct way to use the purchases when transferred to your computer.
2. Import/ transfer process may take quite a long time, especially for large photos and uncompressed videos.
3. Transferred purchases need to be transferred to another iOS device before the user gets to use them again.
Part 3: Transfer app-based files using iTunes
Aside from purchases, iTunes also offers support for transferring app-based files from your iPhone to your computer. Take note that this method, since it doesn't concern purchases, will be quite different to the previous method presented. Just follow these instructions to get started:
Step 1. Connect your iPhone to your PC. iTunes should open automatically the moment it detects that your iPhone is connected to your computer. Launch it manually if it doesn't open up right away.
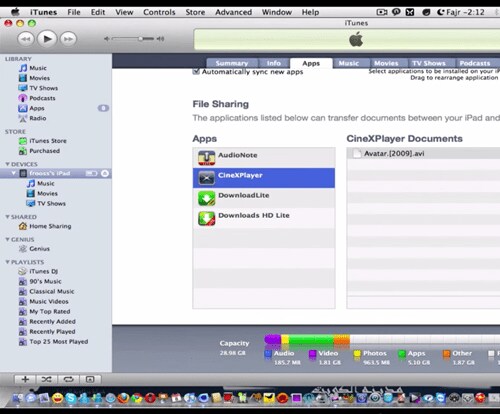
Step 2. Check if you see the sidebar on the left pane of iTunes' main window. If you don't, you'll have to go to the "View" menu and hit "Show Sidebar" first. Once the sidebar shows up, click on your device's name under the "Device" entry. On the main pane of the window, select the "Apps" tab.
Step 3. On the left list under "File Sharing", select the iPhone app you'd want to transfer a file from. On the right list, choose and click the file you want to transfer and hit the Save to button.
Step 4. A window will then appear. In it, choose the destination where you want to see your file saved to. Click on that folder and hit "Open". iTunes will now save your chosen files to the folder you've just selected.
Pros:
1. Level of ease matches that of purchase transfer in iTunes.
2. You get to keep or use the very files your apps on your iPhone uses on your computer.
Cons:
1. Doesn't have Finder or Windows Explorer's simple copy-paste method.
2. You'll need to identify which files belong to which apps before you get to transfer them.
Part 4: Transfer any file using iFunBox
iFunBox gives way for users to customize the file organization within their iPhones as it makes Apple's smartphone function as a USB flash drive. It works very well with the typical copy-paste action done in Windows Explorer to copy or move files within an iPhone or between an iPhone and a computer. Follow these instruction to get started with iFunBox:
Step 1. Download the iFunBox version of your choice from the link: http://dl.i-funbox.com/
Step 2. Install it. Connect your iPhone using the cable that came with its original packaging and launch iFunBox.
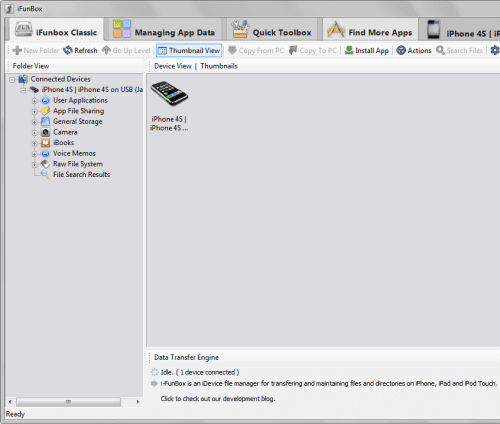
Step 3. Make sure you're working under the iFunBox Classic tab.
Step 4. Under the folder view, select Raw File System to view your iPhone files and folders as you would using Windows Explorer. And since you get full access to every single folder on your iPhone, you get to copy or move files from just about any location on your iPhone.
Step 5. At this point, you can now copy, cut, or paste files and folders within your iPhone's directory and to your computer's directory. To transfer files to your computer, just select any file from your iPhone's directory, copy it, and paste it to the destination of your choice in Windows Explorer.
Pros:
1. Among the best iPhone file explorers available for both Windows and Mac platforms.
2. Updates are put up on a regular basis and the support team seems eager to work on them and fix bugs and issues.
Cons:
1. Numerous features make the interface feel a bit crowded.
2. It may seem too advanced for first-time users.
Part 5: Transfer any file using Cepifx Free Edition (Mac)
Cepifx is a Mac application that allows you to explore the entire file system of your iPhone without having to jailbreak it. While its developers' site recommends a license, the free edition of the software is enough to handle the file transfer. Of the different modes in which it can be used, the one we'll detail here is the so-called "Disk" mode which allows you to use your iPhone as a USB flash disk.

Step 1. Download Cepifx from this link for free: http://www.imactools.com/cefipx/download
Step 2. Install Cepifx by dragging the Cefipx.app file to the Applications folder.
Step 3. Once installed, connect your iPhone to your computer via the cable that originally came with your iPhone's packaging. Run Cepifx.
Step 4. On the left sidebar of the window, select Disk under the DATA entry. At this point, your iPhone functions as a USB flash disk and you can now browse the files within its file system. You can look for photos, videos, music, and just about any file stored in your iPhone.
Step 5. Locate and select the files you want to transfer from your iPhone to your computer. Once you've made your selection, click Copy from Device. Wait for the copying process to finish and you're done.
Pros:
1. Works like Finder, and incorporates the simple copy-paste method that users have been used to.
2. Simple interface makes it easy for beginners to get started in transferring their iPhone files right away.
Cons:
1. The USB flash disk mode seems limited.
2. The simple interface also projects a non-appealing look that makes users feel that it has less features than other programs of its kind such as iFunBox.


