


iPhone users have been specifically entitled to different text messaging features implemented by Apple. There are, however, some instances when too much text messaging requires us to do some action about it. The problem arises when you don’t want to delete a lot of important messages but your iPhone's storage space for messages just doesn't permit too much.
One such workaround is to transfer text messages to new iPhone or to your computer so you can safely keep a copy of them while giving some space for your iPhone's files and apps to breathe. Not convinced by this solution? Read on and we'll explain why.
Part 1. One-click to Transfer Message from iPhone to Computer/iPhone
A single solution that you can look forward to transferring the contacts from your Samsung device is dr.fone (dr.fone for Mac). The phone management tool is a single solution for your entire mobile lifestyle requirement. With the help of it, you can move photos, music, text messages, contacts, and any other data from Android/iOS devices to your computer, and vice versa. Major features of the program are as follows:

- You can use the management ability of the software to move your music and videos quickly between iTunes and Android/iOS phones, computer and iOS/Android phones, and between two Android/iOS devices.
- You can use the backup and transfer to move all your photos from the device to your Windows 10.
- Create a backup of the text messages and contacts from the device, which you can edit on your computer. You can then transfer the same to a different device operating on a different platform. It supports both iOS and Android operating systems.
- You can easily use the Phone-to-Phone Transfer option to copy all the data without any hurdle with a new phone.
- You can root your Android phone to obtain development options to enhance the functionality of the device.
Let's see how to one-click transfer text messages from iPhone to iPhone or to computer
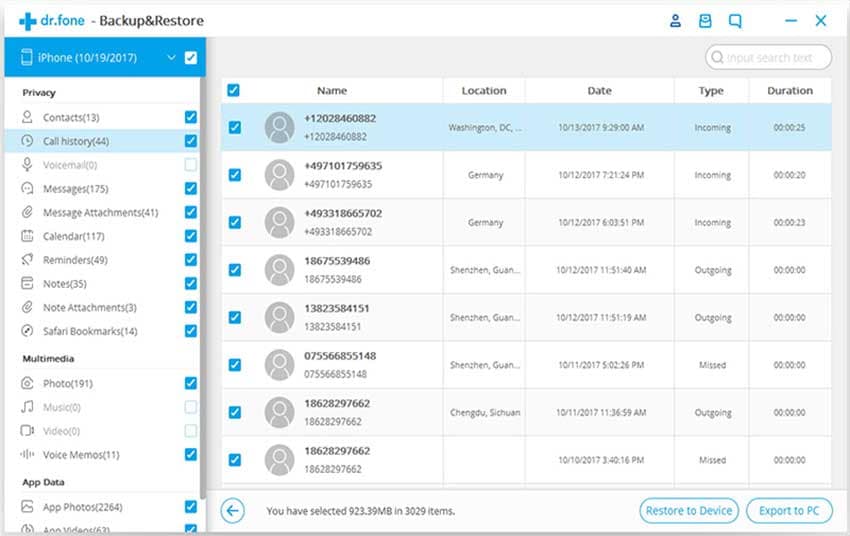
#1: Transfer messages from iPhone to computer
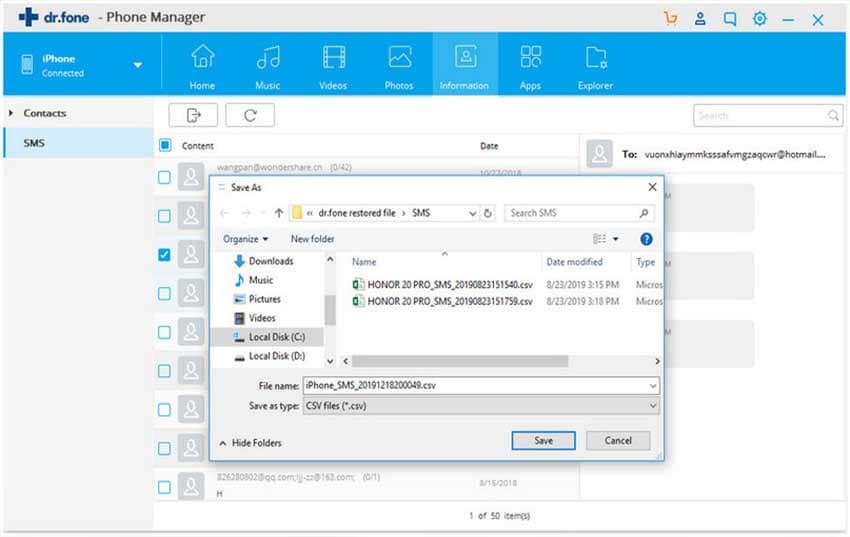
Step 1: Install and open dr.fone for Mac/Win on your computer. Please connect your iPhone to the computer. From the main window, please choose "Information" tab and select "SMS" from the left menus.
Step 2: The software will show your messages on your iPhone and now you can choose the messsages you want to transfer to computer. You are allowed to transfer all of the messages by check the box of "Content". Then click "Expport" to save the messages on your computer as HTML or CSV/Excel files.
#2: Transfer messages from iPhone to iPhone
Step 1: To trasnfer messages from iPhone to iPhone, you need to connect the 2 iPhone to the computer with 2 USB cable. Now go into the "Message" tab.
Step 2: From the top left, please choose the iPhone you want to transfer the messages. Click "SMS" from the left and now please mark the messages you want to transfer to another iPhone or you can choose all of the messages by checking the "Content" option. Then click "Export" >> "to Device" >> "name of your another iPhone". The chosen messages will be transfer from iPhone to iPhone now! Check it out!
Part 2. How to Transfer Messages from iPhone to iPhone
With manufacturers further developing these devices to support more file types and with more extensive memory space, it becomes quite common to save files locally. Saving those important messages alongside other files on the phone allows a user to easily access and opens the file whenever necessary. The following guide will teach you how to transfer messages from iPhone to iPhone by backing up iPhone messages to iTunes and iCloud and then restoring backups on a new iPhone.
Step 1. Backing Up iPhone Messages
To enhance the services to iOS users, Apple has made it possible to back files up online through iCloud Backup service and iTunes.
Backup iPhone Messages to iCloud
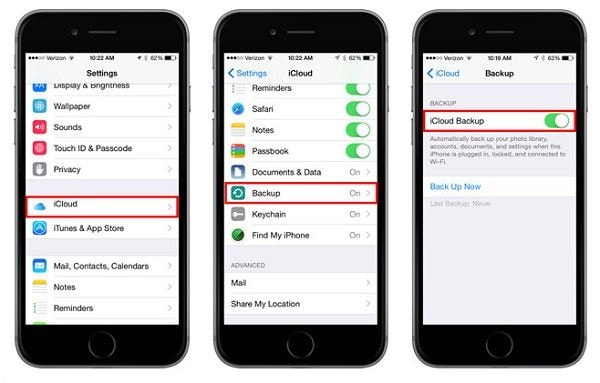
To back up your messages to iCloud, you need to make sure that the device is connected to the internet, preferably through a Wi-Fi network. After ensuring connection, tap on "Settings" from the Main menu. Under Settings tap on "iCloud" and look for Backup for those devices running on iOS 8 or later. For those with earlier versions of iOS, look for "Storage & Backup".
Make sure that "iCloud Backup" is turned on so that the device can back files up online. To back up the most recent set of file s from the iPhone, tap on "Back Up Now".
Backup iPhone Messages with iTunes
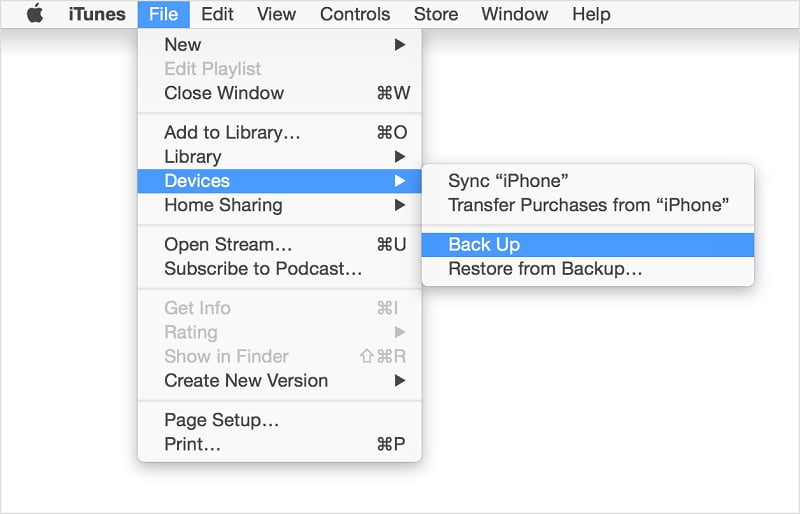
To back up the files to iTunes, you need to open iTunes on the computer and attach the device. Make sure to use the data cable that came with the phone. After the iPhone is connected, click on "File", which is located on the top Menu and select "Devices". From the list of options, click on "Back Up".
To verify if the backup successfully completed, open iTunes "Preference" from the Menu and look for "Devices". The screen will display the most recent backup made for the Device including the time stamp and the file size.
Step 2. Restoring Messages from Backups to New iPhone
As long as the files, including messages, are regularly saved and backed up, they can easily be restored whenever necessary. This guarantees that no matter what happens to your iPhone, you have the files securely saved online and can easily be retrieved when necessary. When the user needs to restore the files to a new device, it is easy to do it even during setup. The following steps also work if the iPhone was reset to factory settings.
Restore Messages from iCloud Backup
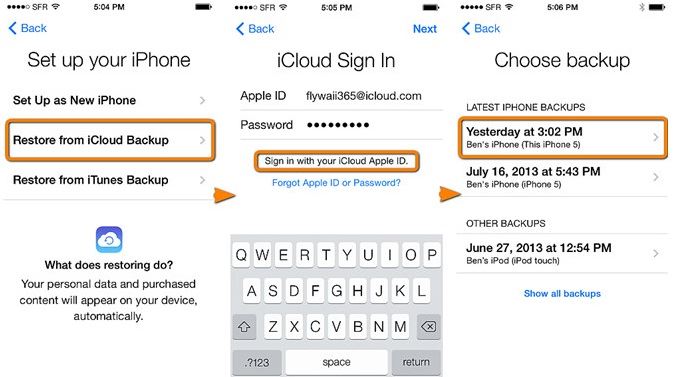
On a new iPhone or after restoring the phone to default settings, go through the initial setup process as you should. After selecting the "Setup Your Device" option on the "Setup Assistant", select the option that says "Restore from a Backup" after which you would be required to sign in to iCloud using your Apple ID. The ID is used to look up any available backup files created and saved under the said user ID.
After signing in, the device pulls up the list of available backup files for you to select from. After selecting the backup file, the phone restarts with the settings and preferences saved and it continues to download other files including the saved messages.
Restore Messages from iTunes Backup
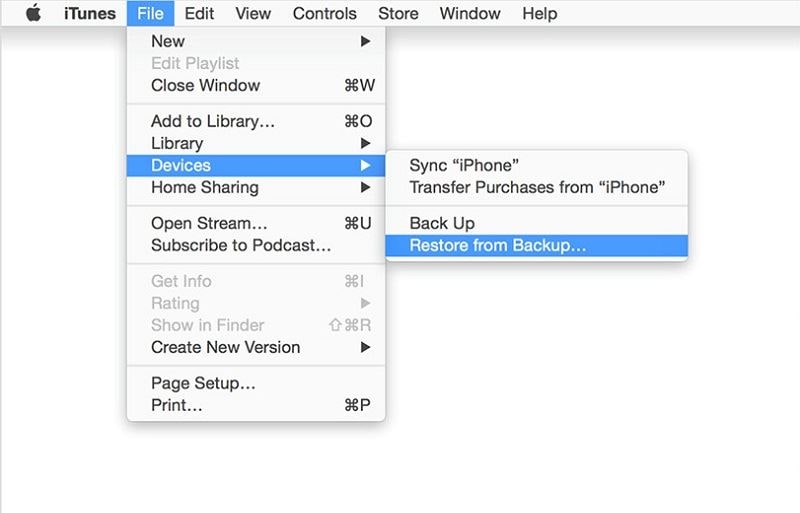
Open iTunes on the computer and then connect the device to the computer using the data cable. Let the program detect the device and Select it from the list of devices when it appears. Click on the "File" from the menu and then select "Devices". Proceed with selecting "Restore from Backup". From the list of backup files, select the most relevant backup file based on the date and file size.
After selecting the file, click "Restore" and wait for the process to finish, ensuring that the phone doesn't get disconnected from the computer in the process. The phone will automatically restart and synchronize all the backed up files.
Part 3. Why you Need to Transfer Messages from your iPhone to your Computer
There are several reasons why you'll want to copy your iPhone messages over to your computer and the limited storage space is just one of them. Other reasons include:
1. Improved iPhone performance
Transferring your messages to your computer and deleting them on your iPhone afterwards allows for more free storage space on your iPhone. This will help improve your phone's performance, depending on how the space your messages are taking up affects it. The more free space you have for your apps and files, the higher the chances of getting significant performance from your iPhone.
2. Full control of your messages on your computer
You can actually save your messages to other storage media, but it’s better to save it on your computer. In this way, you get to save some space on your iPhone while still having full control of the important messages you copied over from your phone to your computer. You can still have your way with your messages, but just with your PC this time.


