The music in your iPhone may very well be important to you. It may define your personality, emotions, likes, dislikes, and pretty much anything about you. It may remind you of the memories you've shared with the people around you. Regardless of the sentimental attachments we can think of on music, you may, at one point in time, feel the need to get them back to your computer so you can make sure that you don't lose them whatever happens with your phone.
There are two options that you may consider should you want to back up the music from your iPhone to your computer. You may transfer them to iTunes first or directly to your computer's storage.
Part 1: Back up iPhone music to Mac with dr.fone for Mac
There is also a workaround for you if you want to get your iPhone's music directly into your computer. In fact, you have a whole bunch of third-party apps and software to help you do just the trick. There are solutions for both Windows and Mac users.
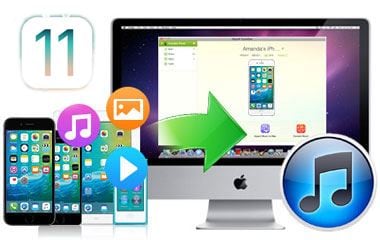
If you're a Mac user, you may opt to avail of one of the various software solutions available for your platform. Keep in mind, though, that no third-party application does the job of getting your iPhone's music to your computer and to iTunes than dr.fone for Mac.
Transfer iPhone/iPad/iPod touch music, videos and photos to Mac and iTunes.
One-click backup to iTunes and manage your songs, videos, and photo albums.
- Copy music from iPhone, iPod, iPad to Mac or iTunes.
- Export videos from iPhone, iPad, iPod to iTunes/Mac.
- Transfer all photos from photo album to Mac or iTunes.
- Copy playlists with rating and play counts to iTunes.
Step 1. Have your iPhone connected to your Mac with the best USB cable you have around to avoid any hardware issues. Open dr.fone afterwards.
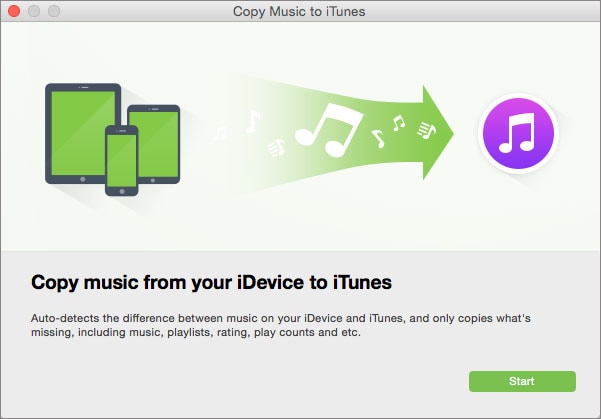
Step 2. Once your device is connected you'll see its information displayed on the window. Select the "Copy Music to iTunes" option located at the lower portion of the window.
Step 3. A pop-up message will appear to tell you that the music and playlists found to be missing will be copied to your iTunes library. This will make sure you don't get any duplicates in your library.
Step 4. Click on the "Start" button to begin copying the music from your iPhone to iTunes. dr.fone will do the rest of the work for you and all you have to do is wait and your music will be placed in your iTunes library afterwards.
Part 2: Back up iPhone music with iTunes
If you're using iTunes only to back up your iPhone music, you may opt to back up everything in your iPhone which includes all of your music or just get the files you've purchased, including all the music that you've bought in the iTunes store.
You need to do the following should you choose to back up your music and everything else in your iPhone:
Step 1. Update iTunes if you haven't got the latest version yet then connect your iPhone to your computer using the exact USB cable that came with its original packaging, or any other USB of perfect working quality. Just make sure that the USB cable you're using is to avoid any hardware issues during the process.
Step 2. On your computer go to File > Devices > Back up to back up everything in your iPhone.
Step 3. You may open "iTunes Preferences" and go the "Devices" tab to verify that your phone's data were successfully backed up.

Part 3: Back up purchased music with iTunes
Should you decide to back up only the music along with everything else you purchased at the iTunes or App store, you must do the following steps:
Step 1. The first step, which is exactly the same as the previously discussed method, is to ensure that the iTunes app in your PC is updated to the latest version. Be sure to connect your iPhone to your computer using the USB cable that has the best quality out of the ones you have. It is even highly recommended that you use the USB cable that originally came with your iPhone unit when you bought it. This is to make sure you don't get any error messages caused by hardware failures.
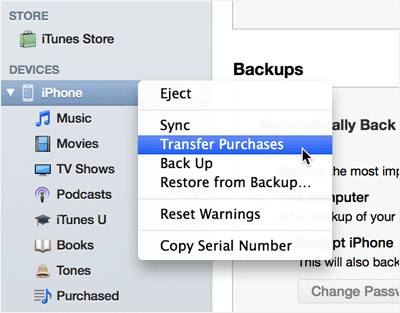
Step 2. In iTunes, your iPhone's name will appear under the Devices category in the left pane of the window. Right-click on your iPhone's listing and you will see a number of different options you may do with your phone. Select Transfer Purchases to start backing up all items you have bought from the iTunes or App store. This will have your music, apps and their data, and all purchased items intact and kept secured.
Step 3. Wait a while for iTunes to transfer all your purchased items and once it's done you're good to go. Everything you got for an expense in the iTunes or App store will now be safely kept.