


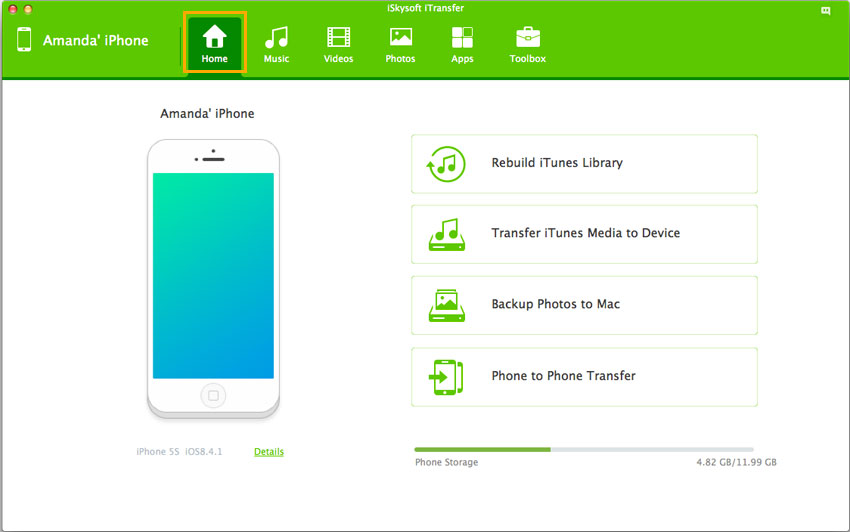
Transferring photos among Smartphone devices are really nothing new. In fact, it is a way people show off photos and share among friends and family members who may be using different devices. Taking pictures on iPad is interesting especially due to its larger screen and better resolution. But not everyone uses an iPad and there may be need to transfer those pictures to someone who has an iPhone. So if that is that case, how can we transfer photos from iPad to iPhone? There are 6 ways to that comfortably and this is what we are about to see. Just read on.
Part 1: Best Way to Transfer Photos From iPad to iPhone
There are much available software to transfer photos between ipad and iPhone. However, some of these software may not provide a complete solution which one could need. The best way to do these transfers is to use the most recommended software, dr.fone. This software has the capability to transfer photos between your iPad and iPhone very easily with just a few clicks. Apart from helping you transfer photos, dr.fone boasts of the following features.
Transfer media files from iPad/iPhone to Mac: Here you can copy music from your iPad to Mac and iTunes library, export videos from ipad to Mac and iTunes library, copy playlists to Mac with iTunes.
1 Click to Copy Music From iPad/iPhone to iTunes Library: You can use the 1 click option which automatically filters all existing songs to avoid duplicates or select songs and playlist to iTunes Library.
Other features include:
- Copy media files from Mac to ipad or iPhone
- Convert Video and song to fit on Apple device
- Back up and manage media files
- Convert iPhone live photos to GIF
- Fully compatible with iOS 11, iOS 10, iOS 9, iOS 8, iOS 7, iOS 6, iOS 5
- Fast speed capability.

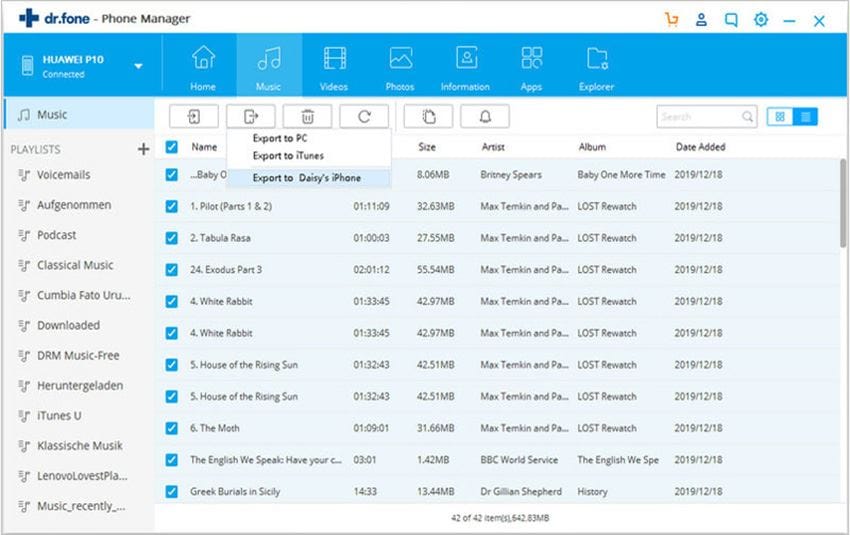
How to transfer Photos from iPad to iPhone with dr.fone
Step 1: You will need to install the dr.fone on your computer. Once this is done, connect your ipad and iPhone at the same time to the computer. Please make sure you have selected the source device. The source device should be displayed in the main window.
Step 2: Click the “Photos” tab on the top of the main window. Next, you can see all photo files are sorted by category and displayed in the sidebar. Click the file type in the left sidebar, then click to select thephotos you need to transfer to another device (iPhone). Click “Export” > “Export to (the name of your iPhone)”. That’s it!
Part 2: Transfer Photos From iPad to iPhone via iCloud Photo Library
iCloud is an inbuilt app on every iOS device which allows you to manage your photos, documents, and other contents on your iPad or iPhone. To transfer photos, follow the steps below.
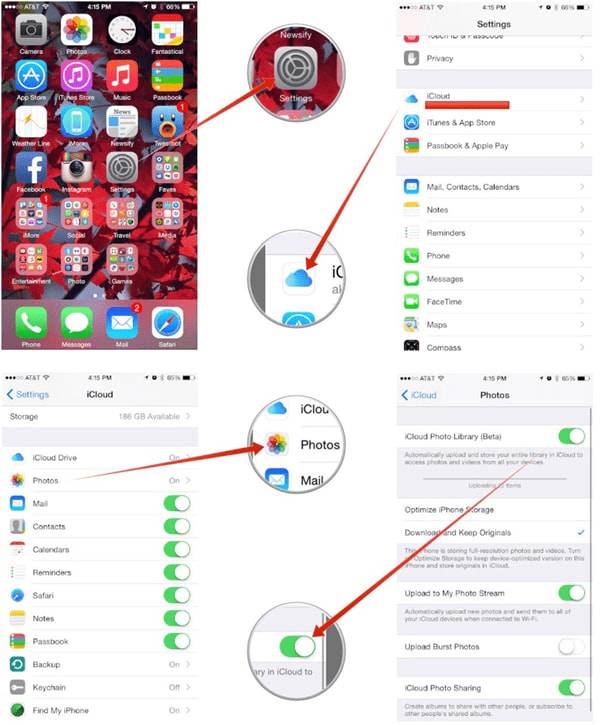
Step 1: Open the settings app on your iPad;
Step 2. select "iCloud" from the menu > Log in with your Apple ID > Go to "Photos" Option > Put on the "iCloud Photo Library Beta".
Step 3: Connect your iPad to a wireless network > Open the photos app on your iPhone > Select ‘All Photos" from the Album > Look for all the photos you want.
Part 3: Transfer Photos from iPad to iPhone via Photo Stream
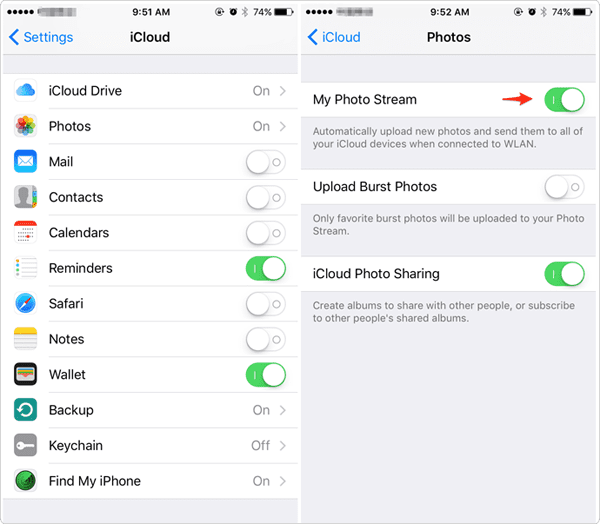
The photo stream uploads your photos to iCloud so that they can be accessed from any connected iOS device.
Step 1: Enable photo sharing on both the iPad and iPhone > Open the photos app on your iPad > Tap the "shared " tab on the bottom of the screen > use the " +" to create a new photo stream > Enter the beneficiaries of the shared photos.
Step 2. Open the new photo Stream > Use the " +" button to select the picture to add.
Step 3: Access the Photos from your iPhone > Save the photos to your iPhone.
Part 4: Transfer Photos from iPad to iPhone via AirDrop
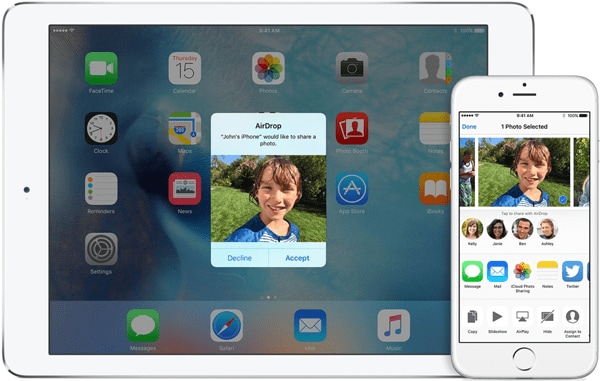
Transferring photos from iPad to iPhone using this method is very quick and easy but it requires an Ipad 4 or a newer version as well as iPhone 5 or a newer version. Note that both devices is expected to be running on iOS 7 or a newer version. To transfer photos to iPhone, use the following steps.
Step 1: Open the control center of both devices > tap the "Airdrop" button and enable it > Open the Photo to be shared > Tap the ‘Share" button > If you want, you can select additional photos
Step 2: tap "iPhone" at the top of the share panel > tap the "Accept" button on your iPhone to accept the photos into your iPhone device. When photos are accepted, they can now be opened in the photos app.
Part 5: Transfer Photos from iPad to iPhone via Email
This method is one of the simplest. You can simply attach and send up to 5 photos to yourself through email. You can then open the email attachments on your iPhone and save them accordingly. It is important to note that to use this method of transfer, you must have a mail app that is configured on you iPad and iPhone. Use the following steps to transfer photos using this method.
Step 1: Open photos app on your iPad > select the photo you want to send > tap the "share" button > You can select additional photos if needed > tap the "Mail" option > Enter your email address as the recipient > Send message
Step 2: Open email on your iPhone > retrieve the photos and save them on your iPhone storage.
Part 6. Transfer Photos from iPad to iPhone via iTunes

To transfer photos from iPad to iPhone via iTunes is easy. To use this method, all you will need is a computer with the iTunes app installed, a USB connector cable for the iPhone as well as the folder that contains the photos you want to transfer to the iPhone. In order to comfortably do that, the following step by step guide will be very useful.
Step 1: The first thing is to create a folder containing photos you will want to transfer to your iPhone.
Step 2: Connect your iPhone to your computer. When that is done, launch your iTunes and select the iPhone on the list of devices shown.
Step 3: Click on the "Photos" tab, check "sync Photos from" box and then select "Choose folder".
Step 4: Locate the folder that contains the photos you want to transfer you created earlier. Select it and click "Choose".
Step 5: Click on "Apply" to start syncing the photos from the computer to your iPhone. When this is done, the photos will sync and a new album will be created in the iPhone photo apps that contain all pictures.


