


Capturing a photo with your iPhone is easy, but it is simpler to show to your friends and family members if you use your iPad. The better screen resolution and display size enable you to view the incredible photos clicked on the iPhone in significantly a better way. Luckily, you can transfer the photos from your iPhone to iPad in simple procedures. You can choose the best method depending on your requirements.
- Part 1. Best Way to Transfer Photos from iPhone to iPad (Strongly Recommended)
- Part 2. How to Use AirDrop to share iPhone Photos to iPad
- Part 3. How to Use Photo Stream to Copy iPhone Photos to iPad
- Part 4. How to Sync Photos from iPhone to iPad via iTunes
Part 1. Best Way to Transfer Photos from iPhone to iPad (Strongly Recommended)

Directly transferring photos from iPhone to iPad is not allowed by Apple. The only options allowed by Apple are sharing via AirDrop or Photo Stream. If you try to sync photos from iTunes to iPad, the existing files on iPad will be erased, by which your files might get lost forever. In this case, I strongly recommend you transfer photos from iPhone to iPad via dr.fone. You can easily copy all your photos from your iPhone to your iPad with a single click. Additionally, it even supports multiple file formats, making it easy for you to transfer any content between iDevices.
Here are the main features of dr.fone for photos:
- Copy photos from iPhone to iPad directly (Windows version);
- Export photos from iPhone/iPad to computer for sharing or further editing;
- Convert iPhone live photo as animated GIF images;
- Put any photo to iPad without erasing any exiting data on iPad;/li>
Why not download the free trial version, try to copy photos from iPhone to iPad!
Follow the actions below to move photos to iPad from iPhone. Before beginning, ensure that you have downloaded and installed dr.fone application.
Step 1: Open the settings app on your iPad > select “iCloud” from the menu > Log in with your Apple ID.
Step 1: Connect both iPad and iPhone to your computer.
Step 2: From the left side of the window, under your iPhone device, choose “Photos”.
Step 3: From the available photos, mark the ones that you wish to transfer.
Step 4: Once done, click “Export to” button located on the menu bar. From the submenu, choose your iPad.
The program will begin transferring the photos from your iPhone to iPad directly. The time taken depends on the number of files and the total size. As you can observe, it is simple to move photos from your iPhone to iPad and view them in a significantly better display. For Mac version, you need to export the photos to your Mac first. After then, add these photos to your iPad va the "Add" button on dr.fone for Mac.
To begin using the AirDrop facility, you require iPhone 5 or newer and iPad fourth generation and up with running no less than iOS 7.
Step 1: Set up AirDrop on your iPhone and iPad. That is, you need to turn on the option to use them together. AirDrop lets you choose between “Contacts Only” and “Everyone”. You can select either of the option based on your requirement. Since you are transferring files to your iPad, you can set the option to “Everyone.” Make sure that the both devices have their Bluetooth and Wi-Fi turned “On.”
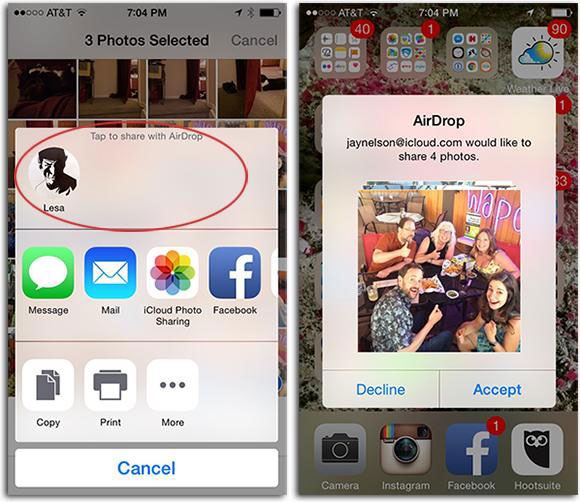
Step 2: Find the pictures that you want to transfer to your iPad from Camera Roll or in the album. Pat the “Select” key at the top-right corner. You can now choose the thumbnails that you want to send and mark the photos with the checkmark as displayed above.
Step 3: Once you have completed selecting the pictures, tap the “Share’ icon located at the lower left corner. Several options appear in the Sharing window, with icons appearing with nearby AirDrop users at the starting.
Step 4: From the available list, select your iPad. You will receive a message on your iPad asking to accept or decline the transfer. Select “Accept” to add the pictures to the iPad library. You can now browse the Photos library on your iPad to see the photos clicked and transferred from your iPhone.
Follow the steps below to transfer the photos from your iPhone to iPad using Photo Stream option. Photo Stream is a section of Apple’s iCloud service that enables you to share your photos from iPhone to iPad
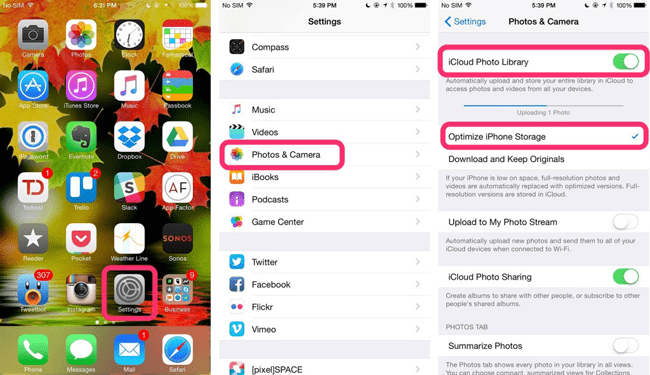
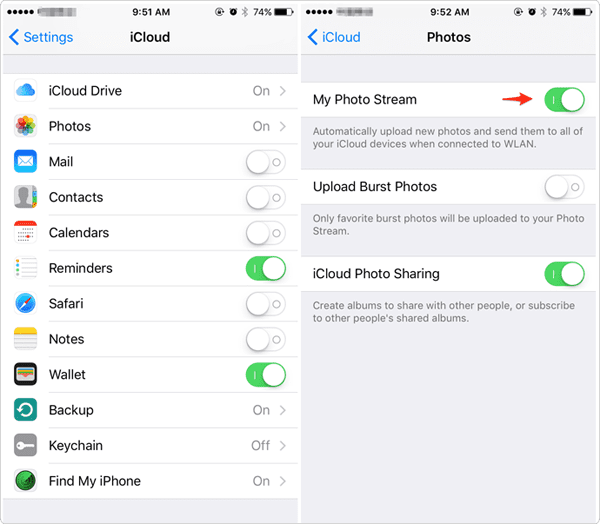
Step 1: Go to the “Settings” icon on your iPhone. Head to the “iCloud” section and press the “Photos” tab. Under the “Photos” tab, ensure that “My Photo Stream” is “On.” If not, slide the button to turn it “On.”
Step 2: Now go to your iPad and tap the “Settings” icon. Head to the “iCloud” section and press the “Photos” tab. Under the “Photos” tab, ensure that “My Photo Stream” is “On.” If not, slide the button to turn it “On.”
Step 3: Go to the “Photos” section on your iPad and select “My Photo Stream” under the “Albums” tab. You will see all the pictures captured by you using your iPhone, or those added to the iPhoto library.
Open Photos on your iPad, Click > Albums > My Photo Stream > Pick the images that you want to save > Tap “Share” displayed at the bottom left corner of the iPad display > Hit “Save to Camera Roll” option. You can now view the pictures in your “Camera Roll” on your iPad
If you do not have iCloud enabled, you can use iTunes to move photos from your iPhone to the computer and then sync them to your iPad. The following is the kind that will help you transform photos from iPhone to the computer and then to your iPad.
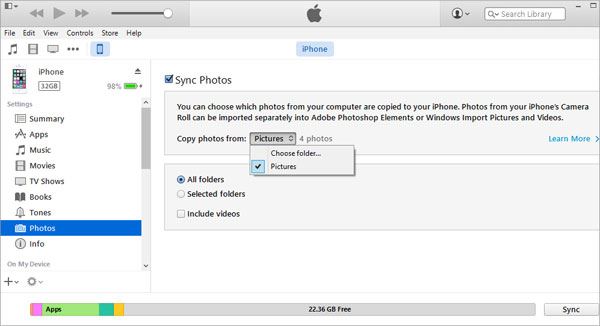
Step 1: Before beginning the process, ensure that you organize the photos on your iPhone. Connect your iPhone to the computer. If you’re using a Windows PC, there will be a folder appear in Windows explorer, letting you copy the photos from your iPhone. If you’re using a Mac, then iPhoto, image capture or Preview will allow you to import photos from your iPhone to your Mac. Just remember where you have saved these photos.
Step 2: Connect your iPod to the computer > Open iTunes, click the iPad icon at the top and then press the “Photos” tab > Mark the “Sync Photos” box > Select “Choose folder” from the drop-down box > Browse to the required folder, and choose to synchronize “Selected folders” or “All folders.” > Press the “Sync” button at the bottom corner. At the end of the process, you will have all the photos moved onto your iPad successfully.


