


Playlists are the best way to play music on a particular occasion; you can create a Playlist for your workout, for traveling or a playlist while you are working. You can quickly create the Playlists on your iPod Nano or Classic using the wheel and button. All you have to do is rotate the wheel button and when you center button to add the music to the Playlist. Moreover, you can also transfer the Playlists from your computer to the iPod using iTunes. Unfortunately, this process does not work reversibility from iTunes; you cannot transfer the playlists from iPod to your computer using the iTunes. So, if you have got a new computer or restored the Windows or Mac OS X on your computer, iTunes will not let you transfer the playlists from your iPod to the computer. We have received multiple requests from our users asking for a solution to fix this problem. The developers at have developed a new software dr.fone to transfer all kinds of Playlists from your iPod to the computer without using iTunes at all.
What You Will Need:
A Computer (PC or Mac both do);
dr.fone
iPod and its USB cable
Time Required:
Very Fast (within 5 minutes)
Difficulty:
Easy
dr.fone - Transfer Playlists fromn iPod to iTunes with Tunes
dr.fone is not only a simple software to copy the Playlists from your iPod to the computer; it is a complete Music manager for your iPod, iPhone, and even the iPads. You cannot only transfer the old or self-created playlists from your devices to your computer, however, it will also work with the Smart Playlists which are automatically created in the iTunes. Moreover, you can also transfer the Genius Playlists using the same software.
dr.fone will not only transfer the Playlists and songs to the iTunes, but it will also copy the play counts, ratings and even the artworks attached with the songs in the Playlists. This will give you a perfect music listening experience on the iTunes on your computer. The outstanding features of this tool do not end here, Using the one-click export option in the Tunes, you can export all the songs, videos, photos and playlists from your iPod to the iTunes or a folder on the computer. You can also copy the individual playlists to a particular folder on your computer. This folder will include all the Playlists and songs associated with these Playlists. There are two methods to transfer the Playlists from your iPod to the iTunes; you can either export the individual Playlist or can move the full music using the one click option in dr.fone. Here’s the Step by step guide to transfer the Playlists from your iPod to iTunes.
Step by Step guide to transfer playlists from iPod to iTunes:
Step 1. Downloading and Installation:
Click on the links given below to download the dr.fone; it will work on both Windows and Mac OS X. After downloading the software, you will have to click once to install it on your computer. So, unlike most of the software, dr.fone does not follow a lengthy wizard or complicated options to install it on any device.
Step 2. Run dr.fone and Connect iPod:
After downloading and installing, connect your iPod with USB cable to the computer and wait for a few seconds till it shows in the dr.fone.
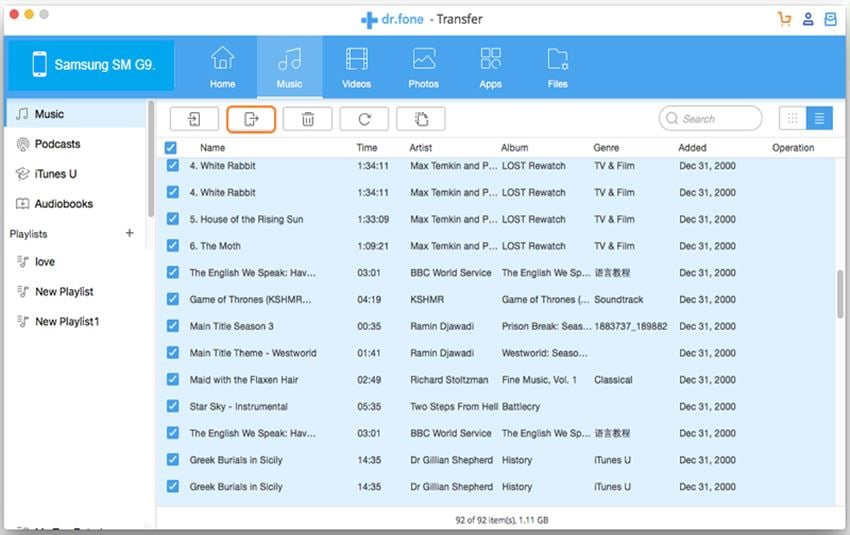
Step 3. Copy Playlists from iPod to iTunes:
Now, click on the "Music" tap at the top of the main window, and you can see the music from your iPod are displayed in dr.fone. In the left side you can see all the playlists you have on iPod. Right click on the playlist you want to transfer and click "Export to iTunes". It will begin copying the whole playlist music to your iTunes Library. Once the process is complete, you can see a dialogue box showing successful export of the music from your iPod to the iTunes Library.
That is it! You have successfully transferred the Playlists from your iPod to computer. You can navigate to the iTunes to see the recently transferred Playlists.


