


Space is one of the major issues that are faced by Android users. It is for the same reason that they not only want to make it free but also want to make sure that the best techniques are applied to get the work done. How to delete auto backup pictures on Android is therefore a question that is asked by the users. It is same as that of freeing the storage space. In short the people want to free the storage space by applying the idea that has been subjected. It is therefore advised to all the users to follow the processes in this tutorial to free up the space.
- Part 1: How to Delete Auto Backup Pictures on Android
- Part 2: How to Delete Android Backup from Google
Part 1: How to Delete Auto Backup Pictures on Android
Again it is to be noted that the idea of the subjected question is just to make sure that the Android space is freed from any extra pictures that are there. The steps that are involved in this regard are simple and therefore can be applied to get the work done with ease ad satisfaction. Each and every step is embedded with screenshot so that the overall implementation does not become an issue for the user at all.
Step-by-Step Guide to Delete Auto Backup Pictures on Android
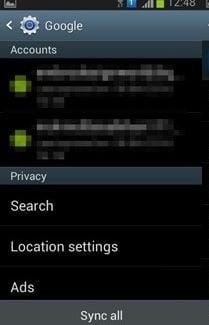
Step 1. The path that is to be followed is Menu > Settings > Accounts > Google to start the process.
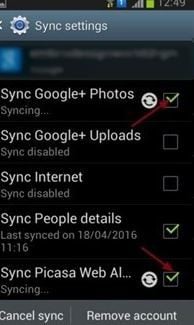
Step 2. The options of "Sync Google + Photos" and "Sync Picasa Web Albums" are to be unchecked.
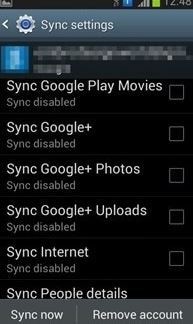
Step 3. The other sync options are also to be disabled as shown in the figure below.
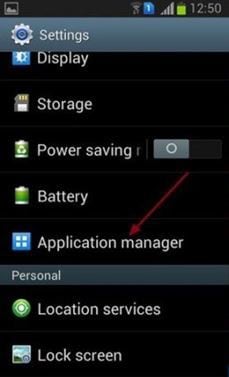
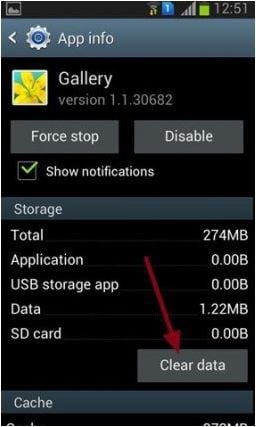
Step 4. In this step access the "Application manager" within the Settings.
Step 5. Tap to access the "Gallery" to proceed with the process. Clear the data and thus the issue will be resolved. This has remove auto backup photos from Android.
Auto Backup Advantages:
● The user gets lots of space freed from the device as well as the online storage that has been provided.
● A typical user gets about 15GB of free space, applying the idea makes sure that there is no issue in relation to the storage and it remains in use for the other apps.
● The user is also able to back up the data to external storage with the help of this idea. The external storage is more reliable for many users as compared to the online one.
Auto Backup Disadvantages:
● Not every picture requires a backup which means that there are some which are personal in nature. It is therefore advised to all the users to disable the auto backup so that the personal data never comes online.
● The auto backup features works without the knowledge of the user and therefore the user never knows what is being shared which is another grave disadvantage of the idea of auto backup.
Part 2: How to Delete Android Backup from Google
The complete process to overcome the issue has been explained as under. Each and every step is again embedded with screenshots so that the implementation becomes easy for the user. It also means that if there is a next time the steps can be implemented with ease and satisfaction. The user therefore should make sure that they are read and understood completely as it will allow them to get over the process as well as the related issue. The complete steps that are mentioned can be applied to multiple Android devices to get the best results. Irrespective of type, make and model these steps can be applied with ease and satisfaction.
Step-by-Step Guide to Delete Android Backup from Google
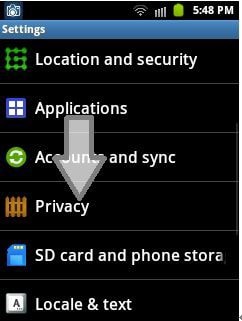
Step 1. First of all the user needs to access the "Settings" to begin the process.

Step 2. The "Privacy" is then to be accessed to proceed further in this regard.
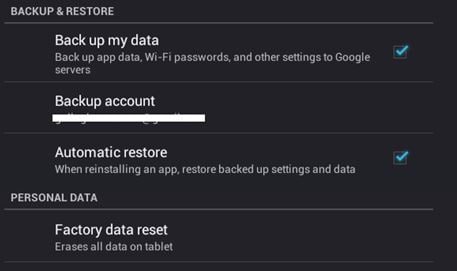
Step 3. Remove the check mark against the option "Back up my data".
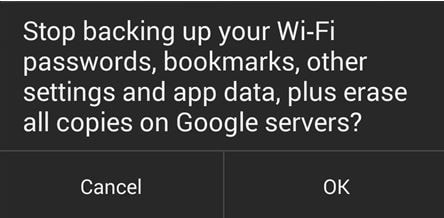
Step 4. The next option will prompt that "You are about to delete your backup from Google servers". Press "OK". This will remove the backup from the Google servers i.e. will delete the Android data from Google completing the process in full.
Whatever the scenario is the processes that are mentioned as above make it possible for the users to get over the issue completely. It is also to be noted that the users can get the best outcome when the processes are applied as mentioned. The storage space will not only be freed but can be used for something that is more of a value for the user. It is also advised to the users to apply these processes to any android device with ease and satisfaction as they will bring forth the same result. From tablets to low end Android handsets the results are simply awesome.


