


Blender is a piece of software that allows you to make animation and 3D models. Most people don’t realize that this software also has video editing capabilities. You can edit videos using Blender on Windows 10 so as to enhance them as well as convert them from one format to the other. The video editing feature functions within Blender, which gives its users the power to manipulate videos.
- Part 1: Best Blender Alternative - Filmora Video Editor
- Part 2: How to Edit Videos using Blender on Windows 10
- Part 3: Troubleshooting on Using Blender on Windows 10
Blender Alternative - Filmora Video Editor
The bast and easiest way to slove the problem of Blender not working with Windows 10 is to try the following Blender Video Editor alternative. Filmora Video Editor comes with multiple great video editing features and effects. It's very easy to learn and easy to use.

- It supports almost all the popular media file formats.
- It can records the videos using the built-in web cam.
- Simple functionalities such as cut and join different videos and a distinguished feature includes improving the existing quality of the video.
- Other features include adding text to your videos, plenty of filters and transitions to join different videos and nothing much.
- You can either export video to certain format or share it to YouTube, Facebook and Vimeo. Even burning edited video directly on the DVD is supported by this Blender alternative.
Part 2: How to Edit Videos using Blender on Windows 10
Blender is a fascinating software which is infamously tasked in creation of 3D models and making of animations. Counter intuitive to this, with Blender you can do more than the latter project. Upon downloading and successfully installing on computer running on Windows 10, it comes with inbuilt non-linear editor (NLE) capabilities. When you sought this, you will be able to perform basic actions like video cut to complex ones like video masking to enhance your video. Additionally, Blender on Windows 10 is fastened with a user-oriented interface hence only one tutorial is enough to achieve intended goal. Stick on this well curated guide on how to edit videos using blender on windows 10. You might experience some variation depending on Blender version. Nevertheless, this guide should be more or less the same.
Step 1. Set Up Blender for Video Editing
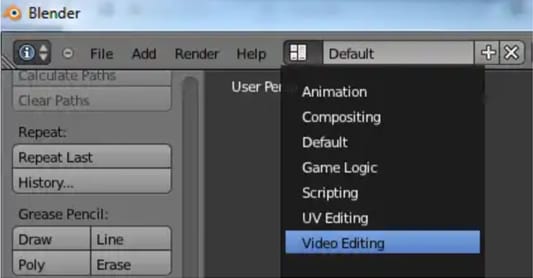
Download, install, and then launch Blender software on your windows 10 computer. From the main interface, click the “Choose Screen Layout” tab and pick video editing from the dropdown menu.
Step 2. Import Video File to Blender
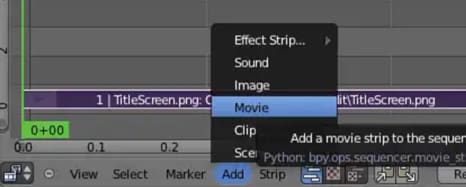
In the Non-Linear Animation (NLA) view, hit on the Add. Then from the pop-up menu select movie and follow the on-screen instructions to add intended video file into the program. And set the start frame and channel. The file will appear on the NLA editor sequence and will appear in two channels the blue and green representing the video portion and audio track of the added file respectively.
If you intend to keep the audio it will be sync always by default. However, if this is not the case, select playback and check on the “AV-sync”.
Step 3. Editing Video using Blender on Windows 10
To cut the video, select the target point on the file by left clicking on the NLA Editor sequence. The green line indicates chosen frame. Once selected, press and hold “SHIFT” and right click both the video and audio portions.
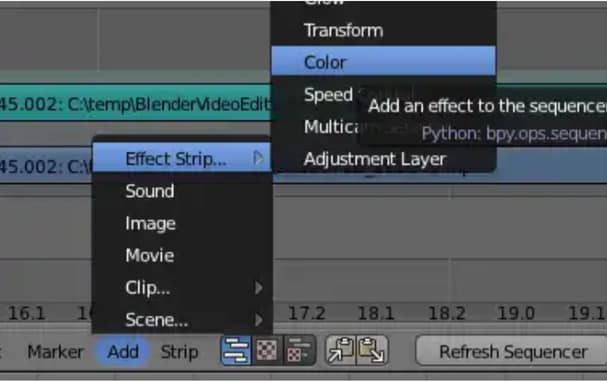
To add a video effect on the video file using Blender on Windows 10, right on the video channel “the blue one” and choose “Add” and from the displayed menu “Effect” then “Color”.
Now on the properties windows, give the starting frame and duration. And set the opacity to 0 then Blend to Alpha Over. At this point, in order, start by shift clicking on the video channel being followed by the color strip we’ve just added. Finally, select Add>>Effect Strip>>Gamma Cross.
Step 4. Export Edited Video File
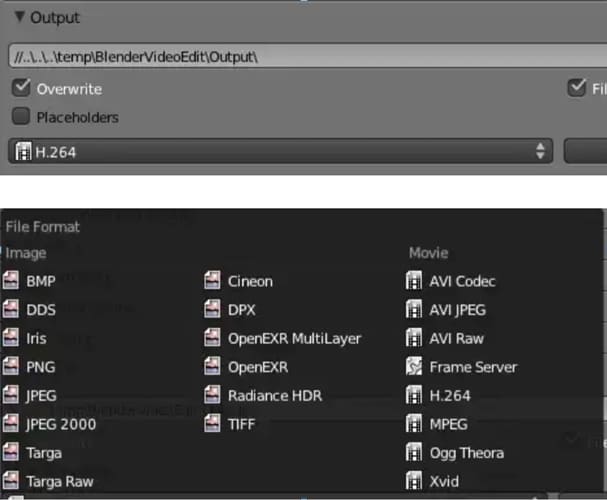
After satisfactorily completing editing, hit on the “Window Type” icon and select properties. Choose preferred dimension, frame rate for the output video. From the output section, select appropriate output location and format. Scroll down and select the Bitrate. This determines file size vs quality. To finalize, scroll back up and hit the Animation button.
Part 3: Troubleshooting on Using Blender on Windows 10
You can edit videos created within Blender or upload videos from other sources. It is not difficult to edit videos when using Blender. Its user-friendly interface will not allow you to access everything that you need to edit your videos very easily. Even a person who is not familiar with the Blender interface can get used to it and start editing videos in no time.
Troubleshooting is easy when running Blender on Windows 10. When you start this program, you may run into a couple of issues every once in a while especially when you use it on a regular basis. When doing your video editing jobs, the software may crush. To be able to use it again, you have to bring it entirely to a stop. This means that you are going to lose the work that you had been doing. Fortunately, there are plenty of things that you can do to troubleshoot these problems when using Blender for Windows 10. This is because of the fact that Blender is a user-friendly video editing software product.
- The first and most effective thing that you can do is open up the task manager. This can be done by pressing “Alt + Cntrl + Delete”. When the task manager opens up, go through the list of all the running programs. On the list, you will find Blender. Select the process and click on 'End Program.’ This will stop all Blender processes to make it possible for you to open it again.
- Another option that you can use to start Blender again after crushing is restarting your computer. By restarting your computer, you will be able to shut down all programs that are running on your windows 10 machine. This will allow you to open up the program when your machine starts running again.


