


There are times when you need to share a large video on the Internet or cut out certain parts and you need to be able to split the video. Splitting videos makes it easy to manage them especially on the timeline. It also allows you to cut into different scenes, using great transitions. There are certain tools that you can use to easily split videos with precision. Here are top 7 ways on how to split movie and video easily.
- Part 1. How to Split Movie in Filmora Video Editor
- Part 2. How to Split Video in Final cut Pro
- Part 3. How to Split a Video in PowerDirector
- Part 4. How to Split Video Files in iMovie
- Part 5. How to Split Video Files in Song Vegas
- Part 6. How to Split Video Files in Adobe Premiere
- Part 7. How to Split Video Files with Windows Movie Maker
Part 1: How to Split Movie in Filmora Video Editor
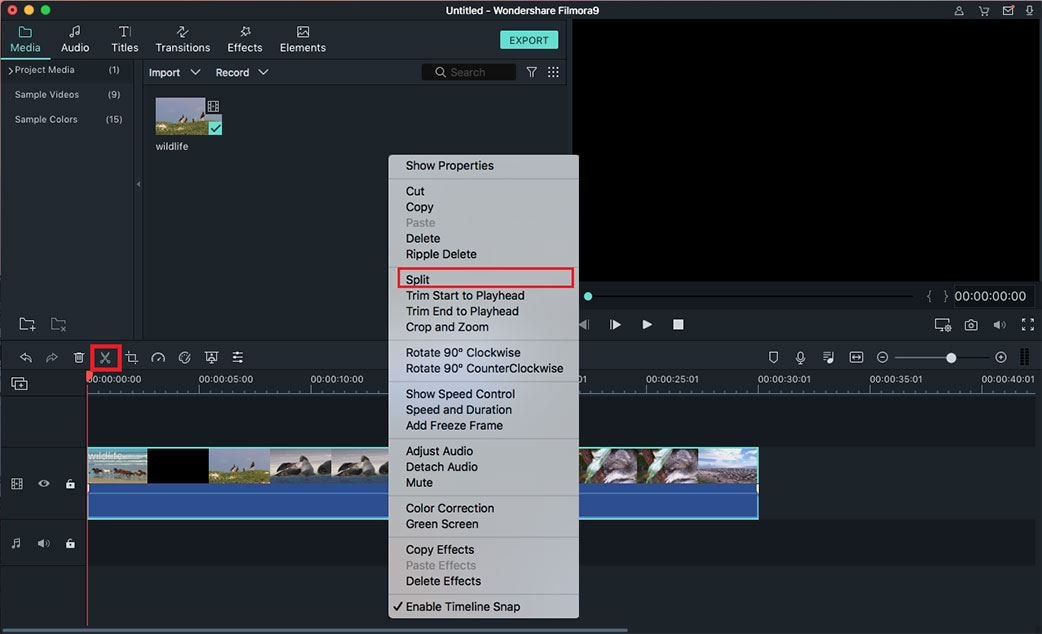
Filmora Video Editor for Mac (or Filmora Video Editor for Windows) is a great video editor and movie splitter, capable of performing some of the most advanced video editing tasks that you can expect from a free video editor. The interface is logical and easy to follow. All the functions are clearly displayed, making sure that you can edit your work with simplicity. You should be soon having your video productions online, when you use this powerful and intuitive tool. Here is how to go about splitting a video into two parts using this movie splitter.
Step 1: Launch the program and import the video to the program. And then drag your video into the timeline.
Step 2: Go to the desired point on the timeline, where you want to split your video and click on it to position the cursor.
Step 3: At the top of the timeline, you will see an icon of a scissor. When you have the right position, you can go ahead to click on the “scissors” icon and split the video into two.
Part 2: How to Split Video in Final Cut Pro

Final Cut Pro is another tool that you can use to split videos into two. The process is also quite simple. The tool can be used to cut a single film clip or several clips at the same time.
To cut a single film clip with Final Cut Pro:
Step 1: Go to the tools section and then click on “Blade” in order to get the cutting tool. You may also click on the letter “B”.
Step 2: Move the Skimmer to the position where you want the clip cut. Then simply click using the blade tool and the clip will be cut.
To cut multiple clips with Final Cut Pro:
Step 1: Move the skimmer in the timeline to the point where all clips should be cut.
Step 2: Once again use the blade tool and then click on the area where the skimmer is. This time use the buttons “Shift–Command–B” or “Blade All” from the tools menu.
NOTE: Final Cut Pro can also be used to cut clips as they are playing. You simply hit Command-B when the video is still playing.
Part 3. How to Split a Video in PowerDirector
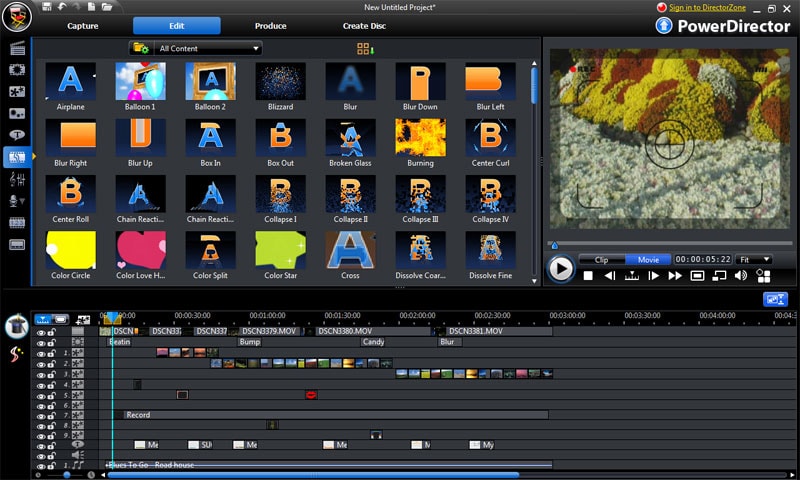
Power Director is another powerful video editing tool that can be used to split videos into two or several clips. The split videos can then be deleted or have special effects and transitions placed in between. Video editing encompasses a lot more than just basic functions and the tools can be used to perform several functions such as trimming, splitting, adding effects and a lot more. Here is how you go about using this tool.
Step 1: Use the timeline skimmer and move it to the point where you want to split the video clip.
Step 2: You may now click on the “Split” button and the clips will be cut into two.
Step 3: Repeat this action for all the parts that you want clipped, especially if you have a very large video, or need to cut out some parts.
NOTE: The split function is not available at the start and end of the video clip.
Part 4. How to Split Video Files in iMovie
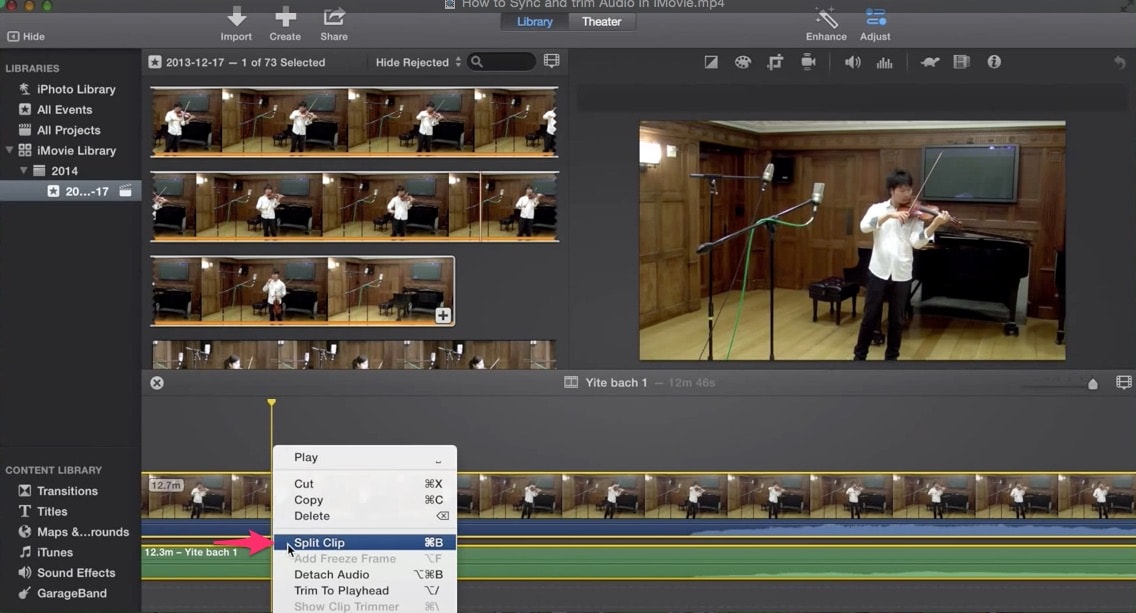
iMovie is a great editor developed by Apple. It is basically a one-stop editor for Apple’s proproietary QuickTime video format. The editor comes with a host of editing features, which enable you to create fantastic productions using the high quality QuickTime format.
Step 1: Go to the timeline and then select the clip that you want to split.
Step 2: move the skimmer, or play head to where you would like the clips to be split.
Step 3: Now choose modify > Split clip. The clip will be split into two.
NOTE: iMovie has been hailed highly especially by users of Mac. Although there are versions that play on Windows, they still only import the QuickTime format, and this is something that Apple should look at so they can extend the usability of the tool.
Part 5. How to Split Video Files in Song Vegas
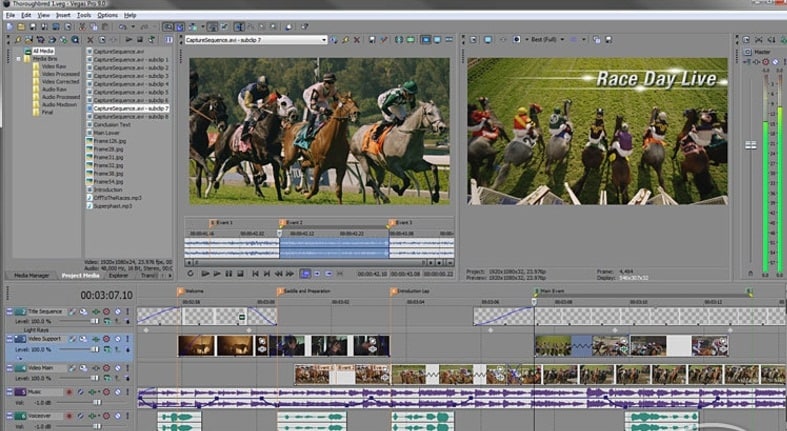
Sony Vegas Pro is another video editor that has been highly regarded within the industry. The tool is used to edit cinema productions, so you can just imagine how powerful it is. The user interface is logical and clean enabling you to bring out your best creations. You can also fully customize the interface to make you more comfortable with the layout. It has come with new features which deliver the power, speed and accuracy that you need when you really wash to push your video editing ability to the highest level. Follow these simple steps to split movie in Sony Vegas Pro.
Step 1: Go to the dialogue hoax and then choose open, so you can choose your video. The video must be in a format that Sony Vegas recognizes. The most popular is MP4.
Step 2: Zoom in on the clip so you can accurately see where you are going to split the video.
Step 3: Use the cursor and find the point at which you want to split the video.
Step 4: Now simply click on “S” and the video will be split.
Part 6. How to Split Video Files in Adobe Premiere
Adobe Premier is another long-standing video editor that has quite a great reputation and history in video editing circles. Adobe Premier has video editing tools for many purposes, You can use it to edit clips, manage them, preview them, trim them and do a lot more. You can even change the properties of clips that have been split from the same movie. This is a tool that has been developed for professionals who want their video editing to go beyond the basics. Here is how to split video clips using Adobe Premier.
Step 1: Go to the Quick view Timeline and then select the clip that you need to be clipped.
Step 2: Move the Current Time Indicator (CTI) to the point where you want the clip to be split.
Step 3: Now click on the scissors icon and the clip will be cut along the particular time.
Part 7. How to Split Video Files with Windows Movie Maker
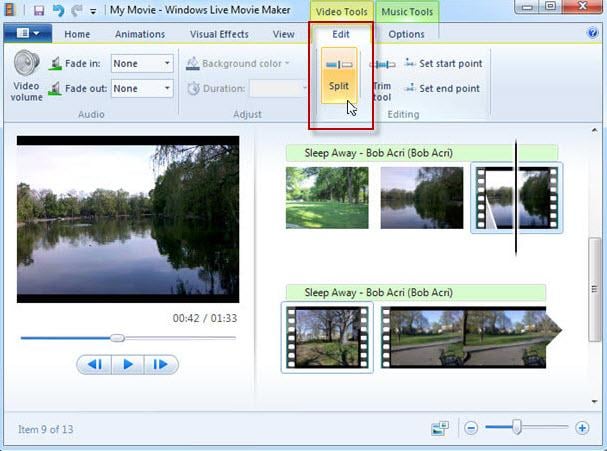
Windows Movie Maker is the proprietary video editor that comes bundled with Windows. The editing functions of this tool are not too complicated. At least someone can be able to edit their home videos, or videos which they take using the mobile devices. Windows movie maker is not as advanced as some of the tools mentioned above, so you should not expect too much from it. However, you will still be able to split videos using the tool.
Step 1: Choose the video clip that you want to split, after importing it to the timeline.
Step 2: Drag the playback indicator to the place where you want the video to be split.
Step 3: Go to video tools, which is found on the edit tab, located in the Editing group. Here you will find the option to split the video. Simply select it and the video will be cut into two parts. You may now move them around as you see fit.
Step 4: Now simply click on “S” and the video will be split.
Conclusion:
Splitting movie and video files is quite a simple task and it is also one of the best ways to make your videos stand out. When you take videos, especially for commercial projects, you may end up taking many retakes, in the hope of getting the best clip. When it comes to the final production, you have to take out the clips that you do not need, and the only way to do this is to split the video and delete these parts off. With any of the above video editors, you will be equipped to cut your videos and edit them as you would like. Some of the tools are highly sophisticated, while others are not. Simply check out which works best for you and get creative.

Filmora Video Editor
- Has everything you need to control videos: rotating, trimming, splitting, cropping and joining.
- In addtion to a large number of built-in effect resources, such as background music, title style, transition, filters and overlays, etc.
- There are so many options for exporting the video: all kinds of formats, for devices, sharing online directly and even burn to DVD.


