


iPhoto is a photos app on Mac. With iPhoto, you're able to manage, enhance, transfer your photos make a compelling slideshow to share with other. iPhoto provides you with animated themes like Holiday Mobile, Places, and Reflections, which bring your photos to life instantly.
Previously, you can burn iPhoto slideshow to DVD using iDVD. However, from Mac OS X 10.7, there is no iDVD any more. So how can you burn iPhoto slideshow to DVD after you update your Mac OS X to EL Capitan, Yosemite, Mavericks, Mountain Lion and Lion? You will get solution here.
iSkysoft DVD Creator for Mac is the right tool to extricate yourself from from the dilemma. It can either burn exported iPhoto slideshow movie to DVD disc, or directly help your make a photo slideshow and burn to DVD without leaving the program. Below I will show you how to burn iPhoto slideshow to DVD, and play on any home DVD player. (For Windows users, you can free download iSkysoft DVD Creator for Windows.)

Why Choose This iPhoto Slideshow to DVD Burner
- Make photo slideshow with background music.
- Burn slideshow and any videos to DVD.
- Support multiple output DVD types.
- Provide many free DVD menus.
- Edit the video before burning DVD.
How to Burn iPhoto Slidehow to DVD
Step 1: Export iPhoto slideshow to a movie file
When you're satisfied with your iPhoto slideshow, click File > Export > Slideshow and then choose QuickTime Movie to save the movie file to a MOV file so you can easily import it to a DVD movie making software like DVD Creator.
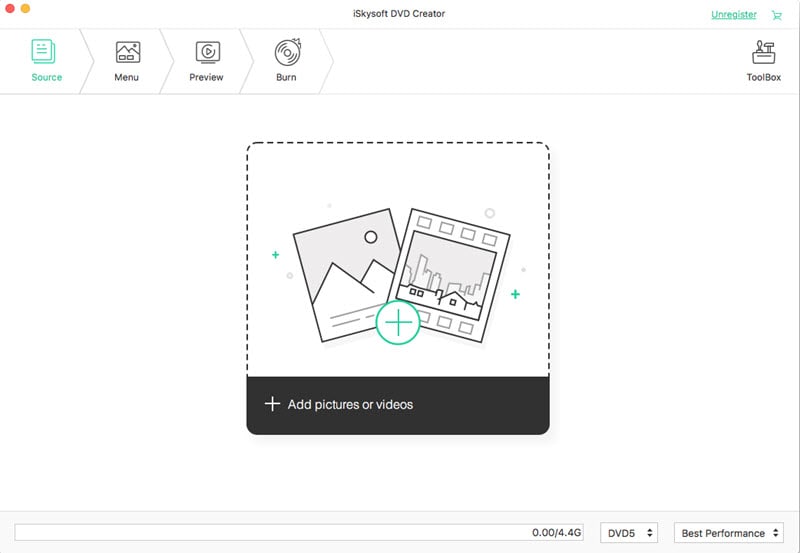
Step 2: Import iPhoto slideshow movie file(s)
After installed DVD Creator, run it from Application folder and import your movie file or files (if you want to burn several iPhoto slideshows to DVD) to the application. There are two ways to do this: 1 - directly drag the MOV files to the program; 2 - click the "+" button in the primary window and select the export iPhoto slideshow files from your hard drive.
Note: You can easily rearrange added Vuze files by dragging and dropping, or through up/down buttons on top.
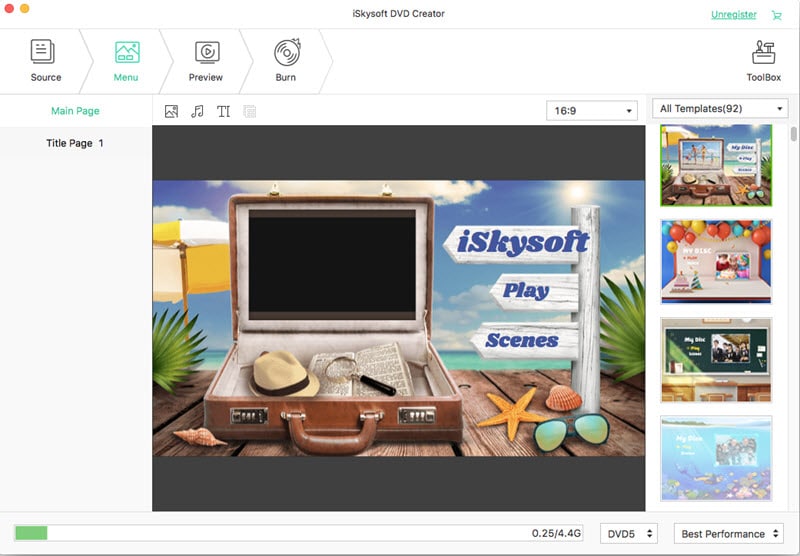
Step 3: Author a personal DVD menu
By default, a DVD menu will be applied to your iPhoto slideshow DVD movie. If you don't like it, you can either change it to another DVD menu template, or just disable it by choosing No Menu from the list. Afterwards, it's able to add titles and background music, which helps you make a beautiful DVD menu to put together with your iPhoto slideshow.
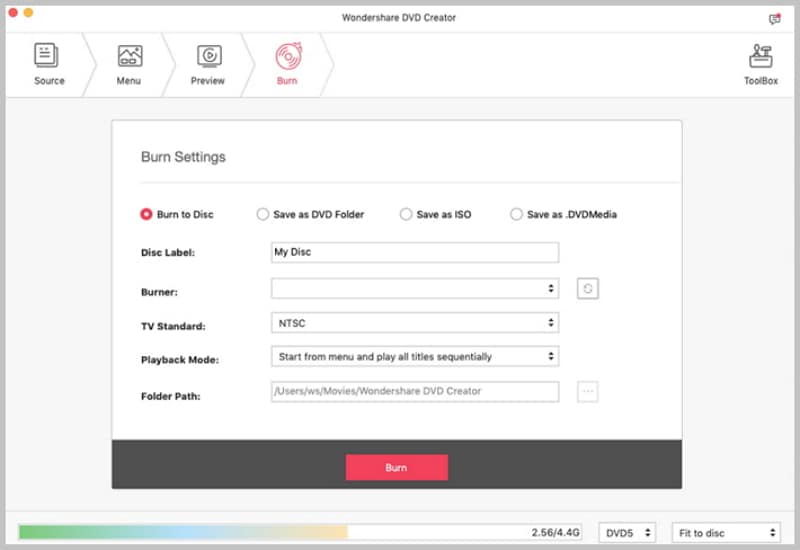
Step 4: Start to burn iPhoto slideshow to DVD
Click the Preview button to check the result. If it's perfect, insert a blank DVD disc and click the Burn button. DVD Creator includes 4 output options: DVD Disc, ISO file, DVD Folder (Video_TS) and. dvdmedia file. To watch iPhoto slideshow on TV, choose DVD Disc and give it a name before burning to DVD disc.
Tips: DVD Creator for Mac supports all popular DVD disc types: DVD-5 and DVD-9; DVD-R, DVD+R, DVD-RW, DVD+RW, DVD+R DL, DVD-R DL, DVD-RAM. To play the created iPhoto Slideshow DVD successfully on your home DVD player, make sure you've chosen the same TV standard with the DVD player.
Video tutorial on how to burn iPhoto Slideshow to DVD


