


If you are looking for the best alternative to Remo photo recovery, we have got you covered. We know how crucial it is to restore your valuable data that is somehow lost or deleted from your computer or some other storage device. This is why we have reviewed the best data recovery tool here.
Part 1. Download Remo Photo Recovery Alternative for Windows and Mac
For all the Mac and Windows users, we have gone all-out to introduce you the best data recovery tool. This tool iSkysoft Data Recovery for Mac (iSkysoft Data Recovery for Windows) is really amazing not only for recovering lost or deleted photos but also for recovering any kind of data that is formatted, deleted or lost from any of your internal or external drive of the system.
Recoverit (IS) is an amazing tool with four data recovery modes. This tool is specifically designed with intuitive interface and remarkable features so as to allow highly effective data recovery. It can recover any file type from any of the internal hard drives or external storage devices without any flaw or change. The program can easily recover videos, music, photos, documents, archive files, emails, contacts and a lot of other data too. The program offers the safest, fastest and simplest data recovery in few minutes only.
Key Features of Recoverit (IS):

- The tool perform read only process so you get unchanged and unflawed data at the end of the process.
- The tool also allows you to preview all the folders and their contents before you decide to recover them.
- You can also use its Deep Scan module for more powerful and thorough scanning of the selected drive or device.
Step-by-Step Guide to Use the Alternative to Remo Photo Recovery
Step 1 Launch Remo Photo Recovery Alternative on Mac
Use the program's official website and download it from there. Now, install the application on your system and launch it to get to its main user interface. On the interface, you will see the file types which you can choose from to recover in the following steps.

Step 2 Scan the Hard Drive
A list of all the drives will appear on your screen. Select the drive for scanning where you know your file is lost. You can choose either of the scanning modules. Although deep scanning may take more time, it is more powerful and efficient. Click on the refresh icon in case the drive you want to scan is not available on the screen. Then click "Start" button to begin the scanning process.

Step 3 Recover Lost Photo from Mac
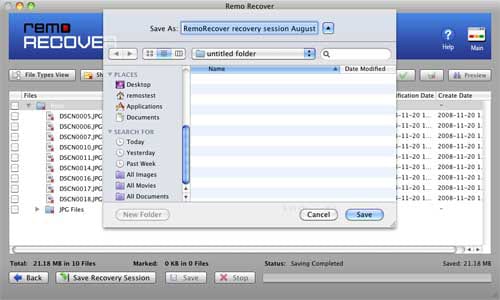
After the scanning is complete, all the folders and files that were ever lost on the selected drive will come up on the interface. Choose your file, Preview them and Recover them using the "Recover" button at the top of the screen.

We always recommend users to not save the recently recovered files on the same drive they were stored prior to deletion. This will save your files from getting written again which is the main cause of permanently damaged data.
Part 2. How to Recover Photos Using Remo Photo Recovery
Remo Recovery allows you to retrieve photos from different kinds of removable storage devices such as memory cards, USB drives, internal and external hard drives. No matter what caused photo loss on your system, this tool will work exceptionally well so as to recover it in its original form.
Step-by-Step Guide to Recover Lost Photos Using Remo Photo Recovery
Step 1. Download and install the Remo Photo Recovery tool on your operating system. Click on the program's icon and drag it to the applications folder.
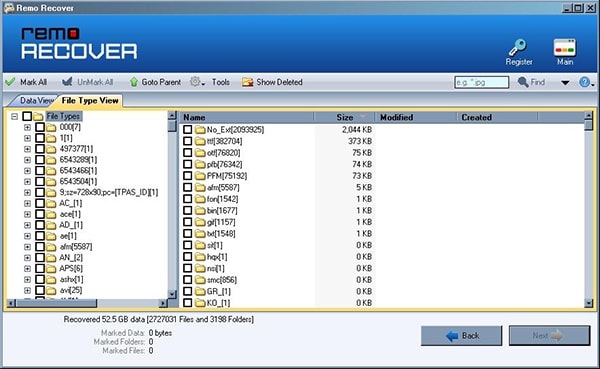
Step 2. Enter your credentials like username and password and then click OK. Depending on the type and extent of your data loss, you will have to select any of the three modes: Basic Edition, Media Edition and Pro Edition. Click on the option and begin your recovery process. Choose either of the Recover Deleted Photos or Recover Lost Photos depending on your data loss. A list of drivers on your computer will queue up on the screen. Choose the drive from where the data was deleted or lost. Tap on the Next button after selecting your drive where you lost data.
Part 3. Troubleshooting on Using Remo Photo Recovery
Several users have faced few problems with this Remo Photo Recovery tool. We have rounded up the troubles here:
When using the software, user may encounter a serious trouble with it. It can get crashed and would stop functioning further. In this scenario, it is advisable to stop experimenting with the tool and call customer care team. The team is there 24/7 and would help you come out of this problem instantly.
The tool uses credentials to begin data recovery. In case, your activation key is lost, you can again contact the customer care team who will submit your request for new activation key.
Other problem with the tool is its three edition system. You have to know the level of your data loss beforehand so as to choose the correct edition. This may cause trouble because sometimes you don’t know the exact extent of your data loss. So, it is better to first understand your loss whether it is a single photo or several of them or some other media that is lost, formatted or deleted from your drive. When you will know about these details, you will choose the edition easily and it will recover all your photos effectively.
Part 4. Comparison of Recoverit (IS) and Remo Data Recovery
|
Software |
Scanning Mechanism |
File Formats |
Compatible OS |
Preview Option |
Rescue Files From Drives with Bad Sectors |
|---|---|---|---|---|---|
|
Recoverit (IS) |
Very Strong | Audio/Video/Photo/Emails/Contacts/Documents and more | Windows/Mac | Yes | Yes |
|
Remo Photo Recovery |
Strong | Audio/Photo/Video | Windows/Mac | Yes | Yes |


