


With so many great features, including Picture in Picture, Siri on Mac and Apple Pay on the web amongst others, macOS Sierra is undoubtedly the best Mac OS system yet. It is clearly designed to make your Mac experience one of a kind and it does. But it still in early stages yet and it does come with a lot of bugs that can dampen the wonderful experience it is meant to convey. If you are not happy with MacOS Sierra, you can downgrade from macOS Sierra to Mac OSX 10.11 El Capitan and wait for MacOS Sierra to get better. This article will show you how to downgrade your system from mac OS Sierra to Mac OSX 10.11 El Capitan.
Part 1: How to Downgrade from macOS Sierra to Mac OS X 10.11 El Capitan
Before we begin, there are two things that you need to do to ensure the safety of your data. To begin with, ensure to create a backup of any files you may have added in Sierra and then save the backup on a separate hard drive. Also ensure that you have a Time Machine Backup of El Capitan. You should have created this before upgrading to macOS Sierra. Now that you have that ready, follow these very simple steps to downgrade to El Capitan.
Step-by-Step Guide on How to Downgrade from macOS Sierra to Mac OS X 10.11 El Capitan
Step 1. Connect the Mac to the internet via Wi-Fi or Ethernet. The Click on the Apple icon and select "Restart" from the drop down menu that appears.

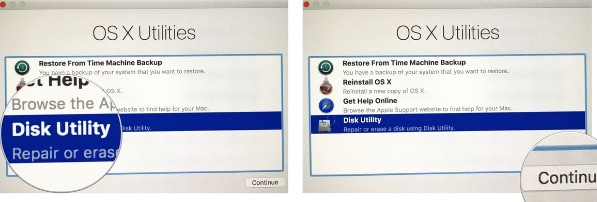
Step 2. Now hold down "Command + R" on your keyboard and when you hear the startup sound, keep holding the keys until the computer reboots. Click on "Disk Utility" in the OS X utilities selector and then click "Continue".
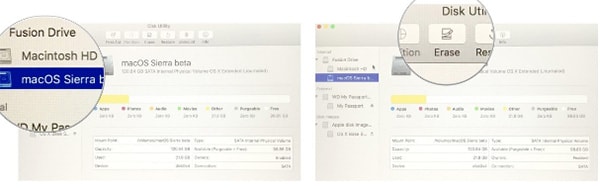
Step 3. Select your startup disk and then click "Erase" tab at the top of the window. Enter a name for the file to be destroyed.
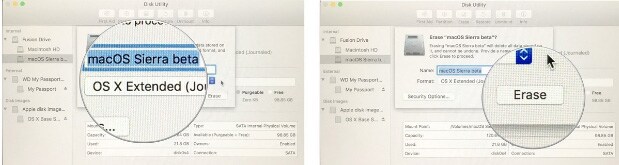
Step 4. Select Mac OS Extended (Journaled) from the format list and then click "Erase".
Once the process is complete, you will have successfully removed MacOS Sierra from your system. You can then quit "Disk Utility" from the drop down menu in the upper left corner of the screen and go back to the OS X utilities selector. Now we reinstall OS X EL Capitan.
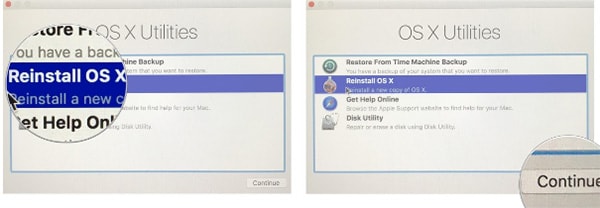
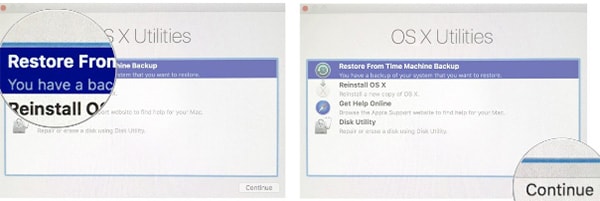
From the "OS X Utilities Selector" click on "Reinstall OS X" and then click "Continue" in the El Capitan installation window.
El Capitan will install like a standard update. You will have to agree to the licensing terms before the software can be installed on the Mac. Now you will have downgraded to El Capitan, you may want to restore your data from a Time Machine Backup. Here's how you can do it.
Step 1. Begin by connecting the Mac to the internet and then click on the Apple icon. From the options presented, select "Restart".

Step 2. Hold down "Command + R" on your keyboard and keep holding down the keys until the Mac reboots. Select "Restore from Time Machine Backup" in the OS X utilities selector and then click on "Continue".
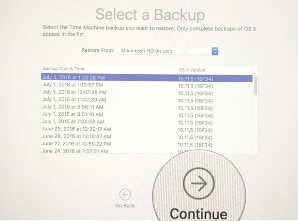
Step 3. Carefully read the information on the screen and then click on "Continue". Select the "Backup Source" from where your Time Machine Backup is stored and then click "Continue". Select the most recent OS X El Capitan backup ad then click "Continue".
The Mac will immediately begin restoring from the selected Time Machine Backup and then reboot. This process may take a while depending on the amount of data in the backup file. Once the backup has been restored, you can go ahead and use El Capitan. But watch out for Sierra upgrades that should make the OS X better.
Part 2: How to Recover Lost Data After Downgrading from macOS Sierra
If for some reason you don’t have a Time Machine backup of El Capitan to restore or you somehow lost some of your data during the downgrade process, you may be wondering how you can get the data back. With iSkysoft Data Recovery for Mac (or iSkysoft Data Recovery for Windows), you may be able to recover the data in a few simple steps. The program is designed to make it easy for you to manage your devices and help you recover data lost in a few simple steps. Here’s what the program can do for you.
Key Features of Recoverit (IS):
- It is very easy to use and highly effective. It can be used to recover data that has been lost under any circumstances.
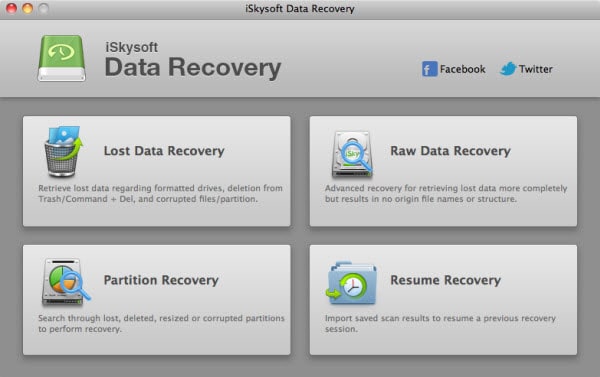
- The program can also recover lost data in the process of upgrading to macOS Sierra.
- It can restore deleted files in 3 steps, even you have emptied the trash or formatted the hard drive.


