


It is that time again for Mac users to upgrade to a new operating system. The new macOS Sierra has dropped the "OS X" that was a premium feature of the title in all its predecessors and also comes with a lot of new features. For example, the new system allows users to Auto unlock, use Siri on desktop and even make use of Apple Pay for the first time. If these features seem attractive to you, it is about time you upgrade to macOS Sierra. If you don't know how, this article will provide you with everything you need to comfortably upgrade to the new Mac OS.
- Part 1: How to Prepare Your Mac for macOS Sierra
- Part 2: How to Upgrade to macOS Sierra
- Part 3: Recover Lost Data after Upgrading to macOS Sierra
Part 1: How to Prepare Your Mac for macOS Sierra
Just like with every major update, there are things you need to do to get your system ready for a new upgrade. The following is how you can prepare the system to ensure a smooth, problem-free transition.
Many of the problems most people encounter after a major upgrade, have to do with data loss. This is why it is very important to create a backup of the data on your Mac before you begin updating to macOS Sierra. This backup should include all the data on your computer including all photos, videos, music, documents and more.
The best way to do this would be to create a Time Machine Backup. Time Machine works with just about any hard disk that is connected to the computer and is a secure way to create a backup of all the files on tour Mac. When enabled, Time Machine will periodically take snapshots of the files on your Mac and catalogue them on to a connected external hard drive. It will also erase old backups and replace them with newer versions. Follow these very simple steps to use Time Machine to create a backup of all the files on your computer.
Step 1. From the Apple Menu, select "System preferences" and then select the "Time Machine" icon.
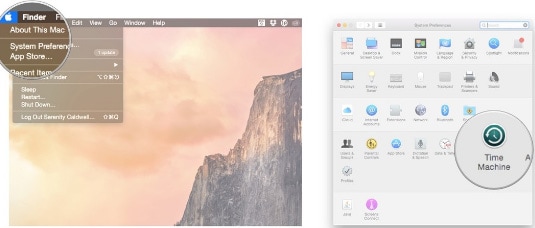
Step 2. Once it is open, turn the "Time Machine" slider to "ON" and then Click "Select Backup Disk" to choose the disk you would like to use for your Time Machine Backup.
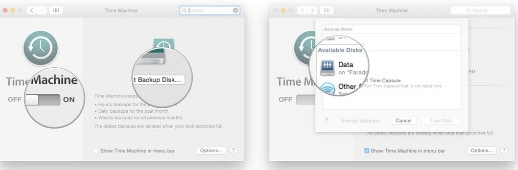
Time Machine will format the hard drive for backup and begin your first backup in a few minutes. If you ever want to exclude some data from the backup, you can do so by going to "System Preferences" to select "Time Machine" and then click on "Options" to select any files that you would rather didn't find their way into the backup. Now that you have a backup of all the data on your Mac, you are ready to install macOS Sierra.
Part 2: How to Upgrade to macOS Sierra
Before upgrading to the new OS, it is important to note that not everyone can upgrade to macOS Sierra. It is available to limited Mac models. The models that can upgrade to Sierra include:
● MacBook Pro mid-2010 and newer
● MacBook Air Late 2010 and newer
● Mac Mini Mid 2010 or newer
● Mac Pro Mid 2010 or newer
● iMac late 2009 and newer
● MacBook late 2009 and newer
The OS versions that can be upgraded to Sierra include:
● OS X Mountain Lion v10.8
● OS X Mavericks v10.9
● OS X Yosemite v10.10
● OS X El Capitan v10.11
If you don't know what version of OS your system is running, you can check by clicking on the Apple icon in the top left corner and then choose “About this Mac” and you should see it there in capital letters. If you can upgrade to Sierra, here's a step by step guide to help you do that.
Step 1. Head on over to the Mac App store and find the macOS Sierra page to download the upgrade.
Step 2. Click on the download button and the follow the install instructions to begin the upgrade process.
The process shouldn't take long and you should have your Mac running on Sierra in just a few minutes. It is important to note however that you will only be able to access the macOS Sierra page on the App store on or after September, 20, 2016.
Part 3: How to Recover Lost Data after Upgrading to macOS Sierra

As scary as it sounds, upgrades can result in some data loss on your Mac. As a matter of fact, this is one of the most common problems that most people will experience shortly after upgrading to a new OS. If you do, you may need the services of a program that is designed to get your data back regardless of how it was lost in the first place. It could be that the hard disk you used to create the Time Machine backup is corrupt or you somehow didn't create the backup correctly, in effect losing some of the data on your Mac. In this case and under any other situation that could cause data loss, iSkysoft Data Recovery for Mac (or iSkysoft Data Recovery for Windows) can help you get your data back in just a few minutes. The program is effective and easy to use. The following are just some of the features that make it the ideal solution for data loss.
Why Choose This macOS Sierra Data Recovery Software:
● It comes with highly capable features that are essential in effective data recovery. These features work together to ensure that data is recovered in its original condition.
● It is very easy to use. In a few simple steps and a few minutes, you can get back all your missing data.
● It is a 100% safe solution. None of the data on your Mac or even the applications on the computer are at any risk from damage. The program utilizes a read-only system that ensures data safety.
● It is compatible with all versions of Mac OS X including the new macOS Sierra and macOS High Sierra. This means that you can use it even if you decide to downgrade to an older OS X.
● It can be used to recover all types of data including videos, music and photos.


