


iCloud storage is the total amount of memory space that you have available to you on iCloud. At the offset, everybody gets 5GB (Gigabytes) of iCloud completely free. There is also an upgrade option to either 50GB, 200GB or even 1TB (1 Terabytes, which is equal to 1,000 Megabytes ). When you are using iCloud with your iPhone for example, as long as automatic backups are turned on, your phone’s data will be automatically backed up on iCloud. This automatic backups will continue unhindered until your 5GB iCloud has been used up. If you want to delete iCloud storage, this article will be helpful for you.
Part 1. 6 Tips to Delete Storage on iCloud
Now that you have chosen to manage the 5GB free iCloud storage and not upgrade, the following points will help you to maintain your iCloud storage so that you will always have enough space to backup your most important data. In all cases, it is important that you know these steps for managing your iCloud storage, how to delete iCloud storage, or how to delete photos from iCloud storage because even when you upgrade to a larger storage, you will still run out of space if you don’t manage it well. Following are the six tips.
#1: How to check iCloud Storage Usage
There are times when you need to know how much storage space you are using. It is part of a good management routine because you are using a rather limited resource. So to check your data usage on your iPhone with iOS 8 or later, tap on Settings -> then on iCloud -> on Storage -> then on Manage Storage and you will see it. If you are using an earlier version of iOS than the version 8, then you will have to check it a little differently. Tap on Settings -> then on iCloud -> then on Storage & Backup -> then on Manage Storage. You will now have to tap the name of your device, whose backup size would be found under Photo Library.
#2: Manage iCloud Backups
It is possible to mange your general iCloud backup settings and configure your device in a way that it only backs-up the kind of data that you choose. Such data that you end up backing-up will then be important and not too large. Photos and videos are two major types of data that can easily fill up your iCloud very quickly, so it is better to disable their backup on iCloud but back them up somewhere else that accepts media backups. To manage your backups, tap on settings -> then on iCloud -> storage & backups -> then tap on Manage Storage -> finally tap on your Device Name.
You will now see a list of all the apps that periodically backup their data. You will have to turn-off the green slider buttons next to the apps that you want to deactivate from backup. You can deactivate photos and videos here and then read the next tip #3. You should note that when you deactivate any app here from backup, all its data in iCloud will be deleted automatically.
#3: Back Up Photos Elsewhere
You can install many different types of apps on your device that will allow you to backup your data onto their cloud servers automatically and for free. So you see it makes sense to disable iCloud photo backup so that there is space on iCloud, but now you download and install either Dropbox, Google+ or Flicker and you are good to go. Your photos will be safely backed-up while your iCloud storage has enough space for your other important data. There will be no more need for how to delete photos from iCloud storage.
#4: Delete Documents & Data
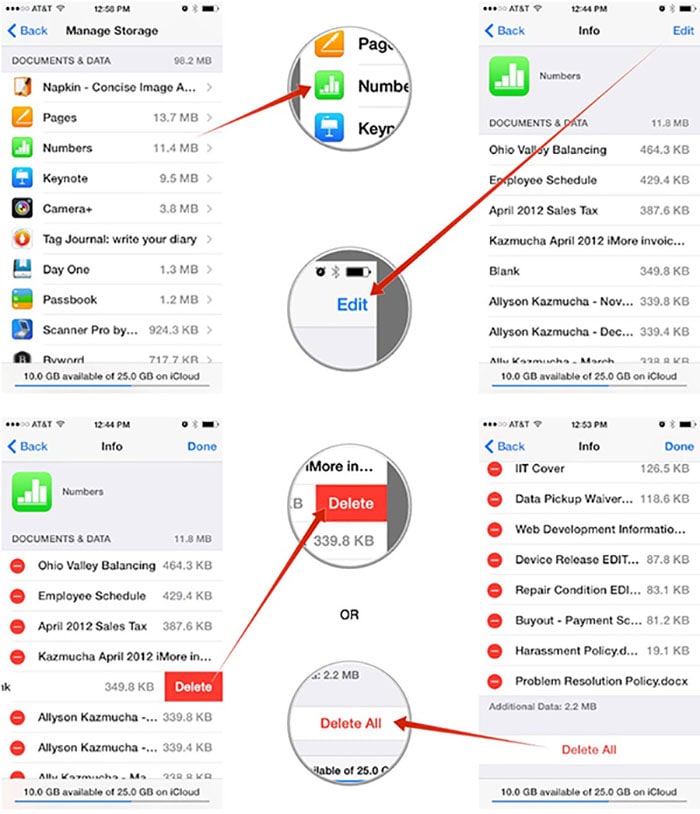
Another method of managing your iCloud storage space is to specifically delete individual files. To do this, you navigate to Settings -> iCloud-> Storage & Backup -> Manage Storage. Under Documents & Data, you can tap on any app you wish to view its backed-up files, then tap on "Edit" at the top-right corner. You can now view the individual files for the selected app and can click on the delete button next to each button to delete it. On the other hand, you could choose to delete all of the app’s files at once. For this, simply scroll down to the end of the page and tap on “Delete All”. This method is quite good when you have the time because you can selectively remove all the unwanted data that clogs your iCloud storage.
#5: Prune Your iCloud Mail
Another source of data to fill up your iCloud storage is emails. In order to better manage your iCloud storage and maintain a smaller data footprint, it would be better if you deleted every unnecessary email immediately, this way your iCloud emails will not pile up. If you already have lots of emails piled up, one quick method of reducing their total data size is to select only emails with attachments, and then delete them. But, of course you must make sure they are not important attachments.
#6: Remove Unwanted iPhone Private Data on iCloud
Having your private data on iCloud is not a very smart thing to do because popular services like iCloud do get their security systems breached sometimes. In case this happens, then you do not want your private data in the hands of a total stranger. So individually single them out and delete them. If you want to backup sensitive data then first encrypt it and after that, store it in a portable USB drive, which you can now hide in a very safe place.
Part 2. How to Delete iCloud Storage on iPhone
The following are the steps required to arrive at the iCloud storage settings and editing page. I will first outline the steps for iOS devices prior to iOS 8 and then later outline the steps for iOS 8 devices.
Steps on How to Delete iCloud Storage on iPhone:
Step 1. Launch the Settings app on your iPhone, then guiding to iCloud.
Step 2. Choose Storage & Backup, then tap on Manage Storage.
Step 3. In Documents & Data section, you can tap on the App you want to know what documents are stored in iCloud.
Step 4. Selecting one App, you can be shown the all documents, then tap the "Edit" button on the upper right hand corner.
Step 5. After that, you can choose to click "Delete All" to delete all of them or you can tap on the "Delete" button to the left of the item to delete one of the documents.


