


Hard drive Partition is an important part of the computer that enables the user to keep their digital data safe and organized. This is one the best way to keep our data safe from accidental deletion. There is two type of partition, one is primarily for the operating system and the other is secondary for storage space. On the other hand, the recovery partition is very useful to restore the operating system if an unexpected error occurs. It is always recommended to create recovery partition to avoid facing any problem. If you don’t know how to create recovery partition then, you can read this full article.
- Part 1. How to Create Recovery Partition on Mac
- Part 2. Create Recovery Partition on Hard Drive in Windows
- Part 3. How to Recover Data from External Hard Drive
Part 1. How to Create Recovery Partition on Mac
To create recovery partition on Mac devices, you need to have recovery partition creator on Mac device.
Step by Step Guide to Create Recovery Partition on Mac
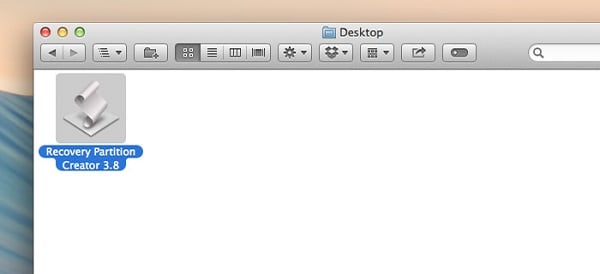
Step 1: At the first step, you have to double-click on recovery partition Creator. Create a backup prompt will appear. It is recommended to use "Time Machine" to do this process.
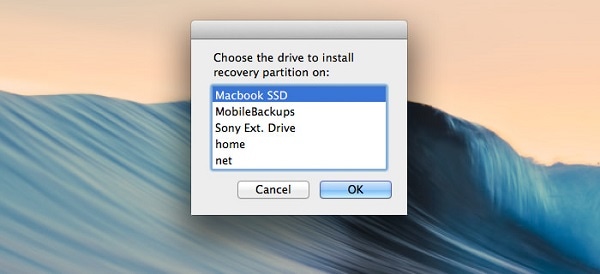
Step 2: Now, you have to click on "OK" button. You can choose the partition disk where is Mac OS is installed and hit on "OK" button.

Step 3: One can also select the external drive if it is connected. You have to connect the drive every time, you open Disk Recovery Assistant.
Step 4: You have to choose Mac operating system installer.
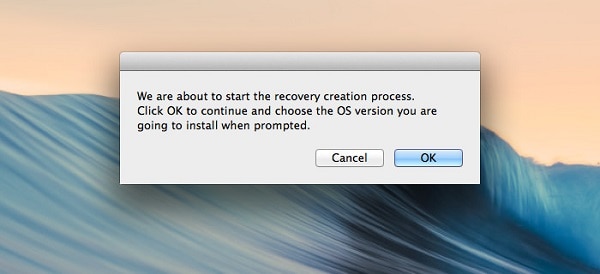
Step 5: Then, click on "OK" button. It will prompt again to check the drives in case of any error occur and click on "Continue".
Step 6: Once the above process completed, you have to click on "OK" button. It will take some time to complete the process.
Step 7: Now, CUI based window will appear, you have to type "diskutil list" and press "Return" button. On the screen, you will see "Apple_boot Recovery HD".

Part 2. How to Create Recovery Partition on Hard Drive in Windows
Step 1: First of all, you have to click on "Start" button and search for "Control Panel" and Press "Enter" button.
Step 2: On the control panel, you have to type "Administrative tools" in the search box and click on "Administrative tools".
Step 3: Administrative tools window will appear, you have to click on "Computer Management" under system and security menu.
Step 4: Now, you have to locate the drive which have sufficient amount of space. Right click on the drive and choose "Shrink Volume". Enter how much space you require for recovery drive. You can press on "Shrink" to make space to create recovery partition.
Step 5: Once the above process completed, you have to right-click on the newly unallocated drive. Popup will appear, you have to click on "New partition". Assign the space and format the drive.
Step 6: Click on "Start" button and type "Backup" without quotes and choose "Backup and Restore Center".
Step 7: Choose "set up backup" and select new partition from the list. And hit on "Next" button.
Step 8: Now, click on "Let me choose" to open a file browser.
Step 9: You have to click on arrow icon next to the drive which you would like to make a recovery partition. Click on "Include a system image of drives" and press "Next" button.
Step 10: Finally, you can click on "Save Settings and Run backup" to move the file to the new partition.
Part 3. How to Recover Data from External Hard Drive

Recoverit for Mac (or Recoverit for Windows)is mainly designed to rescue the permanently deleted files. It is designed for both Windows and Mac operating system and has the capability to recover file from any storage device. It is a great tool for you if you are suffering from accidental deletion or file corruption. This tool aids you by recovering such file by performing deep scanning.
Why Choose This Hard Drive Recovery Software:
- One can recover images, photos, videos, emails, documents, compressed file, and hundreds of other file types.
- Have you deleted a file using "Shift" + "Delete" and want them back? This tool performs in-depth scanning to fetch these file and recover them.
- Recovery process is done in three simple steps including Scan – Preview – Recover.
Easy Steps to Recover Data from External Hard Drive
Step 1. Select the File Types
Initially, you have to download Recoverit from the official website. Now, install it on your computer. Then, connect the external hard drive to the computer and open Recoverit (IS) tool. Now, choose the file type that you would like to recover from the external hard drive.
Step 2. Select the Target Location
You have to select the hard drive and click on "Next" button. If you can't see your hard drive then, simply click on "I can't find my partition" at the bottom of the external removable device.

From here, you can choose deep scan or quick scan as per your need. You can choose quick scan to recover only limited files faster. In deep scan, it will scan deeply to find every file.
Step 3. Recover Data from External Hard Drive
Now, you can preview the files such as document, images, videos, and archive before recovery. In case of images, it will show you thumbnails. If you want to recover it then, click on "Recover" button.


