


It is important to know how to recover damaged photos from your media devices. Digital photos are damaged due to several human errors and operating system issues that occur during writing, reading, storage, processing or transmission. These includes ejection of the memory card while the camera is still in use, CPU mistakes, partition crash, computer overheating, software crash, virus attack, unexpected power failure, sudden or forced system shutdown, etc.
Part 1. How to Recover Damaged Photos Using Recoverit (IS)
iSkysoft Data Recovery for Mac (or iSkysoft Data Recovery for Windows) is the most downloaded data recovery software worldwide, thanks to its powerful data retrieval ability and top-notch, user-friendly features. The safe, affordable and do-it-yourself program is all you need to recover damaged photos from Mac-based hard drives, external hard drives and Mac compatible devices like digital cameras, USB flash drives, memory cards, players and more.
The software features advanced data scanning algorithms that ensure complete retrieval of damaged, corrupted or lost photos, audios, videos, documents, emails, archive files and almost all the file types you can think of. Your data isn't changed or destroyed during the recovery process since it uses a risk-free, read-only process to scan and retrieve your files.
Why Choose This Damaged Photos Recovery Software:
- Reads data from FAT16, FAT32, exFAT, HFS+, HFSX and NTFS files systems.

- Save scan results and then import them to resume recovery without having to restart the scanning process.
- Deep scan increases your data recovery success by completely scanning files in the entire file systems.
- Distinguish valid and invalid data before you can recover them.
Step-by-Step Guide to Recover Damaged Photos on Mac
Step 1. If you want to recover damaged photos from a digital camera, smartphone, player and more, use the original cables to connect it to Mac. You can also remove the memory card from your device, insert it into a card reader and then plug in the card reader to Mac. Continued operation on a device or drive from where your photos were damaged can lead to permanent data loss. Therefore, if you want to retrieve damaged photos from a Mac-based drive, you can use another Mac computer, download Recoverit (IS) for Mac on a USB flash drive and then recover your photos while the program is installed on the USB flash drive. Download Recoverit (IS) for Mac. Drag the downloaded setup file to "Applications" to install the software on your Mac and then double-click the program's icon to launch it. From the first window, please select the file types that you want to recover and the click "Next".

Step 2. A new window will open with a list of all your drives. Select the drive from where you want to recover the damaged photos and then click the "Start" button to start the scanning process. If your drive isn't listed, click the refresh icon, and it will be displayed in no time.

Step 3. When the software completes scanning your device, it will open another window from where you can preview and even determine the quality of the photos you are about to recover. Check the listed files (photos) you would like to retrieve and then hit the "Recover" button to save them to the selected path and not to the device from where you lost them.

Part 2. How to Recover Damaged Photos Using Photoshop
Adobe Photoshop is used to enhance or modify digital photos, but it's also perfect for repairing and recovering damaged photos which can be viewed or edited from your computer. As you may already know, damaged photos that are accessible can be displayed with unexpected results(Black bars/ gray bars/ random colors, in distorted versions or with some bits missing). With Adobe Photoshop installed on your computer, you can repair and edit these photos with ease, especially if you are a computer expert.
Step-by-Step Guide to Recover Damaged Photos Using Photoshop
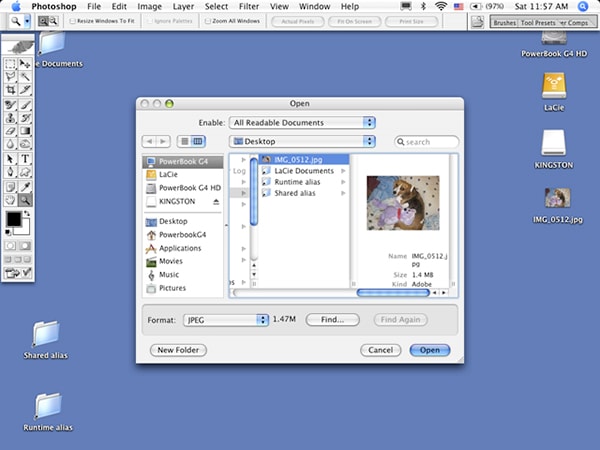
Step 1. Download Adobe Photoshop, install the program on your Mac and then launch it. From the software's main interface, go to Photoshop Menu > Preferences > Display and Cursor. You can then select "Brush Size" option under "Painting Cursors" and click the "OK" button. Explore the tool palate. When you move your cursor over each tool, you'll be able to see its name as well as the letter key that you can type for quick access. Hold down the "Command + O" keys to open the damaged photo you'd like to recover. Select the specific photo and then click the "Open" button.
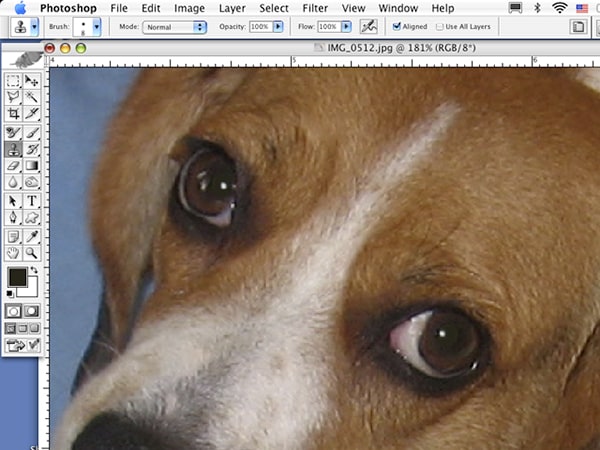
Step 2. Hit the "Z" button to open the "Zoom" tool. Select and drag the dotted marquee around the area you would like to zoom on. For example in this photo, to remove the unwanted highlights in the dog's eye, we have to select and drag the dotted marquee around the dog's eye. Click the "W" key to access the Wand tool. Select the areas you would like to change the color. You can also select more than one area by holding down the "Shift" key. Go to the "Select" menu and then choose "Feather". Identify "pixels" and type a value of 1. Hit the "I" button to use Eyedropper tool. Click on the area with the color you would like to match. Fill that area by holding down the option key and pressing the "Delete" button. To deselect, simply click the "Command + D" keys.
Step 3. Clone the parts of the photo around the new fill so as to match the dog's eyes. Press the "S" key to select the "Clone Stamp" tool. To adjust the size of your brush, use the left and right bracket keys. Hold the option key to select the area you want to sample. You can then click and hold to start painting the area you would like to clone over. Click the "Command + 0 (zero)" buttons to undo the zoom. Select the "Crop" tool and access its options by clicking the "C" key. You can type "5" in the "Width" field and "7" in the "Height" field, and then select "Pixels/Inch" from the "Resolution" drop-down menu and type "300" in the "Resolution" field.
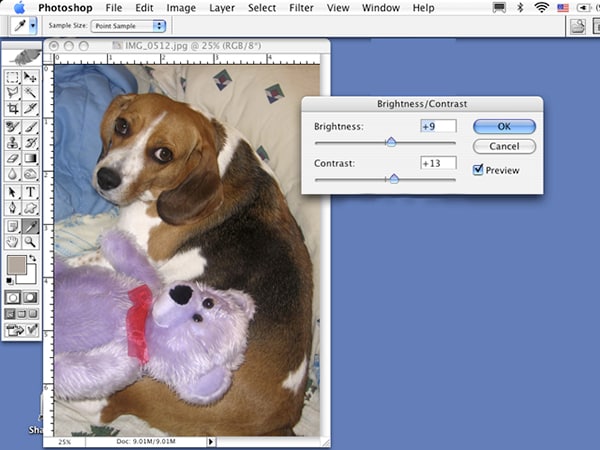
Select and drag the area of the photo you would like to keep. You can also move the box by clicking the center of the dotted lines. Lighter parts will be retained while the darker parts are discarded. Click the return key and go to "Image" menu, choose "Adjustments" then select the “"rightness and Contrast". Adjust the sliders to determine the color that pleases your eyes and then click the "OK" button. Press the "Command + S" keys to save your photo. Alternatively, go to File menu> Save As….


